Group Policies: Apply User Permissions to Groups of Users
Users & Security
Group Policies
Group Policies
The Group Policies page enables you to set up groups of users who will share common privileges.
Add New Policy, Edit, Delete
Create a new policy, modify an existing policy, or remove an existing policy.
If you edit the group policy that is the default for the local provider, or has local administrator users, and remove administrator permissions, a warning message appears. Ensure other users have administrator permissions before proceeding.
Change Order
Click the Change Order button to drag and drop group policies to set their priority. Click Save Order for prioritization changes to take effect. When multiple policies apply to a given user, the permissions take effect by starting at the top of the Group Policies list, and then moving down the list. If a permission conflicts with a permission applied by a group policy higher in the list, then the lower permission will overwrite the higher, unless the higher was set as Final. In short, group policies that appear lower in the list have a higher functional priority than those that are higher.
Search Group Policies
To quickly find an existing policy in the list of Group Policies, enter the name, or part of the name. The list filters to all policies with a name containing the entered search term. The list remains filtered until the search term is removed, even if the user goes to other pages or logs out. To remove the search term, click the X to the right of the search box.
If you click the Change Order button after searching the list, all group policies appear. You can drag and drop group policies to set their priority. When you click Save Order, the changes take effect and the list returns to policies with a name containing the entered search term.
Expand All / Collapse All
To assist with searching and navigating the group policies, click the Expand All link above the grid to expand the details of all listed group policies. Click Collapse All to return to the unexpanded list of group polices.
Copy
To expedite the creation of similar policies, click Copy to create a new policy with identical settings. You can then edit this new policy to meet your specific requirements.
Add or Edit Policy
Policy Name
Create a unique name to help identify this policy.
Available Members and Policy Members
To assign members, select a member from the Available Members list and click Add to move it to the Policy Members box. Use the Search box to find existing members.
You can select users from your local system, or select users or entire groups from configured security providers. To add users or groups from an external directory store such as LDAP, RADIUS, or Kerberos, you must first configure the connection on the /login > Users & Security > Security Providers page. If an attempt to add a user from a configured security provider is invalid, the synchronization log error message appears here as well as in the log.
Account Settings
Which account settings should this Group Policy control?
For each setting, select whether it should be defined in this policy or left available for configuration for individual users. If it is defined, you will be unable to modify that privilege for an individual user from their user account page.
If you have a policy that defines a permission and you do not want any policy to be able to replace that permission, then you must select that the permission cannot be overridden, and the policy must be a higher priority than other policies that additionally define that setting.
Two Factor Authentication
Two-factor authentication (2FA) uses an authenticator app to provide a time-based, one-time code to log into the administrative interface, as well as the access console. If Required is selected, the user will be prompted to enroll and begin using 2FA at the next login. If Optional is selected, the user has the option to use 2FA, but it is not required.
Account Expiration
When checked, the account never expires. When not checked, an account expiration date must be set.
Account Disabled
Allows you to disable the account so the user cannot log in. Disabling does NOT delete the account.
Comments
Add comments to help identify the purpose of this object.
General Permissions
Which general settings should this Group Policy control?
For each setting, select whether it should be defined in this policy or left available for configuration for individual users. If it is defined, you will be unable to modify that privilege for an individual user from their user account page.
If you have a policy that defines a permission and you do not want any policy to be able to replace that permission, then you must select that the permission cannot be overridden, and the policy must be a higher priority than other policies that additionally define that setting.
Administration
Administrative Privileges
Grants the user full administrative rights.
Vault Administrative Privileges
Enables the user access to the Vault.
Password Setting
Enables the user to set passwords and unlock accounts for non-administrative local users.
Jumpoint Editing
Enables the user to create or edit Jumpoints. This option does not affect the user's ability to access remote computers via Jumpoint, which is configured per Jumpoint or group policy.
Team Editing
Enables the user to create or edit teams.
Jump Group Editing
Enables the user to create or edit Jump Groups.
Canned Script Editing
Enables the user to create or edit canned scripts for use in screen sharing or command shell sessions.
Custom Link Editing
Enables the user to create or edit custom links.
Reporting
Session and Team Report Access
Enables the user to view access session reports. Depending on the option selected, users can view their sessions, their jump group sessions, or all sessions.
Allowed to View Access Session Reports
Enables the user to run reports on access session activity, viewing only sessions for which they were the primary session owner, only sessions for endpoints belonging to a Jump Group of which the user is a member, or all sessions.
Allowed to View Access Session Recordings
Enables the user to view video recordings of screen sharing sessions and command shell sessions.
Vault Report Access
Enables the user to view Vault reports. Depending on the option selected, users can view their sessions, or all sessions.
Allowed to View Vault Reports
Enables the user view his or her own vault events or all Vault events.
Allowed to View Syslog Reports
Enables the user to download a ZIP file containing all syslog files available on the appliance. Admins are automatically permissioned to access this report. Non-admin users must request access to view this report.
Access Permissions
Allowed to Access Endpoints
Enables the user to use the access console in order to run sessions. If endpoint access is enabled, options pertaining to endpoint access will also be available.
Session Management
Allowed to share sessions with teams which they do not belong to
Enables the user to invite a less limited set of user to share sessions, not only their team members. Combined with the extended availability permission, this permission expands session sharing capabilities.
Allowed to invite external users
Enables the user to invite third-party users to participate in a session, one time only.
Allowed to enable extended availability mode
Enables the user to receive email invitations from other users requesting to share a session even when they are not logged into the access console.
Allowed to edit the external key
Enables the user to modify the external key from the session info pane of a session within the access console.
User to User Screen Sharing
Allowed to show screen to other users
Enables the user to share their screen with another user without the receiving user having to join a session. This option is available even if the user is not in a session.
Allowed to give control when showing screen to other users
Enables the user sharing their screen to give keyboard and mouse control to the user viewing their screen.
Jump Technology
Allowed Jump Item Methods
Enables the user to Jump to computers using Jump Clients, Local Jump on the local network, Remote Jump via a Jumpoint, Remote VNC via a Jumpoint, Remote RDP via a Jumpoint, Web Jump via a Jumpoint, Shell Jump via a Jumpoint, and Protocol Tunnel Jump via a Jumpoint.
Jump Item Roles
A Jump Item Role is a predefined set of permissions regarding Jump Item management and usage. For each option, click Show to open the Jump Item Role in a new tab.
The Default role is used only when Use User's Default is set for that user in a Jump Group.
The Personal role applies only to Jump Items pinned to the user's personal list of Jump Items.
The Teams role applies to Jump Items pinned to the personal list of Jump Items of a team member of a lower role. For example, a team manager can view team leads' and team members' personal Jump Items, and a team lead can view team members' personal Jump Items.
The System role applies to all other Jump Items in the system. For most users, this should be set to No Access. If set to any other option, the user is added to Jump Groups to which they would not normally be assigned, and in the access console, they can see non-team members' personal lists of Jump Items.
Session Permissions
Set the prompting and permission rules that should apply to this user's sessions. Choose an existing session policy or define custom permissions for this user. If Not Defined, the global default policy will be used. These permissions may be overridden by a higher policy.
Description
View the description of a pre-defined session permission policy.
Screen Sharing
Screen Sharing Rules
Select the representative's and remote user's access to the remote system:
- If Not Defined, this option is set by the next lower priority policy. This setting may be overridden by a higher priority policy.
- Deny disables screen sharing.
- View Only allows the representative to view the screen.
- View and Control allows the representative to view and take action on the system. If this is selected, endpoint restrictions can be set to avoid interference by the remote user:
- None does not set any restrictions on the remote system.
- Display, Mouse, and Keyboard disables these inputs. If this is selected, a check box is available to Automatically request a privacy screen on session start. Privacy screen is applicable only for sessions started from a Jump Client, a Remote Jump item, or a Local Jump item. We recommend using privacy screen for unattended sessions. The remote system must support privacy screen.
For more information, please see Control the Remote Endpoint with Screen Sharing.
Clipboard Synchronization Direction
Select how clipboard content flows between users and endpoints. The options are:
- Not allowed: The user is not allowed to use the clipboard, no clipboard icons display in the access console, and cut and paste commands do not work.
- Allowed from Rep to Customer: The user can push clipboard content to the endpoint but cannot paste from the endpoint's clipboard. Only the Send clipboard icon displays in the access console.
- Allowed in Both Directions: Clipboard content can flow both ways. Both Push and Get clipboard icons display in the access console.
For more information about the Clipboard Synchronization Mode, please see Security: Manage Security Settings.
Application Sharing Restrictions
Limit access to specified applications on the remote system with either Allow only the listed executables or Deny only the listed executables. You may also choose to allow or deny desktop access.
This feature applies only to Windows operating systems.
Add New Executables
If application sharing restrictions are enforced, an Add New Executables button appears. Clicking this button opens a dialog that allows you to specify executables to deny or allow, as appropriate to your objectives.
After you have added executables, one or two tables display the file names or hashes you have selected for restriction. An editable comment field allows administrative notes.
Enter file names or SHA-256 hashes, one per line
When restricting executables, manually enter the executable file names or hashes you wish to allow or deny. Click on Add Executable(s) when you are finished to add the chosen files to your configuration.
You may enter up to 25 files per dialog. If you need to add more, click Add Executable(s) and then reopen the dialog.
Browse for one or more files
When restricting executables, select this option to browse your system and choose executable files to automatically derive their names or hashes. If you select files from your local platform and system in this manner, use caution to ensure that the files are indeed executable files. No browser level verification is performed.
Choose either Use file name or Use file hash to have the browser derive the executable file names or hashes automatically. Click Add Executable(s) when you are finished to add the chosen files to your configuration.
You may enter up to 25 files per dialog. If you need to add more, click Add Executable(s) and then reopen the dialog.
This option is available only in modern browsers, not in legacy browsers.
Allowed Endpoint Restrictions
Set if the user can suspend the remote system's mouse and keyboard input. The user may also prevent the remote desktop from being displayed.
For more information, please see Control the Remote Endpoint with Screen Sharing.
Annotations
Annotation Rules
Enables the user to use annotation tools to draw on the remote system's screen. If Not Defined, this option is set by the next lower priority policy. This setting may be overridden by a higher priority policy.
For more information, please see Use Annotations to Draw on the Remote Screen of the Endpoint.
File Transfer
File Transfer Rules
Enables the user to upload files to the remote system, download files from the remote system, or both. If Not Defined, this option is set by the next lower priority policy. This setting may be overridden by a higher priority policy.
Accessible paths on the endpoint's filesystem
Allow the user to transfer files to or from any directories on the remote system or only specified directories.
Accessible paths on user's filesystem
Allow the user to transfer files to or from any directories on their local system or only specified directories.
For more information, please see File Transfer to and from the Remote System Endpoint.
Command Shell
Command Shell Rules
Enables the user to issue commands on the remote computer through a virtual command line interface. If Not Defined, this option is set by the next lower priority policy. This setting may be overridden by a higher priority policy.
Command shell access cannot be restricted for Shell Jump sessions.
Configure command filtering to prevent accidental use of commands that can be harmful to endpoint systems.
For more information on command filtering, please see Use Shell Jump to Access a Remote Network Device.
For more information, please see Open the Command Shell on the Remote Endpoint Using the Access Console.
System Information
System Information Rules
Enables the user to see system information about the remote computer. If Not Defined, this option is set by the next lower priority policy. This setting may be overridden by a higher priority policy.
Allowed to use system information actions
Enables the user to interact with processes and programs on the remote system without requiring screen sharing. Kill processes; start, stop, pause, resume, and restart services; and uninstall programs.
For more information, please see View System Information on the Remote Endpoint.
Registry Access
Registry Access Rules
Enables the user to interact with the registry on a remote Windows system without requiring screen sharing. View, add, delete and edit keys, search and import/export keys.
For more information, please see Access the Remote Registry Editor on the Remote Endpoint.
Canned Scripts
Canned Script Rules
Enables the user to run canned scripts that have been created for their teams. If Not Defined, this option is set by the next lower priority policy. This setting may be overridden by a higher priority policy.
For more information, please see Open the Command Shell on the Remote Endpoint Using the Access Console .
Session Termination Behavior
If unable to reconnect within the time you set by Reconnect Timeout, choose what action to take. To prevent an end-user from accessing unauthorized privileges after an elevated session, set the client to automatically log the end user out of the remote Windows computer at session end, to lock the remote computer, or to do nothing. These rules do not apply to browser sharing sessions.
Allow users to override this setting per session
You can allow a user to override the session termination setting from the Summary tab in the console during a session.
Availability Settings
Login Schedule
Restrict user login to the following schedule
Set a schedule to define when users can log into the access console. Set the time zone you want to use for this schedule, and then add one or more schedule entries. For each entry, set the start day and time and the end day and time.
If, for instance, the time is set to start at 8 am and end at 5 pm, a user can log in at any time during this window but may continue to work past the set end time. They will not, however, be allowed to log back in after 5 pm.
Force logout when the schedule does not permit login
If stricter access control is required, check this option. This forces the user to log out at the scheduled end time. In this case, the user receives recurring notifications beginning 15 minutes prior to being disconnected. When the user is logged out, any owned sessions will follow the session fallback rules.
Memberships
Add Team Membership
Search for teams to which members of this group policy should belong. You can set the role as Team Member, Team Lead, or Team Manager. These roles play a significant part in the Dashboard feature of the access console. Click Add.
Added teams are shown in a table. You can edit the role of members in a team or delete the team from the list.
Remove Team Membership
Search for teams from which members of this group policy should be removed, and then click Add. Removed teams are shown in a table. You can delete a team from the list.
Add Jumpoint Membership
Search for Jumpoints which members of this group policy should be allowed to access, and then click Add. Added Jumpoints are shown in a table. You can delete a Jumpoint from the list.
Remove Jumpoint Membership
Search for Jumpoints from which members of this group policy should not be removed, and then click Add. Removed Jumpoints are shown in a table. You can delete a Jumpoint from the list.
Add Jump Group Memberships
Search for Jump Groups to which members of this group policy should belong. You can set each user's Jump Item Role to set their permissions specific to Jump Items in this Jump Group, or you can use the user's default Jump Item Roles set in this group policy or on the Users & Security > Users page. A Jump Item Role is a predefined set of permissions regarding Jump Item management and usage.
For more information, please see Use Jump Item Roles to Configure Permission Sets for Jump Items.
You can also apply a Jump Policy to manage user access to the Jump Items in this Jump Group. Selecting Set on Jump Items instead uses the Jump Policy applied to the Jump Item itself. Jump Policies are configured on the Jump > Jump Policies page and determine the times during which a user can access this Jump Item. A Jump Policy can also send a notification when it is accessed or can require approval to be accessed. If neither the user nor the Jump Item has a Jump Policy applied, this Jump Item can be accessed without restriction.
For more information, please see Create Jump Policies to Control Access to Jump Items.
Added Jump Groups are shown in a table. You can edit a Jump Group's settings or delete the Jump Group from the list.
Remove Jump Group Memberships
Search for Jump Groups from which members of this group policy should be removed, and then click Add. Removed Jump Groups are shown in a table. You can delete a Jump Group from the list.
Add Vault Account Memberships
Search for an account, select the Vault Account Role, and then click Add to grant members of the policy access to the selected vault account. Users may have memberships added by other group policies. View Vault > Accounts to see all members within each account. Users may be assigned one of two roles for using the vault account:
- Inject: (default value) Users with this role can use this account in Privileged Remote Access sessions.
- Inject and Checkout: Users with this role can use this account in Privileged Remote Access sessions and can check out the account on /login. The Checkout permission has no affect on generic SSH accounts.
Enable the Add Vault Account Memberships permission to assign a Vault Account Role to a vault account in a group policy. The Vault Account Role is visible in the list of accounts added to the group policy.
Add Vault Account Group Memberships
Search for an account group, select the Vault Account Role, and then click Add to grant members of the policy access to the group of vault accounts. Users may have memberships added by other group policies. View Vault > Account Groups to see all members within each group. Users may be assigned one of two roles for using the group of vault accounts:
- Inject: (default value) Users with this role can use this account in Privileged Remote Access sessions.
- Inject and Checkout: Users with this role can use this account in Privileged Remote Access sessions and can check out the account on /login. The Checkout permission has no affect on generic SSH accounts.
Enable the Add Vault Account Group permission to assign a Vault Account Role to a group of vault accounts in a group policy. The Vault Account Role is visible in the list of account groups added to the group policy.
Save
Click Save to put the policy into effect.
Export Policy
You can export a group policy from one site and import those permissions into a policy on another site. Edit the policy you wish to export and scroll to the bottom of the page. Click Export Policy and save the file.
When exporting a group policy, only the policy name, account settings, and permissions are exported. Policy members, team memberships, and Jumpoint memberships are not included in the export.
Import Policy
You may import exported group policy settings to any other BeyondTrust site that supports group policy import. Create a new group policy or edit an existing policy whose permissions you wish to overwrite, and then scroll to the Import Policy section at the bottom of the page. Click Select Policy File, locate the policy file, and then click Open. Once the policy file is uploaded, the page will refresh, allowing you to make modifications; click Save to put the group policy into effect.
Importing a policy file to an existing group policy will overwrite any previously defined permissions, with the exception of policy members, team memberships, and Jumpoint memberships.
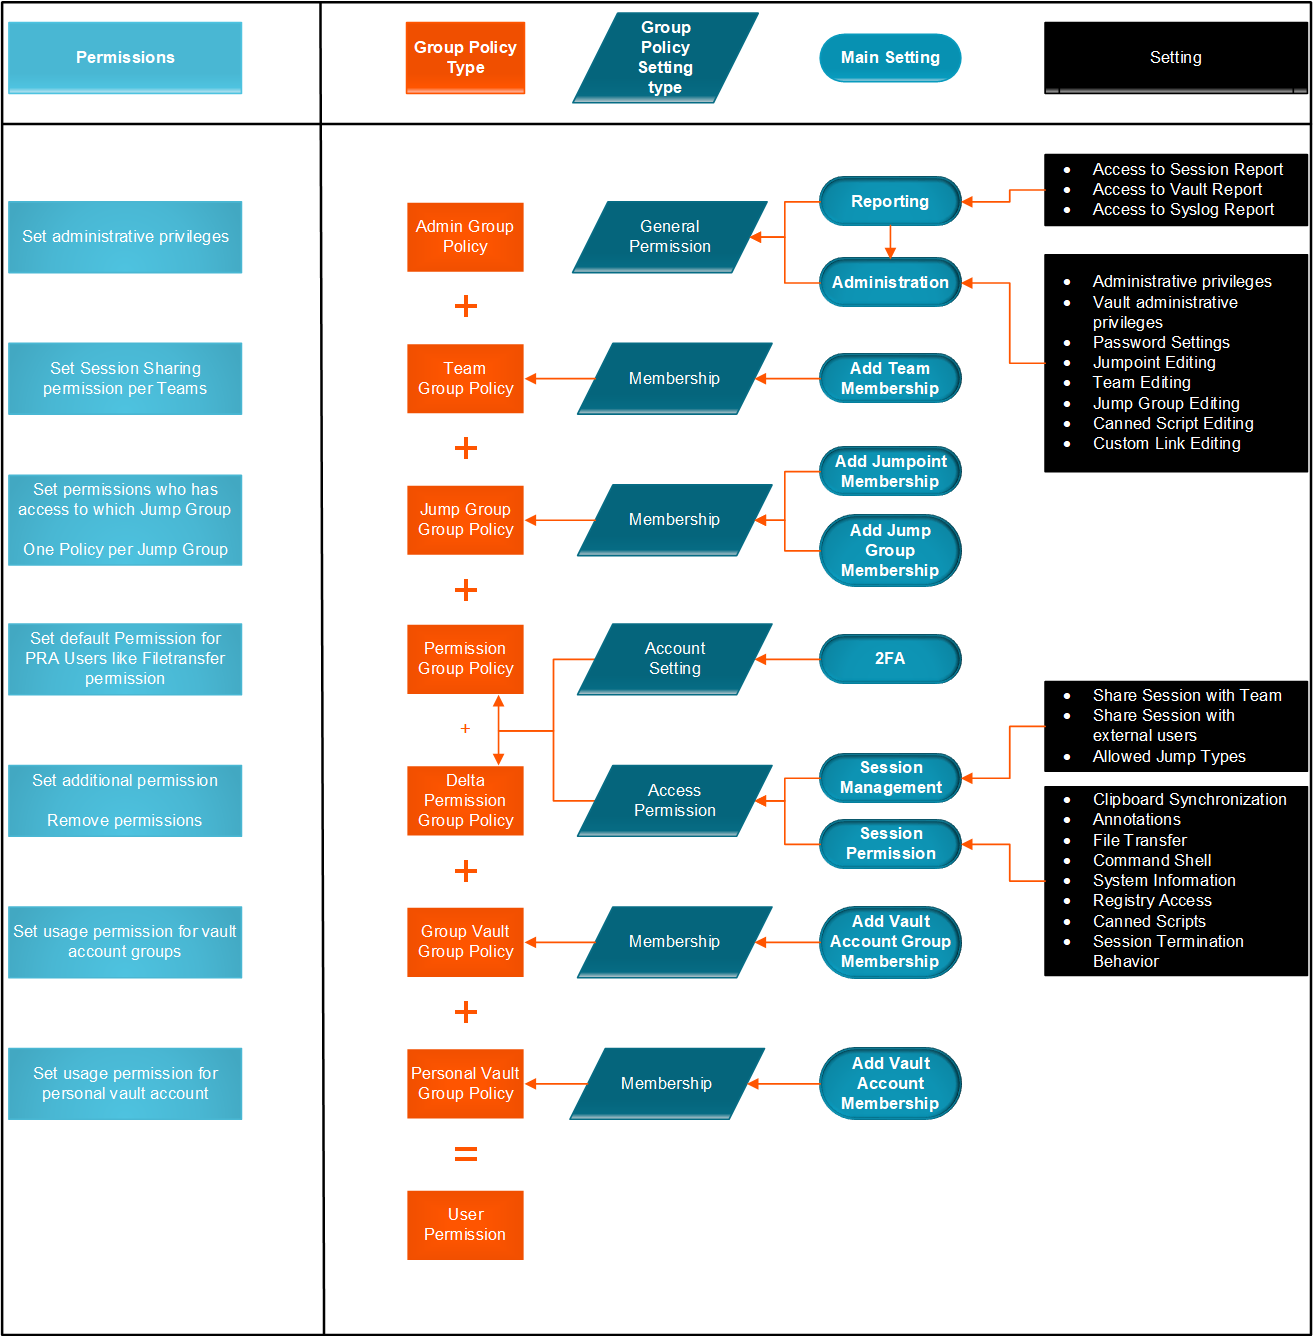
Sample Policy Matrix
The diagram below is an example of how multiple policies can work together.