Create Jump Policies to Control Access to Jump Items
To control access to particular Jump Items, create Jump Policies. Jump Policies are used to control when certain Jump Items can be accessed by implementing schedules, sending email notifications when a Jump Item is accessed, or requiring approval or user entry of a ticket system ID before a Jump Item may be accessed. A Jump Policy can be applied to Jump Clients as well as to Jump shortcuts.
Create a Jump Policy
- From the /login administrative interface, go to Jump > Jump Policies.
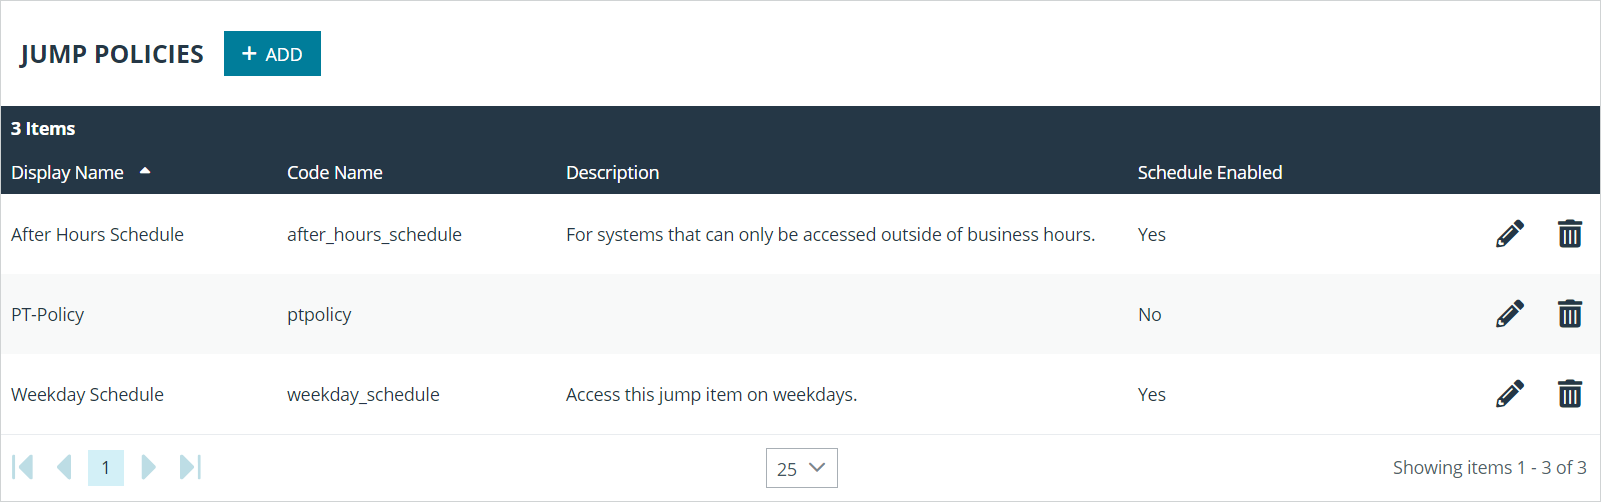
- Click Add.
A Jump Policy does not take effect until you have applied it to at least one Jump Item.

- Create a unique name to help identify this policy. This name should help users identify this policy when assigning it to Jump Items.
- Set a code name for integration purposes. If you do not set a code name, PRA creates one automatically.
- Add a brief description to summarize the purpose of this policy.
- If you want to enforce an access schedule, check Enable. If it is disabled, then any Jump Items that use this policy can be accessed without time restrictions.
- Set a schedule to define when Jump Items under this policy can be accessed. Set the time zone you want to use for this schedule, and then add one or more schedule entries. For each entry, set the start day and time and the end day and time.
- If, for instance, the time is set to start at 8 am and end at 5 pm, a user can start a session using this Jump Item at any time during this window but may continue to work past the set end time. Attempting to re-access this Jump Item after 5 pm, however, results in a notification indicating that the schedule does not permit a session to start. If necessary, the user may choose to override the schedule restriction and start the session anyway.
- If stricter access control is required, check Force session to end. This forces the session to disconnect at the scheduled end time. In this case, the user receives recurring notifications beginning 15 minutes prior to being disconnected.
Jump schedule and Jump approval cannot both be enabled on the same policy.
- You may choose to trigger an email notification whenever a session starts or ends with a Jump Item that uses this policy.
- Check Notify recipients when a session starts to send an email at the beginning of a session. When a user attempts to start a session with a Jump Item that uses this policy, a prompt states that a notification email will be sent and asks if the user would like to start the session anyway.
- Check Notify recipients when a session ends to send an email at the end of a session. When a user attempts to start a session with a Jump Item that uses this policy, a prompt states that a notification email will be sent at the end of the session and asks if the user would like to start the session anyway.
- Enter one or more email addresses to which emails should be sent. Separate addresses with a space.This feature requires a valid SMTP configuration for your B Series Appliance, set up on the /login > Management > Email Configuration page.
- Enter a name for the approver. This name appears on the prompt the user receives prior to a session with a Jump Item that uses this policy.
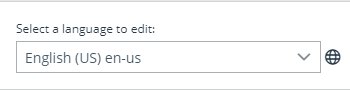
- If more than one language is enabled on this site, set the language in which to send emails.
- If you check Require a ticket ID before a session starts, a valid ticket ID from your external ticket ID approval process must be entered by the user whenever a session is attempted with any Jump Item that uses this Jump Policy. When a user attempts to start a session with a Jump Item that uses this policy, a configurable dialog prompts the user to enter the approved ticket ID from your external ITSM or ticket ID system.
- If you check Require approval before a session starts, an approval email is sent to the designated recipients whenever a session is attempted with any Jump Item that uses this Jump Policy. When a user attempts to start a session with a Jump Item that uses this policy, a dialog prompts the user to enter a request reason and the time and duration for the request.
- Set the maximum length of time for which a user can request access to a Jump Item that uses this policy. The user can request a shorter length of access but no longer than that set here.
- When approval has been granted to a Jump Item, that Jump Item becomes available either to any user who can see and request access to that Jump Item or only to the user who requested access.
- Enter an email address or user name, or a team name so that anyone on that team can approve the jump. Separate multiple entries with a space.This feature requires a valid SMTP configuration for your B Series Appliance, set up on the /login > Management > Email Configuration page.
- Enter a name for the approver. This name appears on the prompt the user receives prior to a session with a Jump Item that uses this policy.
- If more than one language is enabled on this site, set the language in which to send emails.
Jump schedule and Jump approval cannot both be enabled on the same policy.
- If you check Disable Session Recordings, sessions started with this Jump Policy are not recorded, even if recordings are enabled on the Configuration > Options page. This affects screen sharing recordings, protocol tunnel Jump recordings, and command shell recordings.
- When you are finished configuring this Jump Policy, click Save.
If you have more than one language enabled on your site, you can select the language you want to use on the screens below from the dropdown menu. Fields that display the language globe icon can display content in the language you select.
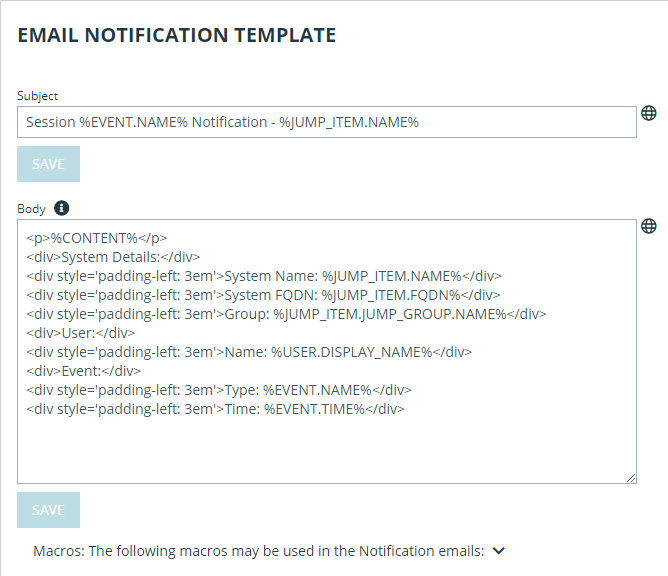
- You can modify the notification email template. Click the link below the Body field to view the macros that can used to customize the text in your emails for your purposes.

- You also can modify the approval email template. Click the link below the Body field to view the macros that can used to customize the text in your emails for your purposes.
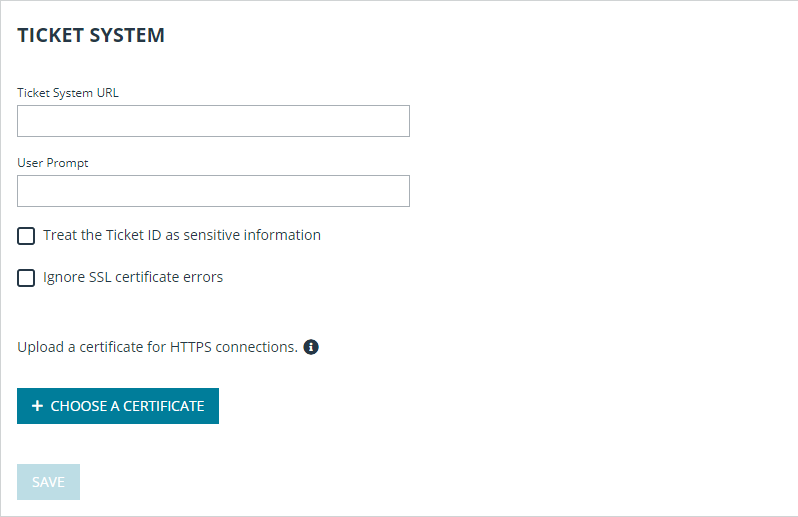
- If you enabled the requirement of a ticket ID in the Jump Approval section, configure access to your external ticket ID system.
In Ticket System URL, enter the URL for your external ticket system. If an HTTPS URL is entered, upload the certificate for the HTTPS ticket system connection to the B Series Appliance.
In User Prompt, enter the dialog text you want access console users to see when they are requested to enter the ticket ID required for access.
If your company's security policies consider ticket ID information as sensitive material, check Treat the Ticket ID as sensitive information.
-
For additional security, the Jump Policy can require an end-user to confirm their identity using a multi-factor authentication challenge before starting or elevating a session. If desired, check Must complete a two factor authentication challenge before starting or elevating a session.
After the Jump Policy has been created, you can apply it to Jump Items either from the /login interface or from the access console.