Deploy Jump Clients During a Support Session or Prior to Support
There are two ways to install a Jump Client:
- During a BeyondTrust support session, a Jump Client can be installed as required by the representative.
- Alternatively, an administrator can mass-deploy Jump Clients for a larger rollout.
These two methods of installation are outlined below.
During a Support Session
A Jump Client can be installed during a support session. This allows the support representative to access this computer at a later time, even if the computer is unattended. This method of installation is also known as session pinning and is achieved by clicking the Pin as Jump Client button.
A Jump Client pinned in user mode is available only when that user is logged in. In contrast, a Jump Client pinned in service mode, with elevated rights, allows that system to always be available, regardless of which user is logged in.

- From within a support session, click the Pin as Jump Client button in the session toolbar at the top right corner of the representative console.
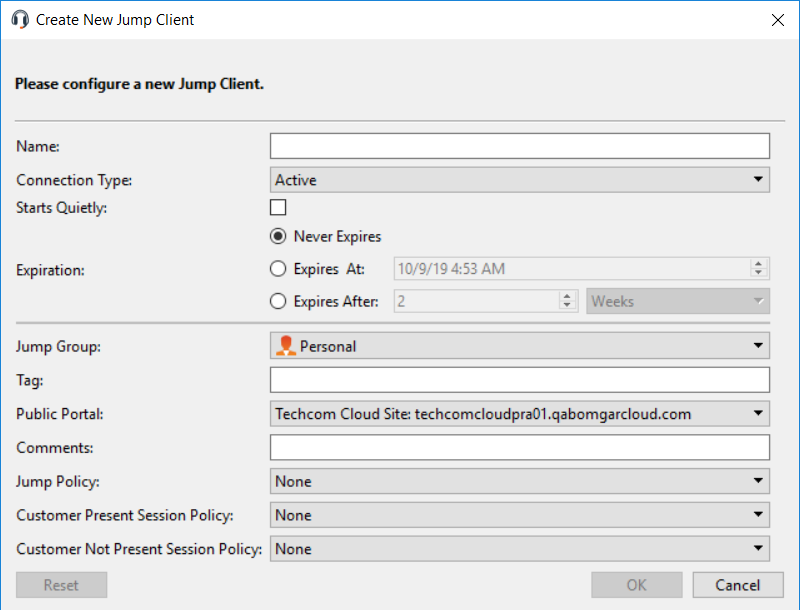
- From the dropdown, you can select to customize the Jump Client before deploying it.
- Enter a Name for the Jump Item. This name identifies the item in the session tabs. This string has a maximum of 128 characters.
- If Starts Quietly is checked, the customer client does not take focus and remains minimized in the taskbar or dock when a session is started.
- You also have the option to set when the Jump Client expires. This can be never, at a specific time and date, or after a certain length of time. An expired Jump Client automatically uninstalls from the remote system and is removed from the list in the Jump Client interface.
- Move Jump Items from one Jump Group to another using the Jump Group dropdown. The ability to move Jump Items to or from different Jump Groups depends upon your account permissions.
- Further organize Jump Items by entering the name of a new or existing Tag. Even though the selected Jump Items are grouped together under the tag, they are still listed under the Jump Group in which each is pinned. To move a Jump Item back into its top-level Jump Group, leave this field blank.
- Select the Public Portal through which this Jump Item should connect. If a session policy is assigned to this public portal, that policy may affect the permissions allowed in sessions started through this Jump Item. The ability to set the public portal depends on your account permissions.
- Jump Items include a Comments field for a name or description, which makes sorting, searching, and identifying Jump Items faster and easier.
- To set when users are allowed to access this Jump Item, choose a Jump Policy. These policies are configured by your administrator in the /login interface.
Choose session policies to assign to this Jump Item. Session policies assigned to this Jump Item have the highest priority when setting session permissions. The Customer Present Session Policy applies when the end user is determined to be present. Otherwise, the Customer Not Present Session Policy applies.The way customer presence is determined is set by the Use screen state to detect Customer Presence Jump Item setting in the /login interface. When enabled, a customer is considered present only if a user is logged in, the system is not locked, and a screen saver is not running. When disabled, a customer is considered present if a user is logged in, regardless of the screen state. Customer presence is detected when the Jump Item session starts. The session policy used for the session does not change throughout the session, regardless of any changes in the customer's presence while the session is in progress. The ability to set a session policy depends on your account permissions.
- Alternatively, you can select a Jump Group to which to pin the Jump Client, not setting any properties.
- Depending on the session permissions, the customer could receive a message that you are requesting to install a Jump Client. The customer is asked to allow or refuse the request.
- Once the Jump Client is installed, the remote computer appears in the Jump interface of the representative console. You might have to refresh the interface to see the new Jump Client.
Support representatives can access unattended Android devices through session pinning. For more information, please see Initiate an Android Support Session
Prior to Support
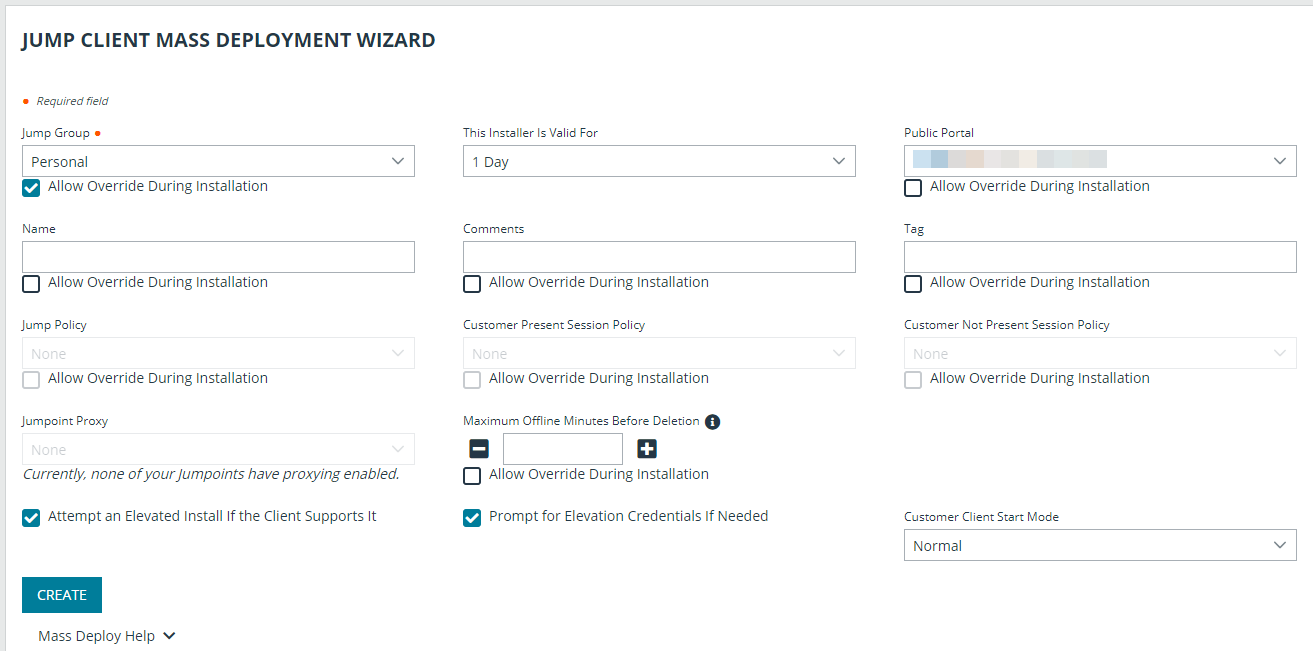
Jump Clients can be installed on remote computers in anticipation of the need for remote access. This method of installation can be applied to one system or multiple systems simultaneously. You can easily automate the mass deployment of your Jump Client network by allowing customization during installation. The Jump Client command line installer has switches that allow a script to modify a variety of Jump Client parameters when executed. This enables you to create custom mass deployment scripts to pull in variables from other sources and use the variables to modify the Jump Client parameters at install time.
You can easily manage active installers from the Jump Client Installer list. This list shows all previously installed active Jump Client installers. Administrators and privileged users can view, download, delete, or extend Jump Client installers.A warning message appears at the top of the list: Installing more than one Jump Client as the same user or more than one Jump Client as a service on the same system is being phased out in a future release. In the Representative Console you may use the copy action on a Jump Client to apply different policies to the same endpoint. Click Dismiss to remove the warning message.
- From the /login administrative interface, go to Jump > Jump Clients.
- At the top of the Jump Client Installer List, click Add.
-
- Select the Public Portal through which you want this Jump Client to connect. If a session policy is assigned to this public portal, that policy may affect the permissions allowed in sessions started through this Jump Client.
- Choose session policies to assign to this Jump Client. Session policies assigned to this Jump Client have the highest priority when setting session permissions. The Customer Present Session Policy applies when the end user is determined to be present. Otherwise, the Customer Not Present Session Policy applies. The way customer presence is determined is set by the Use screen state to detect Customer Presence Jump Client setting. Customer presence is detected when the Jump Client session starts. The session policy used for the session does not change throughout the session, regardless of any changes in the customer's presence while the session is in progress.
- You can apply a Jump Policy to this Jump Client. Jump Policies are configured on the Jump > Jump Policies page and determine the times during which a user can access this Jump Client. If no Jump Policy is applied, this Jump Client can be accessed at any time.
- Adding a Tag helps to organize your Jump Clients into categories within the representative console.
- If you have one or more Jumpoints set up as proxies, you can select a Jumpoint to proxy these Jump Client connections. As a result, if these Jump Clients are installed on computers without native Internet connections, they can use the Jumpoint to communicate with your B Series Appliance. The Jump Clients must be installed on the same network as the Jumpoint selected to proxy the connections.
- Add Comments, which can be helpful in searching for and identifying remote computers. Note that all Jump Clients deployed via this installer have the same comments set initially, unless you check Allow Override During Installation and use the available parameters to modify the installer for individual installations.
-
The installer remains usable only as long as specified by the This Installer is Valid For dropdown. Be sure to leave adequate time for installation. If someone attempts to run the Jump Client installer after this time, installation fails, and a new Jump Client installer must be created.
Once a Jump Client has been installed, it remains online and active until it is uninstalled from the local system either by a logged-in admin user with appropriate permissions, by a user from the Jump interface, or by an uninstall script. It can also be uninstalled, or extended, from the Jump Client Installer List. A user cannot remove a Jump Client unless the user is given appropriate permissions by their admin from the /login interface.
A Jump Client pinned in user mode is available only when that user is logged in. In contrast, a Jump Client pinned in service mode, with elevated rights, allows that system to always be available, regardless of which user is logged in.
-
You can set the Maximum Offline Minutes Before Deletion of a Jump Client from the system. This setting overrides the global setting, if specified.
- If Prompt for Elevation Credentials if Needed is selected, the installer prompts the user to enter administrative credentials if the system requires that these credentials be independently provided; otherwise, it installs the Jump Client with user rights. This applies only if an elevated install is being attempted.
This option does not apply to headless Linux or Raspberry Pi Jump Clients.
- Select Minimized to start the customer client minimized. It does not take the focus, and appears only in the taskbar or dock when a session is started through this Jump Client.Select Hidden to start the customer client hidden. It does not take the focus, and appears only as an icon in the system tray when a session is started through this Jump Client.
This option does not apply to headless Linux or Raspberry Pi Jump Clients.

- Once you click Create, you can download the Jump Client installer immediately if you plan to distribute it using a systems management tool or if you are at the computer that you need to later access. You can also email the installer to one or more remote users. Multiple recipients can install the client from the same link. Click on the Direct Download Link to copy the link.The Platform option defaults to the appropriate installer for your operating system. You can select a different platform if you plan to deploy the Jump Client on a different operating system. Once the installer has run, the Jump Client attempts to connect to the B Series Appliance. When it succeeds, the Jump Client appears in the Jump interface of the representative console. If the Jump Client cannot immediately reach the B Series Appliance, then it continues to reattempt connection until it succeeds. If it cannot connect within the time designated by This Installer Is Valid For, then the Jump Client uninstalls from the remote system and must be redeployed.
For more information, please see the Jumpoint Guide.