Localization
Real-Time Chat: Translate Chat Messages Between Rep and Customer
Localization
Real-Time Chat
BeyondTrust’s optional integration with GeoFluent or AWS Amazon Translate gives your support desk a global advantage by translating chats between reps and customers in real time. Without a language barrier, your support team can reach customers across the globe.
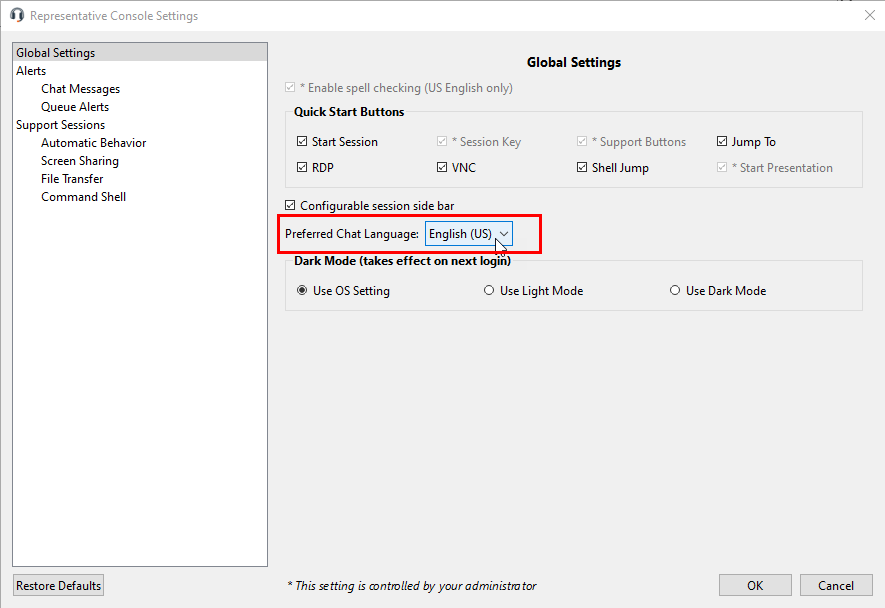
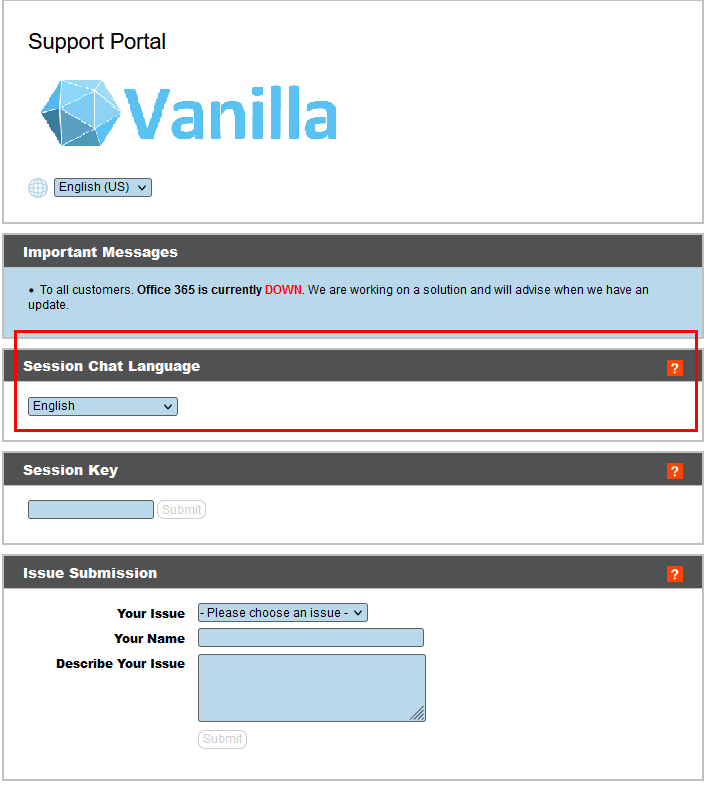
Messages between a customer and a representative can be translated in real time if this feature is enabled. Customers who start sessions using the public portal can select their language from the dropdown menu at the top of the page. Representatives can select their preferred chat language from the Settings > Global Settings page in the representative console.
To set up a translation integration, you need to have an account with the translation service.
For GeoFluent, you need a Lionbridge GeoFluent account, available at https://www.lionbridge.com/get-in-touch/. Once your account is created, subscribe to the language pairs desired. Language pairs are directional. For example, an English-to-French language pair translates English words to French, but does not translate French words to English. In this example, a second language pair, French-to-English, is required to support the French-to-English translation.
For Amazon Translate, you need to be using Amazon Web Services, and obtain an AWS access key.
Once the account is ready, you configure the service provider in the /login administrative interface, enable real-time chat in the representative console, and, if desired, add a session language option to public portals.
Configure a Service Provider
Follow these steps to configure the translation service provider in BeyondTrust Remote Support:
- Log in to the administrative interface.
- Click Localization in the left menu, and then click the REAL-TIME CHAT tab.
- Select AWS or GeoFluent as the Service Provider.
- For GeoFluent:
- A default GeoFluent API URL displays. The default is suitable for North American users. Other areas may see improved performance using the URL https://api-eu.geofluent.com. Your GeoFluent representative can help you decide if you need to change this value.
- Enter your API Key.
- Enter your API Secret.
- Click Save.
- The system tests the connection and displays the status. If the Current Status is not OK, confirm the entered values. If necessary, contact GeoFluent for assistance.
- Once the status is OK, the Language Pairs selected in GeoFluent display on the lower part of the screen.
- Check Enable Real-Time Chat Translations to make the feature available to representatives.
- For AWS:
- For Region, enter the AWS region code of the AWS data center to use for translation (e.g. “us-east-1”).
- Enter the Key to the AWS access token.
- Enter the Secret access key generated by AWS.
- Click Save.
- The system tests the connection and displays the status. If the Current Status is not OK, confirm the entered values. If necessary, contact AWS for assistance.
- Once the status is OK, the list of supported languages displays on the lower part of the screen.
- Check Enable Real-Time Chat Translations to make the feature available to representatives.
For a list of Amazon Regions, please see Regions and Zones - Amazon Elastic Compute Cloud .
Enable Real-Time Chat Translations in the Representative Console
Once real-time chat translation is enabled, representatives can select their preferred chat language by following these steps:
- Download and install the updated representative console.
- Log in and click File > Settings.
- Under Global Settings, select the Preferred Chat Language from the dropdown list.
Enable Chat Translation Dropdown Menu on Public Sites
Once real-time chat translations is enabled, a session language option can be added to public portals. This is in addition to the portal language selection option.
Under Public Portal on the lower area of the screen, click the Public Site link, or click Public Portals in the left menu. Repeat the steps below for each site where a session language option is desired.
- Click the pencil icon to edit the site.
- Under Edit Public Site, check Display Session Chat Language Dropdown.
The portal now shows two language dropdowns: one for the portal near the top of the screen, and one for the chat session. The location varies depending on the portal layout and options. The language options for the chat sessions are the language pairs selected in GeoFluent, or available from AWS. This means a user's desired language for the portal may not be available for chat sessions, or vice versa.