Configure the Program Database
The first time you launch Privileged Identity, a setup wizard helps you configure various components of the Privileged Identity database. All of the component steps are optional except program data store configuration.
If you need to run this setup wizard again, select Settings > Re-Run Setup Wizard in the management console.
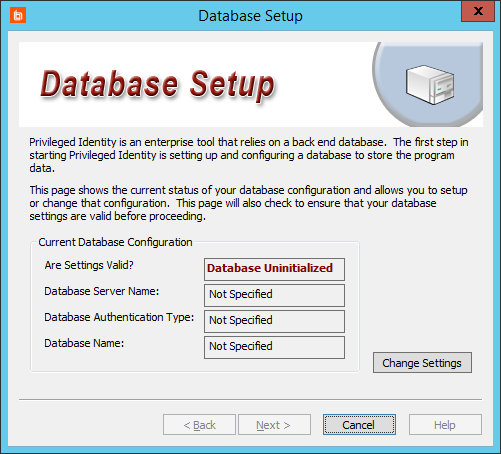
- On the Database Setup screen, click Change Settings to create or connect to the database Privileged Identity will use for its primary data store.
- Complete the fields in the Database Connection Information section.
If you need to change this information later, select Settings > Data Store Configuration > Basic Configuration from the management console.
- After you've successfully connected to your database, complete the fields in the Database Settings section.
- Name of the existing database to use: Select a database instance to use, or click Manage Database Instances to view all found instances, to create a new database instance, or to delete an existing instance.
Deleting a database instance removes it from the data store entirely, not just from this interface. A deleted database instance cannot be restored.
- Use an explicit (non-default) schema: This determines the context under which Privileged Identity will create database objects. We recommend checking this option and entering DBO in the field.
If you leave this unchecked, then data is added under the context of your connected account. If this account is not in the sysadmin role, SQL Server creates a schema with your account name and creates all objects in that context. While this works for a single user or when using database native authentication, this option does not work well when using integrated security where connecting users are not sysadmin-level users.
If you switch schemas, then any data already added will be removed. Be very careful about switching schemas if you've already begun using this database for this or other applications.
- Name of the existing database to use: Select a database instance to use, or click Manage Database Instances to view all found instances, to create a new database instance, or to delete an existing instance.
- Enter Advanced Settings (optional).
- Set explicit connection limit: This limits the number of connections made to the target database host. While this slows down job processing, it can improve stability when the database host is under-provisioned.
- Maximum number of active DB connections during normal operations: Set how many connections can be made at once.
- Overwrite the default database timeout value: Set how long Privileged Identity should wait for data to be returned from the database before the call times out. While 30 seconds should typically be enough, you may need to increase the timeout to handle high-latency, low-bandwidth links or while maintaining your database.
- Click OK. Privileged Identity will now create all required views, stored procedures, and tables on the database. If no issues occur, the Database Setup dialog reappears, with Settings are Valid appearing in green.

- Configure the deferred processor. The deferred processor performs all scheduled actions within Privileged Identity. Supply a service account in the form of Domain\Account Name, and then enter its password. This account must have local administrative rights, as well as the right to log in as a service on the local machine.
If you don't have an account available at this time, click Next to skip this step.
For more information about the deferred processor account requirements, please see Deferred Processor / Zone Processor Service Identity.
If you need to change this information later, select Settings > Application Components from the management console, and then select Deferred Processor Service from the dropdown.
- Click Install/Start Service. Privileged Identity attempts to grant Logon as a Service to the account. If the process succeeds, you'll see Service is Running in green.
If there are problems connecting to the database or granting rights, or if the account is not a local admin, the service fails to start. You can fix the issues now or after install.
- Click Next.
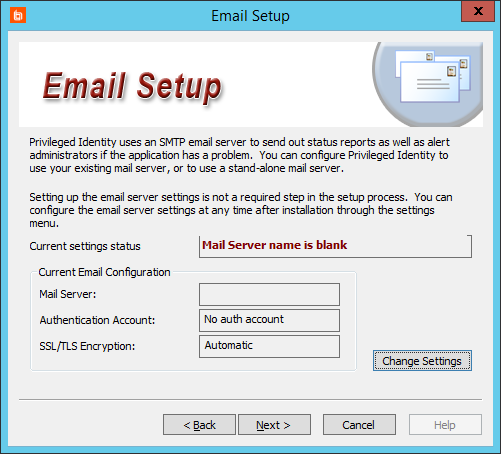
- Enter the Email Setup information to set up Privileged Identity to send email. Click Change Settings to start the setup.
If you don't need Privileged Identity to send emails or if you don't have email server settings available at this time, click Next to skip this step.
If you need to change this information later, select Settings > Email Settings from the management console.
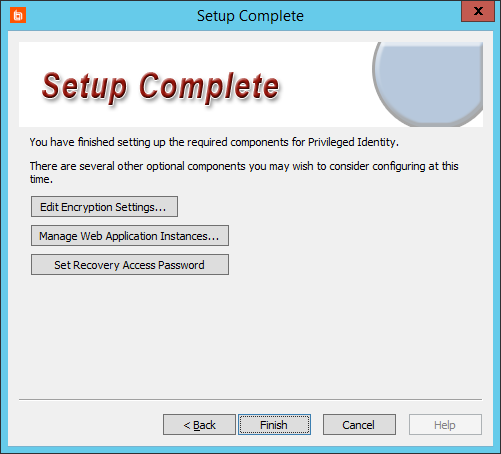
- On the Setup Complete screen, click Edit Encryption Settings.
If you need to change this information later, select Settings > Encryption Settings from the management console.
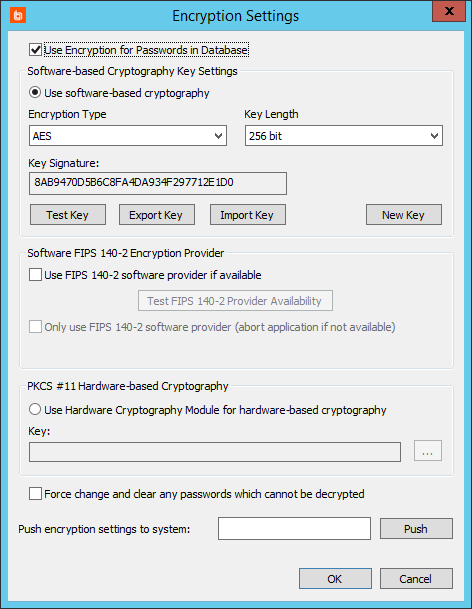
- We highly recommend that you check Use Encryption for Passwords in Database.
- Select the encryption type appropriate to your environment: Software-based, Software FIPS 140-2, or PKCS #11 Hardware-based. If you're unsure which to use, select Use software-based cryptography, with an Encryption Type of AES and a Key Length of 256 bit.
- Click OK.
For details about encryption settings, please see Configure Encryption Options.
- We recommend that you skip managing web application instances at this time, as not all web site options are enabled until you've completed registration. Furthermore, the web app requires the web service, which you have not yet configured.
For information on installing the web app, please see Install the Web Application.
- Click Set Recovery Access Password to change the default password.
You can change this password later by selecting Manage > View Stored Managed Passwords from the management console. If the password has not been set, you'll receive a prompt to set the password. Otherwise, from the Stored Passwords dialog, select Access > Change Recovery Access Password.
- Click Finish.