Configure Encryption Options
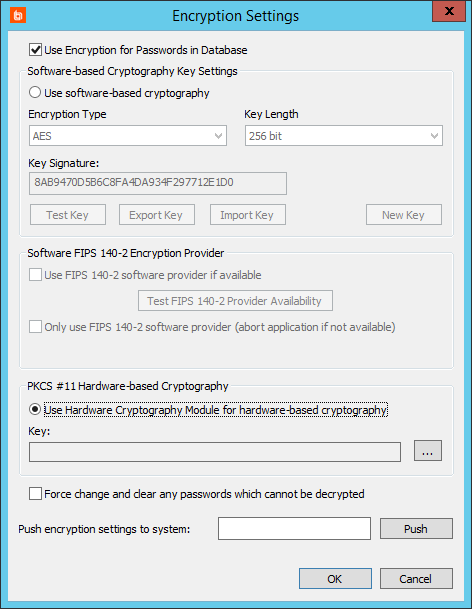
To configure Privileged Identity to work with software-based or hardware-based encryption, first select Settings > Encryption Settings from the management console.
When you change encryption settings, be sure to update the web app and web service settings. Otherwise, they will attempt to use invalid encryption mechanisms and will fail to access stored credentials and data.
Configure Software-Based Encryption

When you select Use software-based cryptography, the generated key is unique to your installation. With an Encryption Type of AES, select a Key Length of 128, 192, or 256 bits.
To change the key, click New Key. After you confirm the change, the Key Signature updates. When recovering stored passwords, you can match the current key signature against the password's key signature to ensure that it was encrypted with the same key.
When you change encryption settings, passwords are decrypted and re-encrypted with the new key. You must manually update the web app settings to reflect the new encryption key.
You may also test the validity of the current encryption key, export the current key, or import a different key. Exporting writes a registry file (.reg) with the encrypted key settings. You can later import these settings to the same system or to a different system by using the import feature or by double-clicking on the registry file.
Be careful when saving, importing, and exporting encryption keys. In the event of disaster recovery, if the key is lost, you cannot recover any passwords that have been encrypted with that key. Be sure to export your key and keep it in a secure location.
Software FIPS 140-2 Encryption Provider
While the software encryption algorithms are FIPS algorithms, you may be required to use external FIPS 140-2 encryption modules if you are working with certain government organizations. The encryption code is the same for both methods; the FIPS 140-2 method simply uses the encryption procedures in a way that is compatible with the FIPS certification.
FIPS 140-2 requires you to use a certified stand-alone module. The Crypto++ library that Privileged Identity uses leverages the exact same cryptography code as a certified module. In the built-in case, the code is compiled into the software (not a certified use); in the certified case, the code is used through a call to an external, certified DLL. The certified use case is actually slightly less secure, as it is susceptible to replacement of the external DLL, whereas changing the built-in cryptography would require modifying the software itself, invalidating the digital signature.
To enable FIPS 140-2 certified encryption, download and install the module from your provider, which should contain the necessary add-on components, including the Crypto++ library. Then, check Use FIPS 140-2 software provider if available.
Choose what to do if the provider is not available. If you check Only use FIPS 140-2 software provider, the process will abort. Otherwise, the process will switch to the internal code.
For more information about FIPS 140-2 certification, please see https://csrc.nist.gov/publications/detail/fips/140/2/final.
Configure Hardware-Based Encryption
Hardware-based cryptography offloads the encryption process from the software and its host to an external device. You can use any hardware security module (HSM) that uses a PKCS #11 interface and supplies a 32-bit provider.
HSM technology is used by the government, military, and intelligence industries to protect against the security risks of conventional encryption software. In software-based solutions, even when keys are encrypted, software debuggers can potentially locate and access the encryption key, allowing critical data to be compromised. With an HSM, there is no record of keys stored in memory. Instead, keys are stored in a secure device, physically located inside an external piece of hardware.
To configure hardware-based encryption, select Use Hardware Cryptography Module for hardware-based cryptography, and follow the steps below:
- Click the ellipses (…) to open the PKCS #11 Interface to HCM Settings dialog.
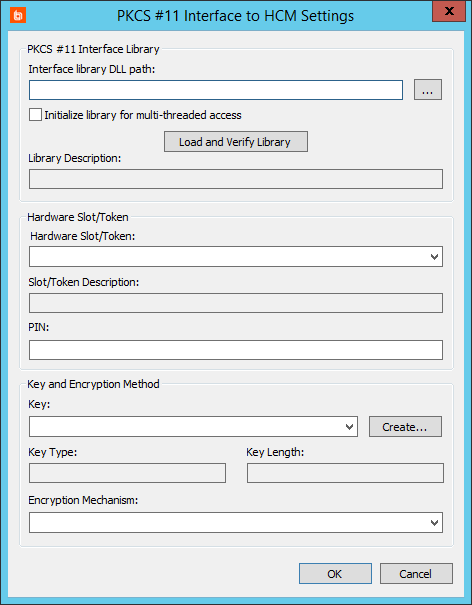
- In Interface library DLL path, provide the path to the DLL that supports the HSM device.
When you install the hardware encryption device, it places a DLL on the host computer. This is required to interface with Privileged Identity.
- If your device supports multi-threaded access, check Initialize library for multi-threaded access to improve performance.
- Click Load and Verify Library. The Library Description field will be automatically filled.
- Select a Hardware Slot/Token. The Slot/Token Description field will be automatically filled.
- If the hardware devices requires a PIN, enter it now.
- Under Key and Encryption Method, fill the fields required by your device.
- Select the Key from the dropdown. If no key exists and you have sufficient access, click Create to create a new key.
- Select the Encryption Mechanism from the dropdown.
- Click OK.
Finish Configuring Encryption
If you check Force change and clear any passwords which cannot be decrypted, Privileged Identity examines all passwords in the password store and clears any passwords which cannot be decrypted using the current settings. This clears erroneous data from the database when the correct encryption key is unavailable. This is a single-use option. After this option is selected and the dialog is confirmed, the operation takes place; the next time this dialog is opened, the option will no longer be selected.
If you want to copy these settings to another system, enter the system's connection details, and then click Push.
BeyondTrust is unable to provide support for your specific hardware security module (HSM). All support for your specific HSM must be handled by your HSM provider.