Install the Web Application
The Privileged Identity web application is the primary method for accessing stored credentials, whether managed or static, as well as auditing access to those credentials. The web app also provides features such as the file store, the personal password store, privilege escalation, and job management. In this section, we'll cover installation of the web app from the management console.
For information on the web app host requirements, please see Web Application Host Requirements.
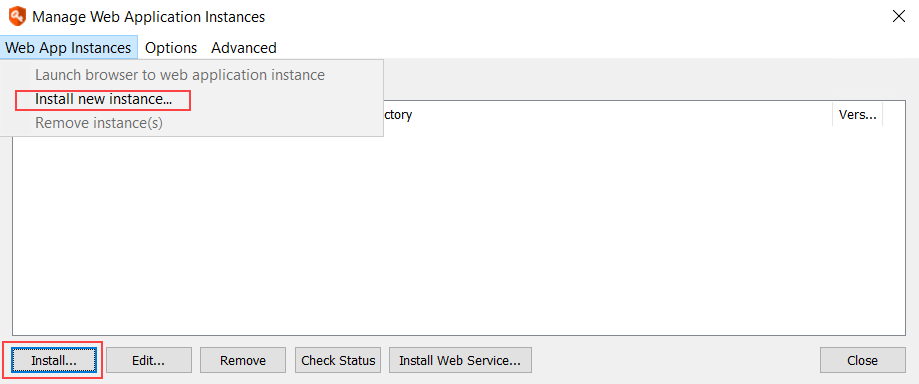
- From the Actions pane, click Manage Web App.
- On the Manage Web Application Instances dialog, click Install or select Web App Instances > Install new instance from the menu.

- On the Install Web Application dialog, select the target installation system.
- Local system is the computer you're currently working on.
- If you choose Remote System, enter the remote system's fully qualified domain name.
- Click Check System Compatibility. This checks that IIS and the file system are accessible on the target system, and that remote registry and Remote COM access are possible. Resolve any access errors before continuing.
- You will receive prompt to specify connection credentials. To use the currently logged in user account, click No. To specify a different account, click Yes, then enter the access credentials and click OK.
- If the system compatibility check completes successfully, the Web Interface Files section is filled in automatically. If you need to change any of this information, the following are the details:
- Install to target website: All root web sites on the target server are listed here. Choose the root web site to host the web application.
- Web files destination path: This is where the web application files will be copied. The path is resolved from IIS on the target server, which defaults to %inetpub%\wwwroot\PWCWeb.
- Click Install.
- You may receive a COM Account Confirmation warning. This appears if the COM account specified on the installation dialog is different from the currently logged in user. The warning asks you to be sure that the account specified has data store access. If it does not, the web app will fail to function until the access issue is resolved.
If you are sure about the account information, click Yes to continue. Alternatively, click No to change to a different account.
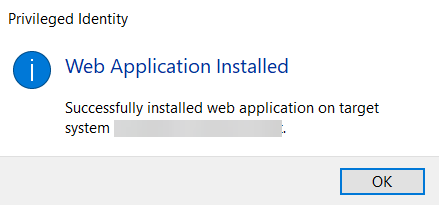
- When the web application install is complete, a success prompt appears. Click OK.
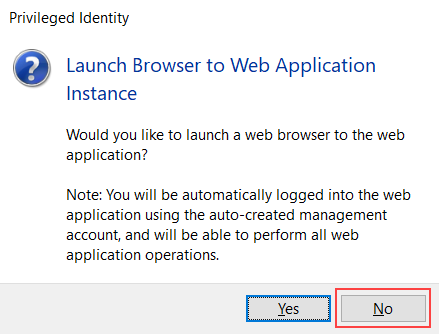
- You are prompted to launch a browser to the web application. Click No.
- Click Close.
The Manage Web Application Instances dialog in the management console is populated with a list of all known web applications.
Supported Browsers
The web app has been tested with:
- Internet Explorer 11
- Microsoft Edge
- Google Chrome
- Mozilla Firefox
- Apple Safari
- Konqueror
- Opera
Following are known caveats when working with these browsers.
Internet Explorer
- On Windows Servers with Internet Explorer Enhanced Security Mode enabled, the web app will not work unless its URL is added as a trusted site.
- In Internet Explorer, select Tools > Internet Options > Security.
- Select the Trusted sites icon.
- Click Sites.
- Add your web app URL to the list (e.g., https://server.example.int).
- After closing the options, refresh your browser. The web app should now appear.
- CORS support is available only on Internet Explorer 10 or later. To enable CORS, you may need to set this option:
- In Internet Explorer, select Tools > Internet Options > Security.
- Select the appropriate internet zone.
- Click Custom Level.
- Under Miscellaneous, enable Access data sources across domains.
Microsoft Edge, Konqueror, Opera
- This browser does not support the ActiveX control needed to launch RDP sessions.
- This browser does not support the ClickOnce extenson needed to support application launching.
Google Chrome
- The IE Tab extension is required to support the ActiveX control needed to launch RDP sessions. This is currently supported only by Chrome for Windows.
- Only Chrome for Windows supports the ClickOnce extension needed to support application launching.
- SSL certificates that do not include a properly formatted subject alternative name are shown as insecure sites. This causes the user extra prompts and will likely break access to the web service, required for web app functionality.
- For Chrome to support Integrated Windows Authentication in scenarios where cross-origin requests (CORS) must be used, you must launch Chrome with the following flags:
--disable-web-security --user-data-dir=SOMEDIRECTORY
Chrome will display a security warning. You can ignore this warning.
Mozilla Firefox
- This browser does not support the ActiveX control needed to launch RDP sessions.
- Only Firefox for Windows supports the ClickOnce extension needed to support application launching.
- For Firefox to allow Integrated Windows Authentication, the operating system must be joined to a trusted domain, and the following configuration must be made to the browser's profile:
- For Kerberos authentication: network.negotiate-auth.trusted-uris
- If Kerberos ticket passing is required: network.negotiate-auth.delegation-uris
- If NTLM authentication is allowed: network.automatic-ntlm-auth.trusted-uris
For the Kerberos exchange, define the domain name. If your domain name were example.int, you would enter .example.int (notice the leading dot).
- When the web app and web service are on separate machines and work with cross-origin requests (CORS), Firefox may not function properly when using Integrated Windows Authentication.
Apple Safari
- This browser does not support the ActiveX control needed to launch RDP sessions.
- This browser does not support the ClickOnce extenson needed to support application launching.
- CORS support is available only on Safari 9 or later.