Add managed systems and accounts using Smart Rules
You can add assets to Password Safe using an asset-based Smart Rule.
Before proceeding, consider the selection criteria to use to add the assets. There are several options available, including Operating System and Directory Query.
SSH key enforcement is not supported when using the pbrun jumphost elevated credential. The settings display as available after pbrun jumphost is selected. However, the settings will not work with the elevated credential.
- From the left menu, click Smart Rules.
- Leave Asset selected as the Smart Rule type filter.
- Click + Create Smart Rule.
- Select a Category from the dropdown.
- Enter a Name and Description for the Smart Rule.
- Select a Reprocessing Limit from the dropdown to limit how often the Smart Rule processes. Default means the Smart Rule processes when necessary. This is the preferred setting for less intensive processing. For more intensive processing select another option to restrict the Smart Rule to run once per selection.
A Smart Rule always processes when first saved or updated.
- Set the Selection Criteria by selecting ALL or ANY from the Include Items that match the following dropdown and selecting the filter criteria from the list. Address Group is a very useful filter and more than once condition may be added.
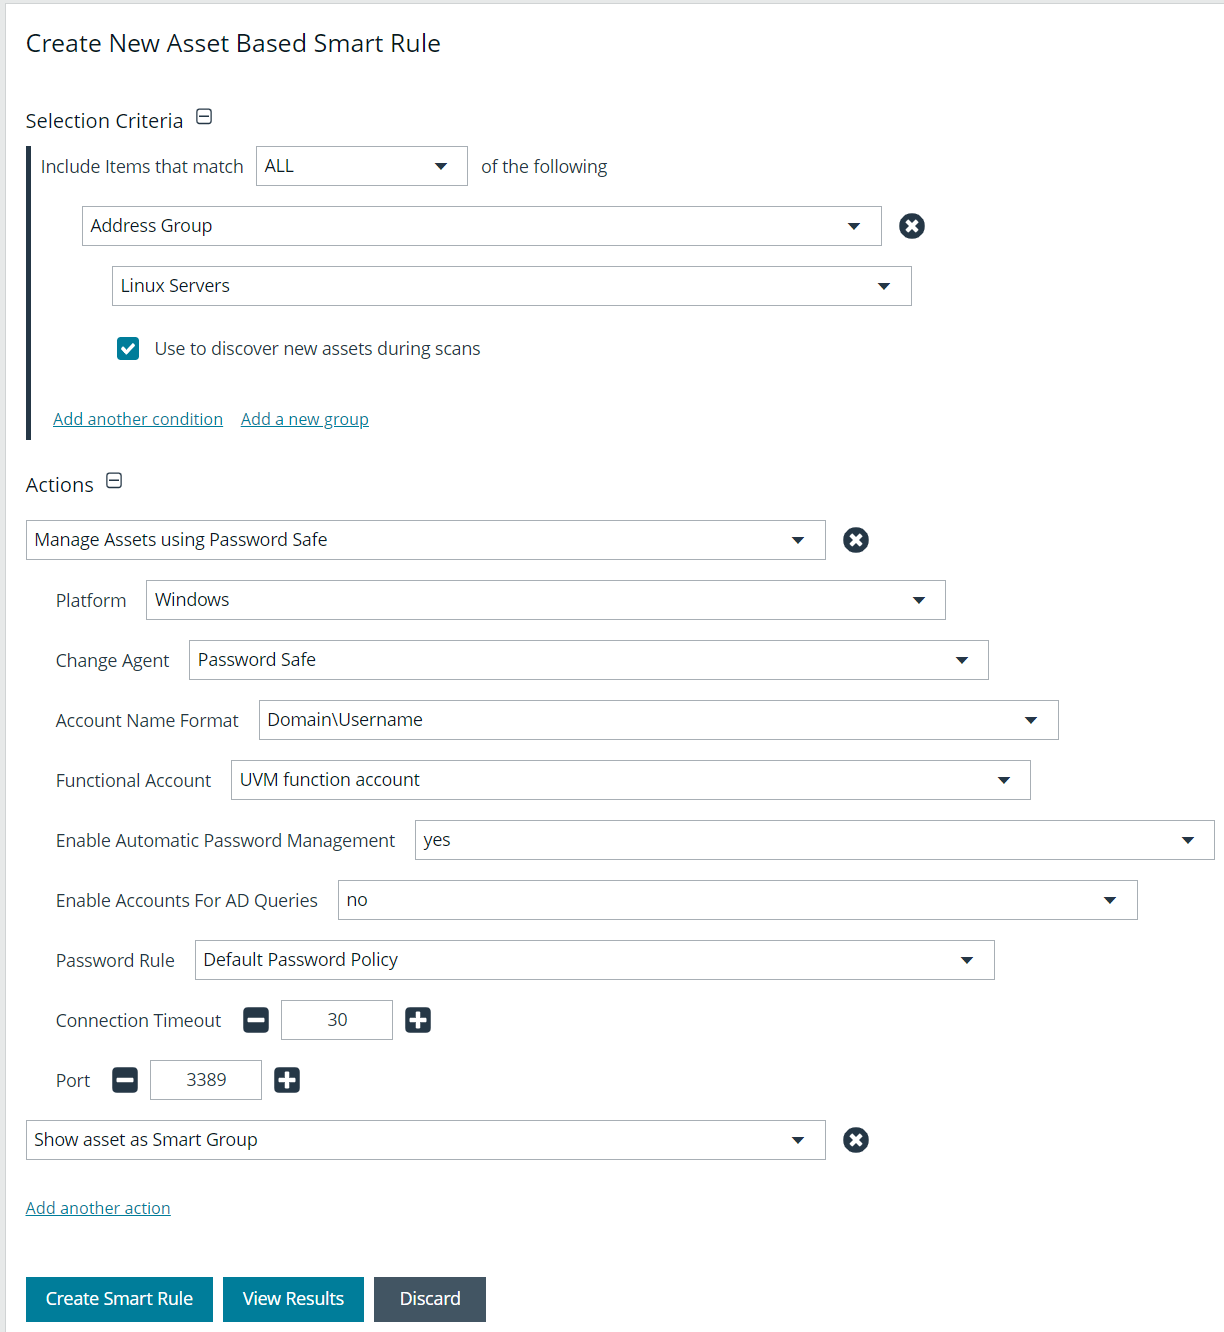
- In the Actions section, select Manage Assets Using Password Safe from the list.
- Select the Platform, Functional Account, and Account Name Format. Other settings may be left as defaults or changed as required.
These settings are the same settings available when adding the system manually by creating a new managed system.
- In the Actions section, click Add another action.
- Select Show asset as Smart Group from the list. This is helpful for grouping assets and accounts by their type.
- Click Create Smart Rule.
- Once the rule is saved, click View Results.
- You are taken to the associated grid, where the contents of the Smart Rule are listed.
- If the rule is actively processing, a banner displays letting you know that.
- View Results displays only if you have permissions to the grid corresponding to the Smart Rule, i.e.; Assets, Managed Accounts, Managed Systems.
- The Smart Rule must be saved with Show <entity> as Smart Group selected under Actions to view the results.
Once you have confirmed the rule contains your desired items, you can then add additional actions to the Smart Rule.
For complete descriptions of fields and settings for the Smart Rule, please see Add a managed system manually.
Add Active Directory managed accounts using a Smart Rule
You can create a Smart Rule that discovers and adds Active Directory accounts to Password Safe, using the below procedure. The procedure also shows how to link domain accounts to the system.
A directory query and a domain should be created prior to creating a Smart Rule.
- From the left menu, select Smart Rules.
- From the Smart Rule type filter list, select Managed Account.
- Click + Create Smart Rule.
- Select the Selection Criteria as applicable:
- Asset Smart Group: Select a Smart Group from the list.
- Child Smart Rule: Select a Smart Rule you want to filter the child Smart Rules from.
- Dedicated Account: Select an account filter from the list. Enter a keyword to search on.
- Directory Query: Choose to Include or Exclude accounts from Directory Query.
- Select a query from the list, or click Create New Directory Query to open the form and create a new query.
- Provide the frequency for the query to run. Leave the entry as 0 for a one time run.
- Enable the Discover accounts for Password Safe Management option to discover accounts when the Smart Rule processes.
- Select a Domain from the list.
- Managed Account Fields: This filter only applies to existing managed accounts.
- Select a filter: Account Name, Create Date, Description, Domain Name, Last Change Date or Last Change Result.
- Select an expression, and then enter a keyword to search on, for example, WIN for Windows.
- Managed System Fields: The Smart Rule is filtered according to the managed system you select.
- Select a filter: System Name, Create Date, Last Update Date.
- Select an expression, and then enter a keyword to search on, for example, WIN for Windows.
- Platforms: Select a platform or check Select All.
- User Account Attribute: Select the attribute from the list, and then provide the filter condition and value for that attribute. For each attribute filter, select Yes for Discover accounts for Password Safe Management, and then select a Smart Group to search in.
- Privilege: Select is one of or is not one of. Select All or one, or a combination of Administrator, Guest, or User.
- SID: Select an expression, and then enter a keyword to search on.
- Account Name: Select an expression, and then enter a keyword to search on.
- Password Age: Select an expression, and then select age parameters to search on.
- In the Actions section, select Manage Account Settings to add the accounts that match on the criteria to Password Safe. The settings are the same as when you add the accounts manually.
- Additional properties can be set under Actions:
- Assign preferred Domain Controller on each Active Directory account: Select the Active Directory domain and Domain Controller from the lists.
- Assign workgroup on each account: Used with agent workgroups in multi-active deployments, this action enables you to define groups of accounts that will be assigned to specific password change agents. Select a workgroup from the list, or select Any.
- Link domain accounts to Managed Systems: When used with Directory Accounts filter criteria, this action creates a linked association between the directory accounts and the target asset Smart Groups for role-based access control.
- Link managed accounts to Remote Applications: Assigns the application(s) to any managed accounts that match the Session Criteria.
- Map Dedicated Accounts To: Use only when the Dedicated Accounts filter criteria is selected. This action identifies the group of user accounts that are used to match against the dedicated account mask condition.
- Send an email Alert: Select to send an email alert when the Smart Rule processes. The email contains a summary of the results the managed accounts matched by the Smart Rule and any changes since its last execution.
- Set attributes on each account: Select to assign an attribute to filter and sort managed accounts. When viewing the Smart Groups on the Managed Accounts page, the groups are organized based on the filters selected in the Smart Group. You can use the default attributes that are available or create an attribute on the Configuration page. When the Smart Rule runs, the attribute is applied to all managed accounts that match on the selected filter criteria.
- Under Actions, click the link to Add another action, and then select Show managed account as Smart Group.
- Click Create Smart Rule.
Add Endpoint Privilege Management for Windows systems and local accounts into Password Safe
The integration between Password Safe and Endpoint Privilege Management for Windows (EPM) allows for agent-based local account password rotation and privileged account retrieval to run as actions for accounts on Windows systems where an EPM agent is running.
Prior to BeyondInsight 24.1, EPM agents could only use certificates to authenticate with BeyondInsight. You can download the certificate from Configuration > System > Downloads > Download Client Certificate in the BeyondInsight console. BeyondInsight configuration segments can be included in the EPM policy to enable policy management from one console and password policy from Password Safe.
Using BeyondInsight 24.1 or a later version, you can use installer activation keys to leverage OAuth authentication when configuring the integration between BeyondInsight and Endpoint Privilege Management (EPM) agents that support OAuth communications. Prior to this, the integration between EPM agents and BeyondInsight was certificate-based only. While certificate-based authentication is still available, the addition of OAuth authentication greatly simplifies the setup process.
In Endpoint Privilege Management for Windows, features to support Password Safe integration include:
- Off-network account management: The EPM agent contacts Password Safe for password tests or password changes.
- Allow as Password Safe user: You can run an application using managed account credentials sourced from Password Safe.
For more information on configuring OAuth authentication for EPM agents, see Configure OAuth Authentication for Agents Using Installer Activation Keys.
Discover local accounts on EPM Windows systems
For 22.4 and later releases of Password Safe in conjunction with the Endpoint Privilege Management for Windows 22.9 EPM agent, discovery can be performed by the EPM agent on the EPM Windows system on a scheduled basis, eliminating the need to run a discovery scan in BeyondInsight. The EPM agent, running on a Windows system, publishes local user data to the Assets grid in BeyondInsight. You can then add the local accounts to Password Safe using a Smart Rule or add them manually.
For Password Safe releases prior to 22.4, you can add well-known local admin accounts into Password Safe using a Smart Rule, eliminating the need to run a discovery scan in BeyondInsight, as documented in the next section.
For more information on configuring the Endpoint Privilege Management for Windows integration with Password Safe, as well as discovering and onboarding accounts from EPM Windows systems, please see Integrate Endpoint Privilege Management for Windows with Password Safe.
Add known local admin managed accounts using a Smart Rule
It can be useful in some cases to onboard well-known local admin accounts, such as the Windows administrator or the Linux root account, from endpoints into Password Safe without the need to run a discovery scan against the endpoints. You can create a managed system Smart Rule that uses the Create Managed Account on each system action to accomplish this.
One scenario in which this is useful is when you have Endpoint Privilege Management (EPM) clients in your environment. You can create a managed system Smart Rule to add local accounts as managed accounts from the EPM client endpoints so that a password rotation event exists when the EPM agent requests it. Having these preconfigured managed accounts saves time by not having to configure and run a discovery scan after the EPM agent makes the request.

Create the Smart Rule as follows:
- From the left menu, click Smart Rules.
- From the Smart Rule type filter list, select Managed System.
- Click + Create Smart Rule.
- From the Category dropdown, select Managed Systems.
- Provide a name and description.
- For the Selection Criteria, select Asset Smart Group and Endpoint Privilege Management Clients from the dropdowns.
- For Actions, select Show managed system as Smart Group and Create Managed Account on each system from the dropdowns.
- Leave the remaining settings for Actions as default or modify as required.
Administrator is the default account name, because that is standard for Windows systems. You can modify the name if you have configured something other than default standard local admin account name in your environment. You can also add multiple Create Managed Account on each system actions if you have additional local admin accounts you wish to manage with Password Safe.
- Click Create Smart Rule.
- Once the rule is saved, click View Results.
- You are taken to the associated grid, where the contents of the Smart Rule are listed.
- If the rule is actively processing, a banner displays letting you know that.
- View Results displays only if you have permissions to the grid corresponding to the Smart Rule, i.e.; Assets, Managed Accounts, Managed Systems.
- The Smart Rule must be saved with Show <entity> as Smart Group selected under Actions to view the results.
Once you have confirmed the rule contains your desired items, you can then add additional actions to the Smart Rule.
For more information, please see the following: