Configure allow as Password Safe user
In Endpoint Privilege Management for Windows, you can run an application using Managed Account credentials sourced from Password Safe.
Prerequisites
Ensure the following prerequisites are in place if you are configuring the Allow as Password Safe User integration with Endpoint Privilege Management.
Use the installation commands that apply to your implementation.
The prerequisites apply to on-premises and EPM SaaS platforms.
Endpoint Privilege Management endpoint
The endpoint must be set up as a managed system in Password Safe.
Communication to Password Safe relies on BeyondInsight communication channels and the appropriate client certificate. Therefore Endpoint Privilege Management for Windows must be installed using the BIMODE=1 flag.
BeyondInsight and Password Safe install
PrivilegeManagementForWindows_x64.exe /v"BIMODE=1 PSMODE=1 BEYONDINSIGHTURL=https://useries002.btrusteng.com/EventService/Service.svc"
EPM install
Endpoint Privilege Management for Windows must be installed using the Password Safe mode flags, BIMODE=1 and IC3MODE=1, as shown:
PrivilegeManagementForWindows_x64.exe /v"BIMODE=1 IC3MODE=1 BEYONDINSIGHTURL=https://useries002.btrusteng.com/EventService/Service.svc"
Webserver install
Endpoint Privilege Management for Windows must be installed using the Password Safe mode flags, BIMODE=1 and WEBSERVERMODE=1, as shown:
PrivilegeManagementForWindows_x64.exe /v"BIMODE=1 WEBSERVERMODE=1 BEYONDINSIGHTURL=https://useries002.btrusteng.com/EventService/Service.svc"
Password Safe
The Password Safe account name must be a managed account associated with the managed system (Endpoint Privilege Management endpoint).
For more information, see 'Add Assets to Password Safe' in the Password Safe Administration Guide.
Create an Application Rule
To configure the Password Safe user in the Endpoint Privilege Management for Windows client, you need to set up an Application Rule that includes the Password Safe user.
To add a Password Safe user in the MMC Policy Editor:
- In the Edit Rule Application dialog box, select Allow as Password Safe User from the Action list.
- In the Password Safe Account Name field, enter the name of the account exactly as configured in Password Safe. This is the Managed Account configured in Password Safe for the endpoint.
End user messaging is not available in this release.
For more information about Application Rules, see Application Rules in the Endpoint Privilege Management for Windows Administration Guide.
Configure Off-Network Account Management
In a typical password rotation using Password Safe, the appliance or Resource Broker reaches out to the target system to trigger the password change using the functional account credentials. However, off-network clients that are not ever or not consistently accessible by a Password Safe appliance or Resource Broker cannot use this mechanism.
Using Password Safe integration settings in the Policy Editor, Endpoint Privilege Management clients can check in with Password Safe at a configured interval for password change commands, including password rotation.
Supported scenarios
- Password Safe Cloud/On-prem with EPM
- Password Safe Cloud/On-Prem with GPO/webserver
- Password Safe on the same server as BeyondInsight for Endpoint Endpoint Privilege Management.
Requirements
- Password Safe: Endpoints require a Password Safe license.
- Endpoint Privilege Management client: Endpoint Privilege Management license not required for this use case.
- Endpoint Privilege Management policy: Required to deliver the integration settings.
Install the Endpoint Privilege Management client on computers before you run a Password Safe discovery scan. If you run the scan first, then the computers are onboarded to Password Safe with Password Safe as the change agent with an asset ID. If you install the Endpoint Privilege Management client on the same computer later, the asset has a unique install ID. A duplicate record is created with the same asset name but different asset ID.
Workflow
The following section provides information on how to set up the off-network scenario. The high-level steps are:
- Download a client certificate for authentication
- Install Endpoint Privilege Management client and adapter
- Create a policy in Endpoint Privilege Management
- Onboard the managed system in Password Safe
- Add accounts to Password Safe
For more information and detailed step-by-step instructions, see our Knowledge Base article.
Download a Client Certificate
Communication between EPM and the BeyondInsight server are encrypted over port 443. The Endpoint Privilege Management computers need a client certificate to authenticate to BeyondInsight or Password Safe.
The certificate must be deployed to all EPM client machines and Policy Editor machines.
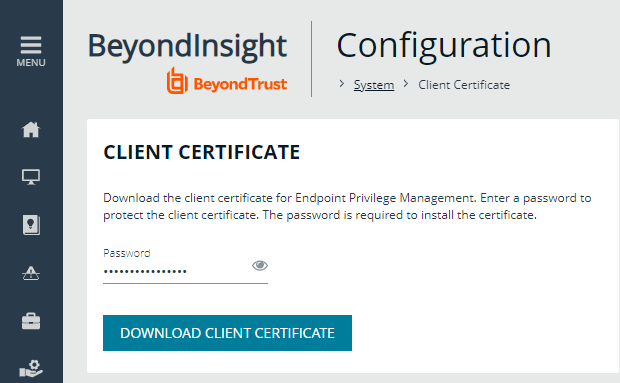
Download the client certificate to the Endpoint Privilege Management computer, from PS Cloud or BeyondInsight console: Configuration > System > Client Certificate.
- PS Cloud: The client certificate is issued to PS Cloud authentication.
- BeyondInsight U-Series Appliance: Default certificate is issued to eEyeEmsClient.
For more information on deploying the certificates to EPM machines, see Configure BeyondInsight and Endpoint Privilege Management
Install EPM
The following sections provide information on installing Endpoint Privilege Management for Windows client and adapter software on either the EPM or BeyondInsight platform.
For more information, see Installer Flags.
Install on EPM
Use the commands in these sections when setting up the off-network account management integration.
Install the EPM Client
Run the following command to install the Endpoint Privilege Management client.
msiexec /I PrivilegeManagementForWindows_x64.msi BIMODE=1 PSMODE=1 IC3MODE=1 BEYONDINSIGHTURL="https://xxxxxxxx.beyondtrustcloud.com/EventService/Service.svc" BEYONDINSIGHTCERTNAME="PS Cloud Authentication" BEYONDINSIGHTWORKGROUP="<if not using default>" /qn /norestart
Install EPM Adapter
The EPM adapter is required to create and push Endpoint Privilege Management policy.
Install on U-Series Appliance with Password Safe
Run the following command to install Endpoint Privilege Management:
msiexec.exe /i PrivilegeManagementForWindows_x64.msi BIMODE=1 PSMODE=1 BEYONDINSIGHTURL="https://xxxxxxxxx/EventService/Service.svc" BEYONDINSIGHTCERTNAME="<if not using eEyeEmsClient>" BEYONDINSIGHTWORKGROUP="<if not using default>" /qn /norestart
Verify Endpoints are Registered in BeyondInsight
Verify EPM clients are registered in BeyondInsight on the Assets page.
For more information, see Verify Endpoints are Registered in BeyondInsight.
Create a Policy
You must configure integration settings in the Policy Editor. An Endpoint Privilege Management license is not required if using only password rotation.
Use the following procedure when EPM SaaS is managing the policy. If you are using the on-premises Policy Editor, see the knowledge base article for instructions.
- Click the Policies menu, and then click Create Policy.
- Select Blank on the Policy Creator page, and then click Use Blank Template.
- Enter a name and description, and then click Create Policy.
- Create a workstyle.
- Expand the workstyle, and then click Application Rules.
- Click Integration Settings.
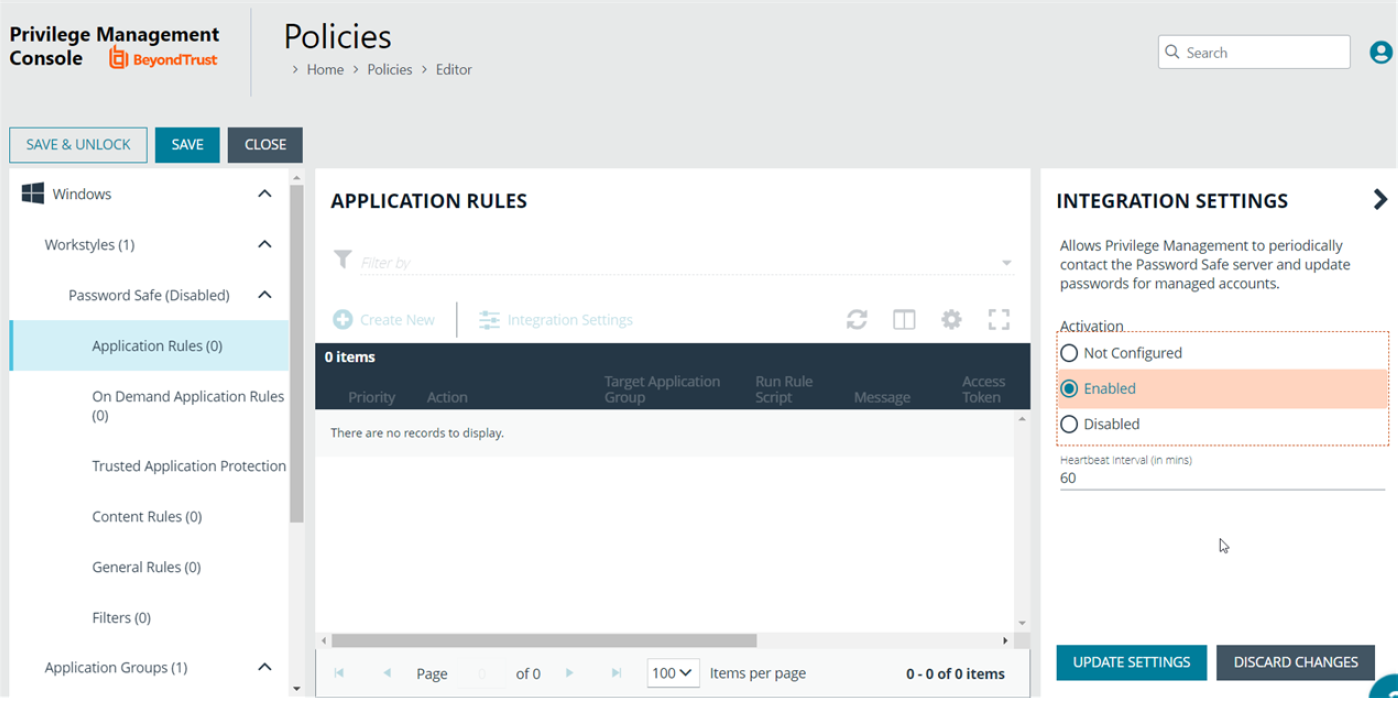
- Select Enabled.
- Enter a heartbeat interval. The default value is 60 minutes. This is the time span the computer polls Password Safe unless the time is determined by Password Safe. The Endpoint Privilege Management computer checks in for missed jobs such as scheduled password rotations, forced resets, and password releases. Password rotations run at this time.
- Click Update Settings.
Onboard the EPM Assets to Password Safe
During the Endpoint Privilege Management client installation, the computer registers as an asset with the Endpoint Privilege Management solution flag set. Therefore, you can onboard the asset manually, using a Smart Rule, or the API.
The Endpoint Privilege Management client is the password agent. A functional account is not required, however a limitation in 22.1 (and earlier) requires a dummy functional account to be created and assigned if using a Smart Rule to onboard accounts.
Sample Smart Rule
Create a Smart Rule that includes the following criteria and actions.
Criteria
Currently the Endpoint Privilege Management identifier is hidden in PS Cloud. Other identifiers are needed to include all Endpoint Privilege Management computers in the criteria.
Action
Actions to set on the Smart Rule:
- Manage Assets using Password Safe
- Platform: Windows
- Change Agent: Endpoint Privilege Management Client
- Account Name Format: Domain\Username
- Functional Account: None (or dummy account)
- Enable Automatic Password Management: Yes
- Enable Account for AD Queries: No
- Password Rule: Select a policy
Default values for the following account settings in Password Safe are applied in an Endpoint Privilege Management for Windows off-network integration and cannot be changed in this scenario:
- Change Services (Yes)
- Restart Services (No)
- Change Tasks (No)
Add EPM-W Systems and Local Account to Password Safe
- Password Safe 22.4 (and later) and Endpoint Privilege Management for Windows 22.9 agent: The Endpoint Privilege Management agent can run a discovery scan on a scheduled basis. This eliminates the need to run a discovery scan in BeyondInsight. The agent, running on a Windows system, publishes local user data to the Assets grid in BeyondInsight. You can then add the local accounts to Password Safe using a Smart Rule or manually.
- Password Safe 22.4 (and earlier): You can onboard well-known local admin accounts using a Smart Rule as documented in the next section. This eliminates the need to run a discovery scan.
Add Known Local Admin Managed Accounts Using a Smart Rule
In some cases, it can be useful to onboard well-known local admin accounts, such as the Windows administrator or the Linux root account, from endpoints to Password Safe without the need to run a discovery scan against the endpoints. You can create a managed system Smart Rule that uses the Create Managed Account on each system action to accomplish this.
One scenario in which this is useful is when you have Endpoint Privilege Management clients in your environment. You can create a managed system Smart Rule to add local accounts as managed accounts from the Endpoint Privilege Management client endpoints so that a password rotation event exists when the Endpoint Privilege Management agent requests it. Having these preconfigured managed accounts saves time by not having to configure and run a discovery scan after the Endpoint Privilege Management agent makes the request.
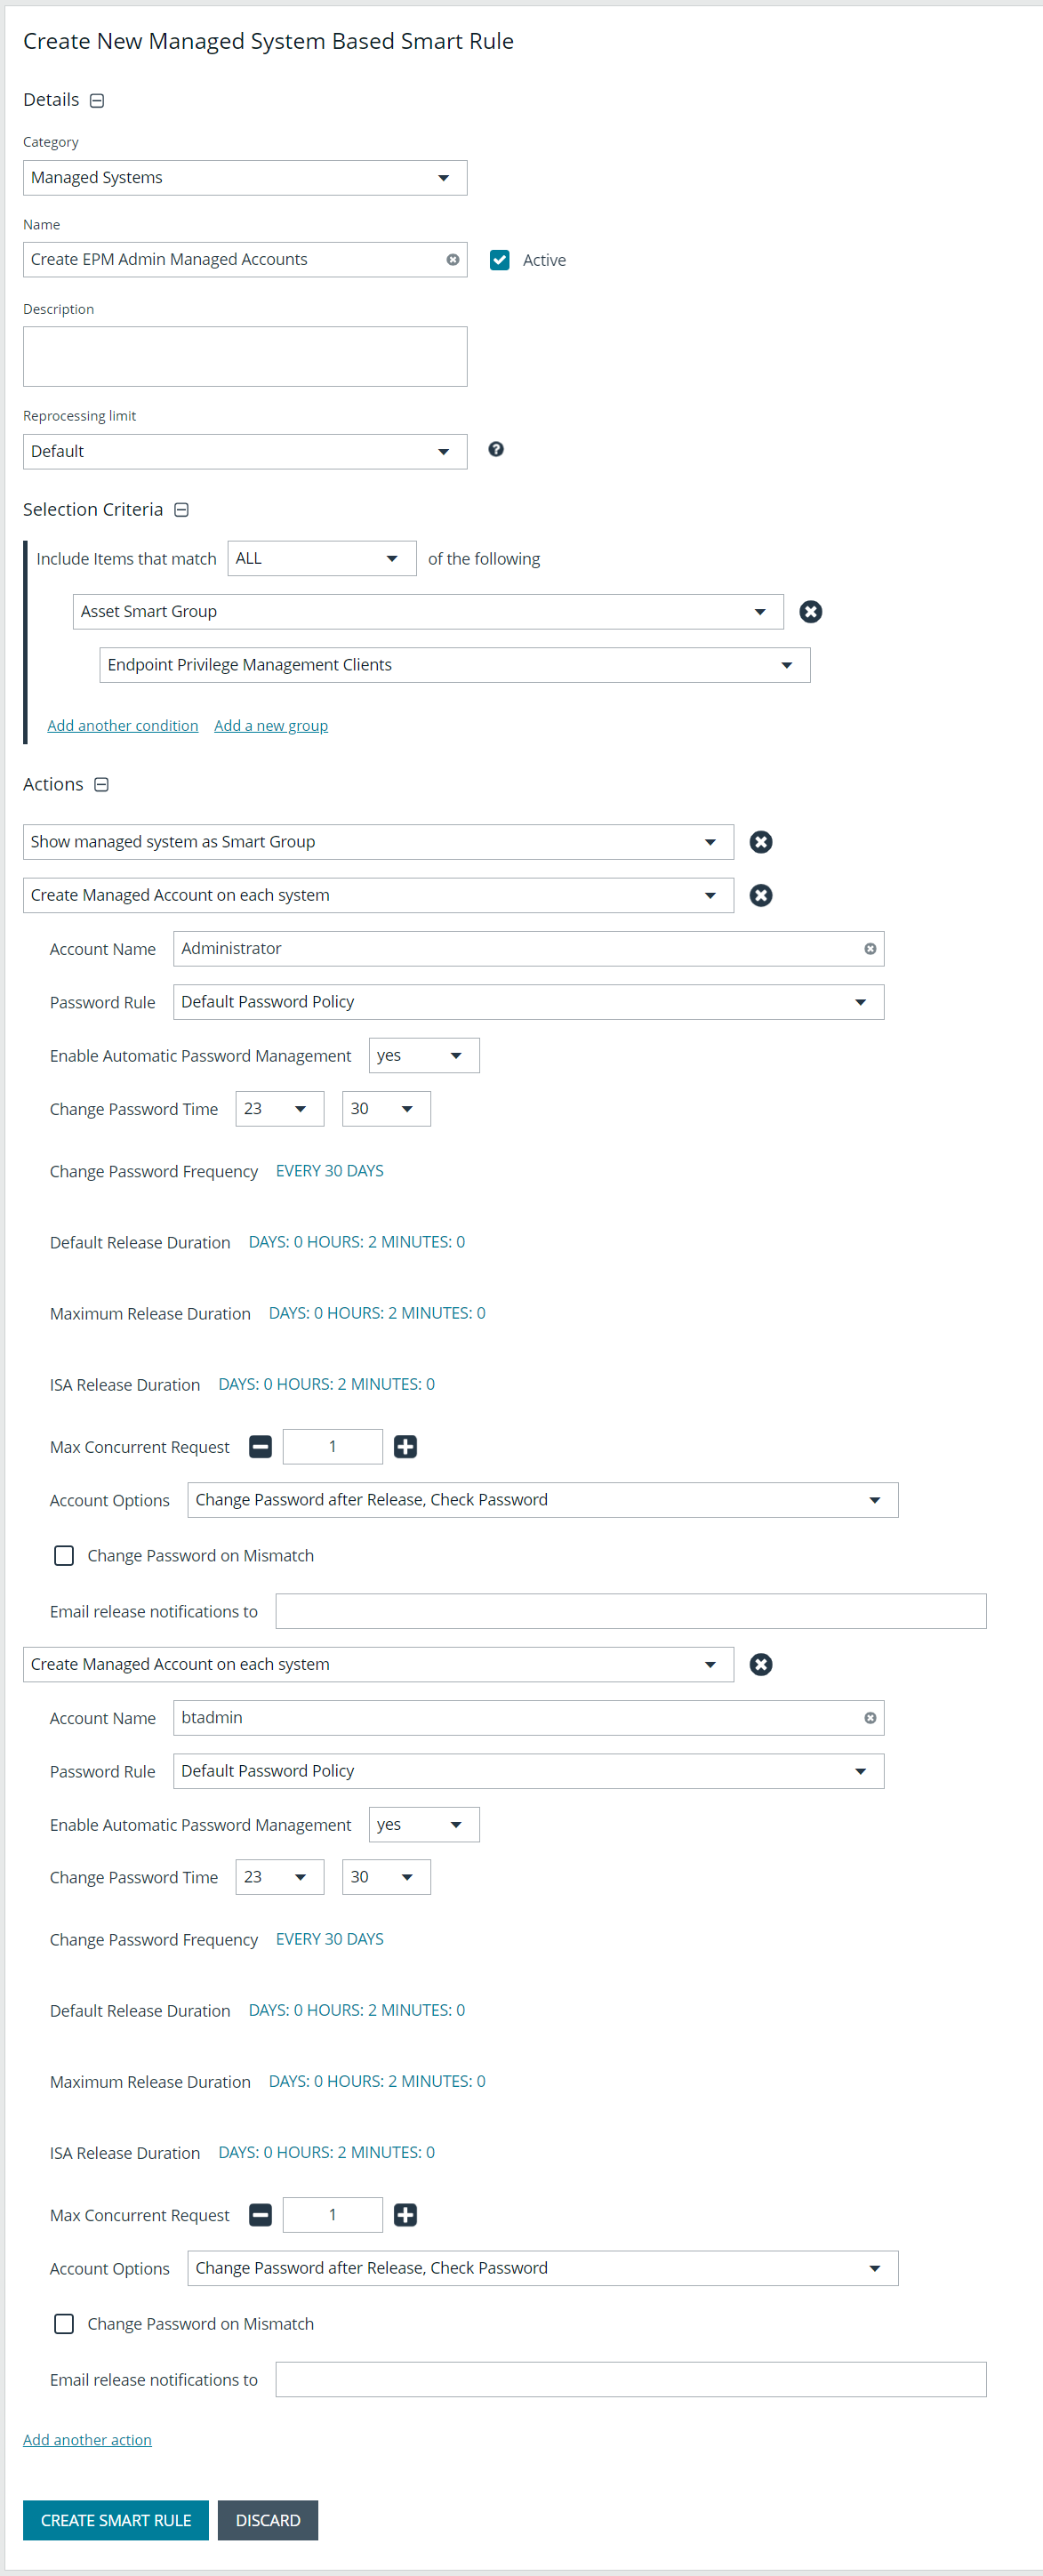
To create the Smart Rule:
- From the left navigation menu, click Smart Rules.
- From the Smart Rule type filter list, select Managed System.
- Click Create Smart Rule +.
- From the Category dropdown menu, select Managed Systems.
- Provide a name and description.
- For the Selection Criteria, select Asset Smart Group and Endpoint Privilege Management Clients from the dropdown menus.
- For Actions, select Show managed system as a Smart Group and Create Managed Account on each system from the dropdown menus.
- Leave the remaining settings for Actions as default or modify as required.
The default account name is Administrator as this is standard for Windows systems. You can modify the name if you configured something other than default standard local admin account name in your environment. You can also add multiple Create Managed Account on each system actions if you have additional local admin accounts you want to manage with Password Safe.
- Click Create Smart Rule.
For more information, see "Add a Managed System Manually" and "Add Directory Accounts" in the Password Safe Administraton Guide.
Set up a Discovery Scan in EPM Policy Editor
Configure a discovery scan to detect unmanaged accounts on an endpoint. The scan results are sent to Password Safe.
This setup applies to Password Safe 22.4 (and later) and Endpoint Privilege Management for Windows 22.9 agent.
- On the Policy Editor page, expand Windows.
- Expand the Workstyles node, and then expand a Workstyle.
- Select Application Rules or On Demand Application Rules, and then click Integration Settings.
- From the Activation list, select Enabled.
- Set an account discovery interval.
- Click Update Settings.