Configure and install a Jumpoint for Windows systems
Setup of a Jumpoint on a remote network is a multi-step process that includes configuring from the /login administrative interface, downloading the installer, and running the installation wizard.
Understand Clustered Jumpoints
Before configuring a Jumpoint, it is important to understand the difference between clustered Jumpoints and stand-alone Jumpoints, because they have different feature sets and because a clustered Jumpoint cannot be converted to stand-alone, nor a stand-alone Jumpoint converted to clustered. A clustered Jumpoint allows you to install up to ten redundant nodes of the same Jumpoint on different host systems in the same local network.
A clustered Jumpoint is available as long as at least one of the installed nodes is online. This provides redundancy, preventing the failure of all Jump Items associated with the failure of a single, stand-alone Jumpoint, and improves load balancing across the system.
All configuration of clustered Jumpoints is done in /login, with no local configuration available on the local host either during or after the installation. This means that if you install a clustered Jumpoint, selecting the BeyondTrust Jumpoint Configuration item on the start menu of the Jumpoint host does not result in a configuration window, and only an About box is shown. Editing a clustered Jumpoint in /login loads the same configuration page that was used to create the Jumpoint. This means clustered Jumpoint configuration lacks the following options which are available to stand-alone Jumpoints:
- Proxy
- Intel vPro
- Shell Jump
- TTL
This also means that a clustered Jumpoint cannot be configured as a Jump Zone Proxy. vPro, RDP, VNC, Shell Jump, and normal Jump sessions are all supported when using clustered Jumpoints; however, the advanced configuration of these features is not available. This includes settings such as provisioned SSH hosts, vPro reimaging, Jump Zone Proxy, TTL, etc.
Configure

- From the administrative interface, go to Jump > Jumpoint.
- Click Add.
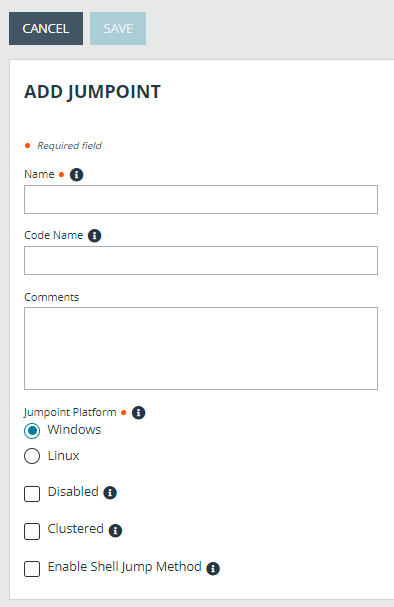
- Create a unique name to help identify this Jumpoint. This name should help users locate this Jumpoint when they need to start a session with a computer on its same network.
- Set a code name for integration purposes. If you do not set a code name, one is created automatically.
- Add comments to help identify this Jumpoint.
- Select the Jumpoint Platform. Options are Windows and Linux. Once the Jumpoint has been created this options cannot be changed.
- Leave the Disabled check box unchecked.
- Check the Clustered box, if appropriate.
A Clustered Jumpoint allows you to install multiple, redundant nodes of the same Jumpoint on different host systems. If this option is selected, the Jumpoint is available as long as at least one of the installed nodes is online. This provides redundancy, preventing the failure of all Jump Items associated with the failure of a single, stand-alone Jumpoint, and improves load balancing across the system. All configuration of clustered Jumpoints is done in /login, with no local configuration available during the install. Once created, a clustered Jumpoint cannot be converted to stand-alone, nor a stand-alone Jumpoint converted to clustered.
Jumpoint cluster nodes must be installed on hosts residing in the same local area network.
- If you want users to be able to connect to SSH-enabled and Telnet-enabled network devices through this Jumpoint, check Enable Shell Jump Method.
- From the Jumpoint edit page, you can authorize users to start sessions through this Jumpoint. After the Jumpoint has been created, you can also grant access to groups of users from Users & Security > Group Policies.
- Save the configuration. The new Jumpoint appears in the list of configured Jumpoints.
Once you have installed the Jumpoint, the table populates the hostname of the host system, as well as that system's public and private IP addresses. This information can help you locate the Jumpoint's host system in case you need to change the Jumpoint's configuration.
At the bottom of the Jumpoint page is the option to Enable network browsing. If checked, a permitted user can view and select systems from the network directory tree. If unchecked, a user can access a system through a Jumpoint only by entering the system's hostname or IP address. Either way, the user must provide valid credentials to the remote system before gaining access.
For more information on Shell Jump, please see Shell Jump.
Download
Now that your Jumpoint is configured, you must install the Jumpoint on a single system in the remote network you wish to access. This system serves as the gateway for Jump sessions with other computers on the remote network. You can either install the Jumpoint directly to the host or email the installer to a user at the remote system. If this is to be a clustered Jumpoint, you will be able to add nodes later.

- From the table, find the appropriate Jumpoint and click the link to download the installer file (bomgar-jpt-{uid}.exe).
- If you are logged into the system you want to use as the Jumpoint host, you can run the installation file immediately.
- Otherwise, save the file and then transfer it to and deploy it onto the system that will serve as the Jumpoint host.
If you need to change the Jumpoint's host system, click Redeploy. This uninstalls the Jumpoint from its current location and makes the download links available. You can then install the Jumpoint on a new host. The new Jumpoint replaces the old one for any existing Jump shortcuts that are associated with it. The new Jumpoint does not copy over the configuration from the old Jumpoint and must be reconfigured during installation.
bomgar-jpt-24cf209c6aab939fc418813b9723995ev.exe /S
The Jumpoint installer expires 7 days after the time of download.
Install

- From the system that will host the Jumpoint, run the installation package. When the installation wizard appears, click Next.
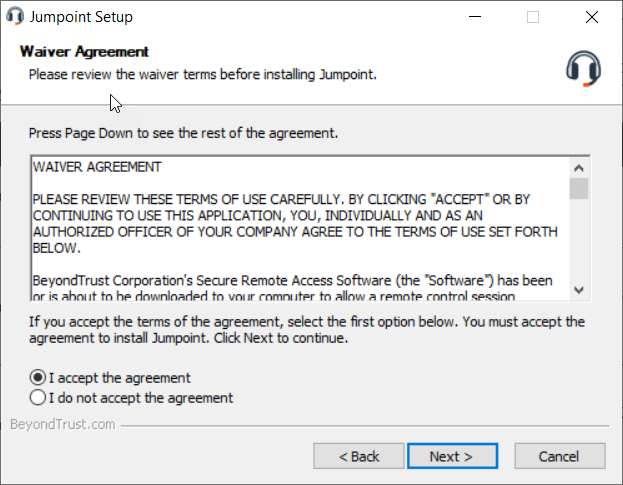
- Read and accept the waiver agreement. You must accept the agreement to be able to proceed with the installation.
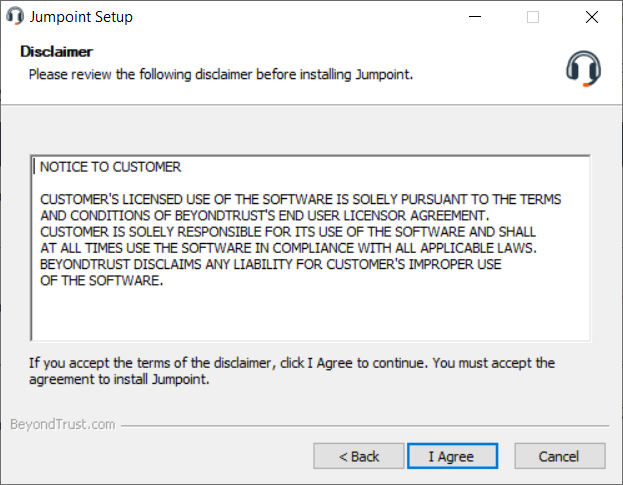
- Read and agree to the disclaimer.

- Choose where you would like the Jumpoint to install. The default location is C:\Program Files\Bomgar\Jumpoint or C:\Program Files (x86)\Bomgar\Jumpoint.
- Click Install. If you are installing a single Jumpoint, the BeyondTrust Jumpoint Configuration window opens after a moment. If you are installing a clustered Jumpoint node, the installation finishes.
Deploy behind proxy
In the case of clustered Jumpoints, keep in mind that there is no customization available at the local level. As a result, you will not see the configuration window that allows for Proxy or other configuration items available for stand-alone Jumpoints. If you are installing a clustered Jumpoint, you may skip the following steps and go directly to Clustered Jumpoint Setup: Adding Nodes.

For a Jumpoint to be deployed on a remote network that is behind a proxy, appropriate proxy information may be necessary for the Jumpoint to connect back to the B Series Appliance.
- From the dropdown on the Proxy tab in the Jumpoint Configuration application, select Basic or NTLM to configure proxy settings.
- Enter the Proxy Host, Proxy Port, Username, and Password, and then click OK. The Jumpoint supplies this proxy information whenever Jumping to another system on the remote network, providing the credentials necessary to download and run the customer client on the target system.
You can configure a Jumpoint to go through another Jumpoint deployed as a Proxy Server. This allows secure access to isolated, non-routable, OT networks without being constrained to only Jump Clients. Follow these steps:
- On System1, install a Jumpoint with a JumpZone Proxy configured.
- System2 is isolated from the internet.
- On System2, set the system's proxy configuration to point to System1's JumpZone Proxy.
- On System2, install a Jumpoint which detected the system's proxy configuration.
- On System2, configure the Jumpoint's Basic Proxy configuration to point to the JumpZone Proxy on System1.
- On System3, run a Representative Console and configure an RDP Jump Item to System4 using System2's Jumpoint.
- On System3, jump to the RDP Jump Item to System4 through System2's proxy configuration, through System1's JumpZone Proxy.
You can’t daisy chain the proxies, so System2 can’t both have JumpZone Proxy enabled and connect out through System 1. Thus, Jump Client jumps likely will not work since they would need to connect directly to System1’s JumpZone Proxy. However, Remote Push works. Other jump types get their proxy configuration from the jumpoint’s bomgar.ini file. If the jumpoint itself is able to connect, other jump types should also be able to connect.
Configure Windows Jumpoint as a proxy server
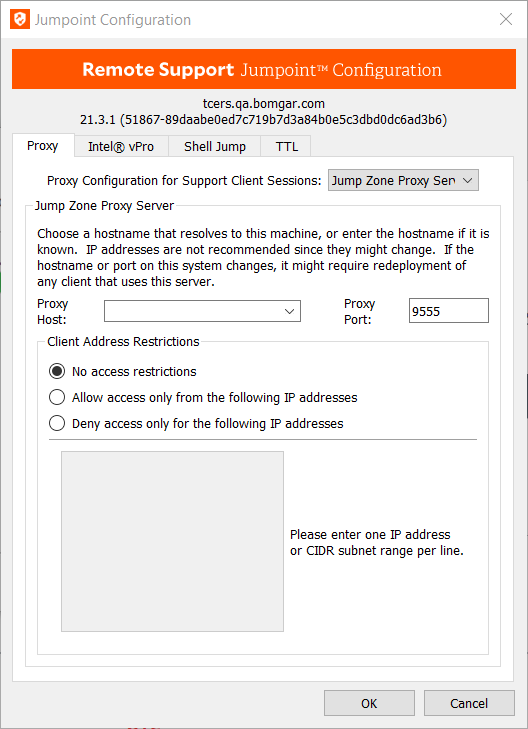
You can set up this Jumpoint to function as a proxy itself by selecting Jump Zone Proxy Server from the dropdown on the Proxy tab in the Jumpoint Configuration application. With Jump Zone Proxy Server selected, this Jumpoint can be used to proxy connections for customer clients and Jump Clients on the network that do not have a native internet connection, such as POS systems. Using a Jumpoint as a proxy routes traffic only to the B Series Appliance. If there is a direct connection available, clients attempt to use that connection in preference to the Jump Zone Proxy.
For more information on deploying Jump Clients, see the Jump Client Guide.
In order for a Jumpoint to function as a Jump Zone Proxy Server, its host system cannot reside behind a proxy. The Jumpoint must be able to access the Internet without having to supply proxy information for its own connection.
-
Enter the hostname to use at the listening interface, and set which port to use.
Host and port fields should be set carefully since any Jump Client deployed using this Jumpoint as a proxy server uses the settings available to it at the time of deployment and is not updated should the host or port change. If the host or port must be changed, the Jump Client must be redeployed.
- Set whether to allow all IP addresses or to limit the IPs that can connect through this proxy.
- If allowing or denying access, enter one IP address or CIDR subnet range per line.
It is a best practice to make an exception in the Windows firewall for the port on which the proxy server listens for the process which accepts connections.
Intel® vPro
Intel vPro configuration is available only for stand-alone Jumpoints. Clustered Jumpoints do not have this option.
Using Intel® Active Management Technology, privileged users can support fully provisioned Intel vPro Windows systems below the OS level, regardless of the status or power state of these remote systems. Configure this Jumpoint to enable vPro connection by going to the Intel® vPro tab and checking Enable Intel® vPro.
For a representative to use Intel® vPro support, they must be granted access to a Jumpoint with Intel® vPro enabled and must have the user account permission Allowed Jump Methods: Intel® vPro.
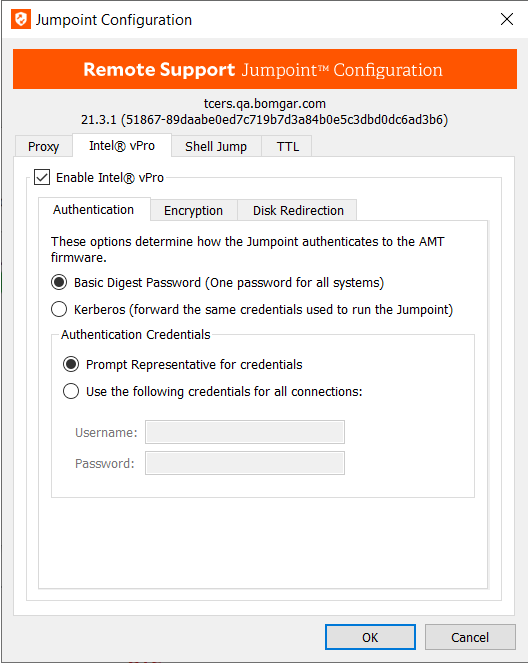
Authentication
- Under Authentication, designate how the Jumpoint should attempt to authenticate to vPro-provisioned computers. Regardless of the authentication method, the provided credentials must match the authentication settings in the AMT firmware on the vPro systems.
- To require representatives to provide credentials each time they connect to a vPro computer, select Basic Digest Password and then Prompt Representative for credentials.
Prompting for credentials is useful if the vPro systems on this network do not share a common username and password. However, since the vPro AMT firmware is entirely separate from any user accounts on the computer, administrators frequently provision all vPro systems to have the same credentials.
There is little security risk in storing credentials in the Jumpoint. To use vPro support, a representative must have not only the vPro user account privilege but also access to the vPro-enabled Jumpoint. Therefore, prompting for credentials may be an unnecessary measure.
- If the same credentials are used for all vPro systems on the network, you can select Basic Digest Password and then Use the following credentials for all connections. With this configuration, representatives are never prompted for vPro credentials; the Jumpoint automatically supplies the stored username and password for all vPro connections.
- If you select Kerberos, the Jumpoint supplies the credentials for the account that the Jumpoint service is running as. These credentials can be modified to be a specific account that has permissions to access the AMT system. This configuration assumes that the account hosting the Jumpoint uses the same credentials as all provisioned vPro systems to which you wish to connect. With this configuration, representatives are never prompted for vPro credentials.
Encryption
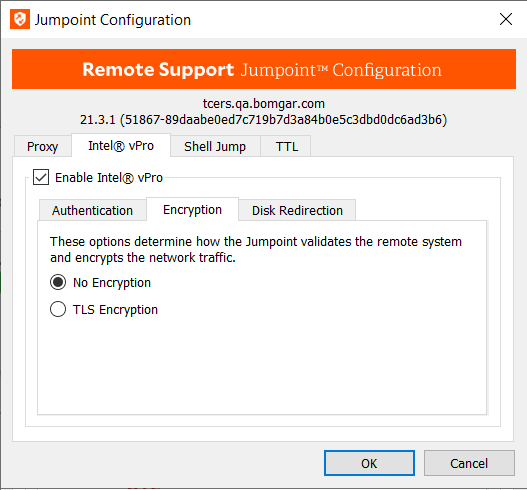
- On the Encryption tab, set how the Jumpoint encrypts vPro network traffic.
- If the remote vPro systems are provisioned not to use TLS encryption, simply select No Encryption.
- Otherwise, select TLS Encryption and define the path to the Base 64-encoded CER file which contains the certificates used during the provisioning of the remote vPro systems.
Disk Redirection
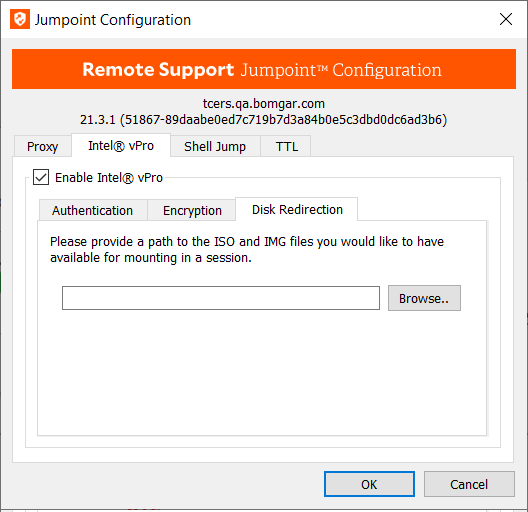
- Under Disk Redirection, specify the folder location of any ISO or IMG disk images you would like to make available for mounting in a vPro session. Representatives can use these files for IDE-R, booting the remote vPro system to a disk image rather than the hard drive.
Shell Jump
While Shell Jump can be enabled and disabled from /login for both stand-alone Jumpoints and clustered Jumpoints, further configuration is available only to stand-alone Jumpoints; therefore, this section of the guide applies to stand-alone Jumpoints only.
The Shell Jump tab determines how this Jumpoint can be used to connect to SSH-enabled and Telnet-enabled network devices.
Shell Jump must also be enabled on the Jump > Jumpoint page of the administrative interface. For a representative to use Shell Jump, they must be granted access to a Jumpoint with Shell Jump enabled and must have the user account permission Allowed Jump Methods: Shell Jump.
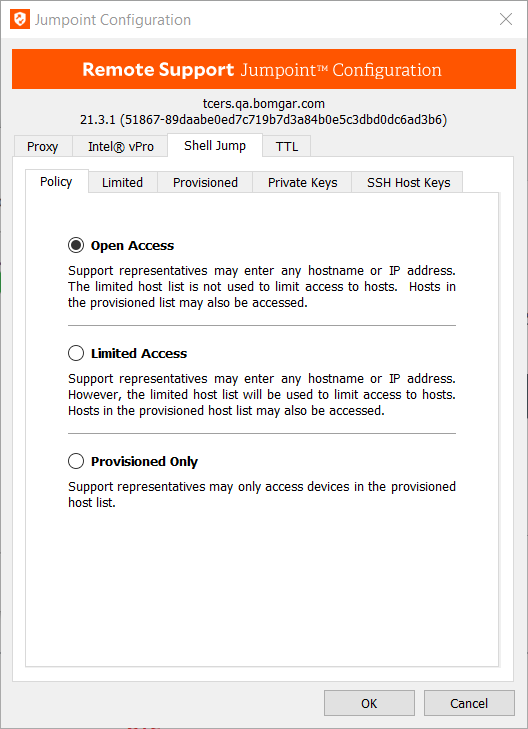
Policy
- On the Policy tab, if Open Access is selected, permitted representatives can Shell Jump to any remote device by entering its hostname or IP address or by selecting it from a list of provisioned devices.
- If Limited Access is selected, representatives can Shell Jump to provisioned devices or can enter a device's hostname or IP address, provided that it falls within the parameters set by the host list on the Limited tab.
- If Provisioned Only is selected, representatives can Shell Jump only to provisioned devices.
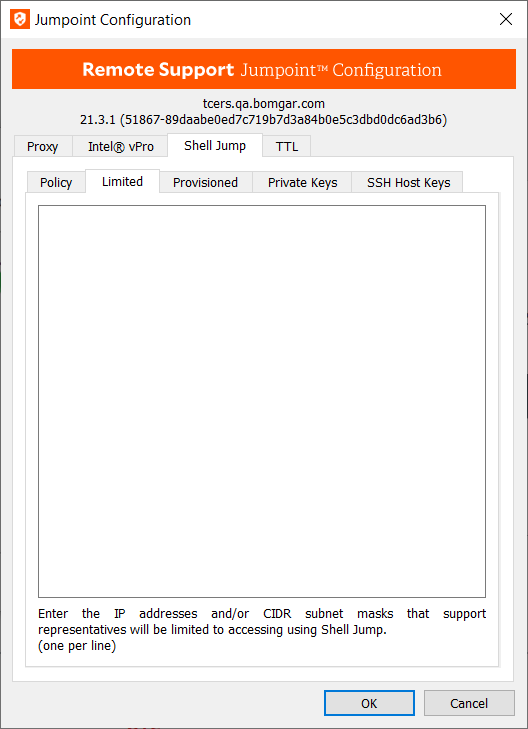
Limited
- If limited access is enabled on the Policy tab, the Limited list accepts IP addresses and CIDR subnet masks to which Shell Jump access is limited.
Provisioned
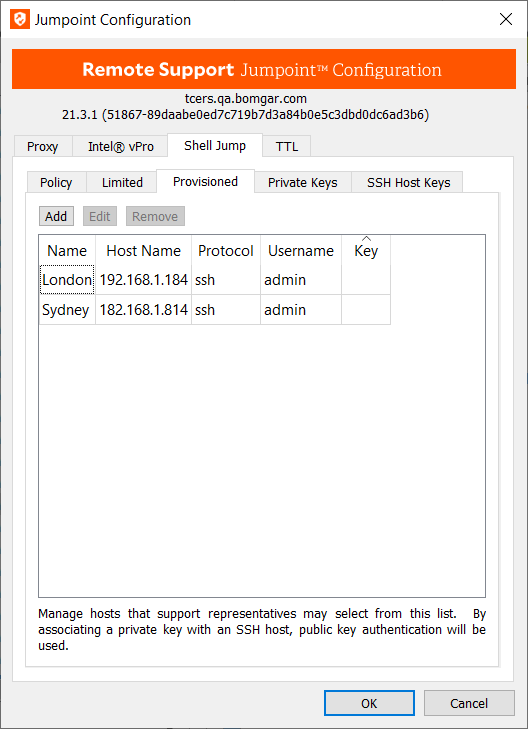
- Configure access to provisioned Shell Jump targets by going to the Provisioned tab and clicking Add.
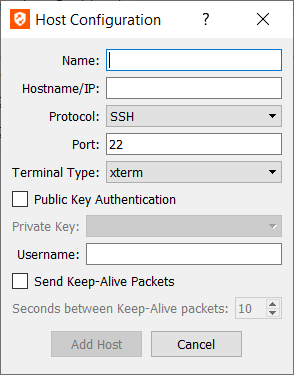
- Enter a Name to help representatives identify this device when starting a Shell Jump session with it.
- Enter the device's hostname or IP address.
- Choose the Protocol to use, either SSH or Telnet.
- Port automatically switches to the default port for the selected protocol but can be modified to fit your network settings.
- Select the Terminal Type, either xterm or VT100.
- If you are using SSH, you can choose to use Public Key Authentication. If you choose to do so, select a Private Key to use. Private keys are configured from the Private Keys tab.
- Representatives Shell Jumping to this provisioned device may connect only with the Username you provide.
- You can also select to Send Keep-Alive Packets to keep idle sessions from ending. Enter the number of seconds to wait between each packet send.
Private Keys
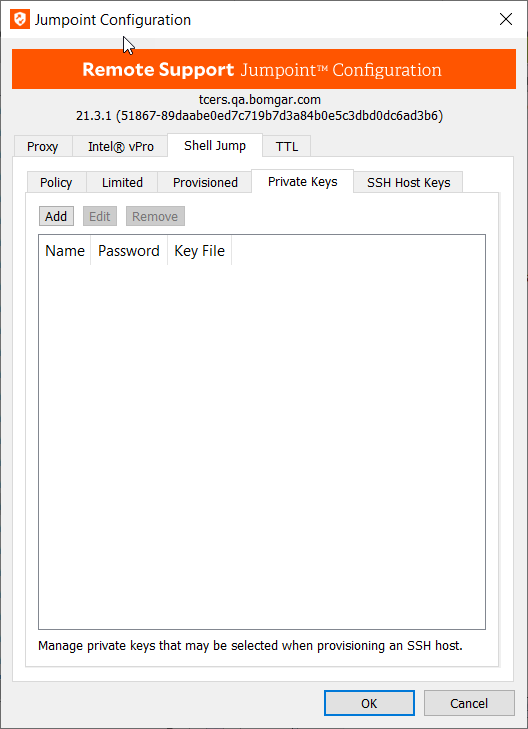
- If you are using SSH, you can upload a key file to use by going to the Private Keys tab and clicking Add.
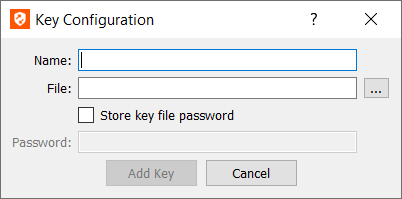
- Give this key a Name and click the ellipsis to browse to the key File you wish to use. Keys must be in OpenSSH format. The ssh-keygen utility can be used to generate an OpenSSH format key file if needed.
- If a Password is required, you can check Store key file password to save the password for all representatives to use, or you can require representatives to enter the key file password each time they connect to a provisioned device using this key.
SSH Host Keys
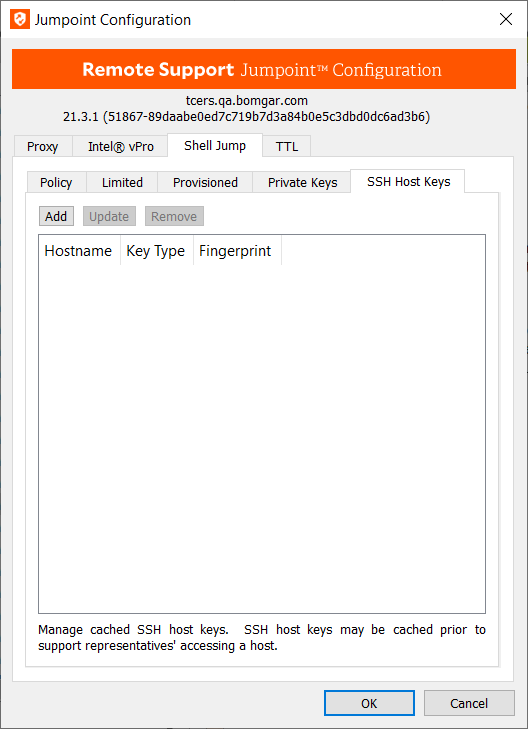
- You can add SSH Host Keys prior to a representative's Jumping to that host. If no host key is cached, the representative receives a message alerting them that the server's host key is not cached and that there is no guarantee that the server is the computer they think it is. Caching a server's host key prior to connection can help prevent confusion.
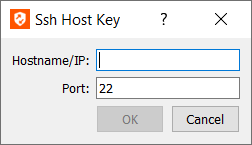
- Enter the Hostname or IP address.
- Enter the Port the device uses.
- The server then returns its host key, which you should verify.
- Click Update to poll the device for its host key; the device lets you know if the host key has changed.
TTL

TTL configuration is available only for stand-alone Jumpoints. Clustered Jumpoints do not have this option.
A date and time can be set to specify when the Jumpoint should become active and when it should automatically uninstall. Setting these delimiters determines the duration of time for which users can access the remote network through this Jumpoint.
- To activate this Jumpoint as soon as its setup is complete, select Always Active.
- Alternatively, select Do Not Activate Until, and then set a date and time upon which this Jumpoint should become active.
- To keep this Jumpoint available without a designated uninstall date, select Do Not Automatically Uninstall.
- Otherwise, select Automatically Uninstall At, and then set a date and time upon which this Jumpoint should uninstall itself.
Jumpoint Setup Completion and Revision
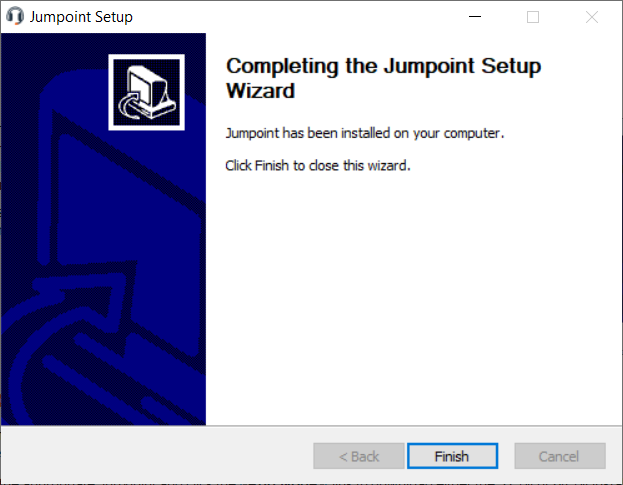
After installing the Jumpoint, you receive a confirmation message. Click Finish.
If you installed a stand-alone Jumpoint, the configuration options can be modified by locating the Bomgar folder in the Windows All Programs or Programs and Features menu, opening the site subfolder, and running BeyondTrust Jumpoint Configuration.
If you installed a clustered Jumpoint, selecting the BeyondTrust Jumpoint Configuration item on the start menu of the Jumpoint host does not result in a configuration window, and only an About box is shown
Clustered Jumpoint Setup: Adding Nodes
The steps for creating a clustered Jumpoint in /login are the same as for one that is stand-alone, with only one difference: once you have created the clustered Jumpoint, you can add nodes to it. At least one node needs to be installed for the Jumpoint to be online.
- From the administrative interface, go to Jump > Jumpoint.
- From the table of existing Jumpoints, find the appropriate Jumpoint and click the Add Node link to download the installer file (bomgar-jpt-{uid}.exe).
- If you are logged into the system you want to use as the Jumpoint host, you can run the installation file immediately.
- Otherwise, save the file and then transfer it to and deploy it onto the system that will serve as the Jumpoint host.

- Follow the prompts and install the node. Note that there are no configuration screens of any kind.
- In the Jumpoint table, the clustered Jumpoint now shows information about each installed node, including public and private IP addresses and online or offline status.
Nodes can be deleted but cannot be individually edited. In the representative console, none of the nodes are visible; only the clustered Jumpoint under which they are installed is visible. Nodes function as redundant connection points. When a user needs to use the Jumpoint, one of the nodes is selected randomly. At least one node must be online for the Jumpoint to work.