Configure Remote Support for the ServiceNow Integration
You must purchase this integration separately for both your Remote Support software and your ServiceNow solution. For more information, contact BeyondTrust's Sales team.
All of the steps in this section take place in the BeyondTrust /login administrative interface. Access your Remote Support interface by going to the hostname of your B Series Appliance followed by /login (e.g., https://support.example.com/login).
Verify the API is Enabled
The Remote Support integration requires the Remote Support XML API to be enabled. This feature is used from within the integrating software to communicate with the Remote Support APIs.
Go to /login > Management > API Configuration and verify that Enable XML API is checked.
Create a ServiceNow OAuth API Account
The ServiceNow API account is used from within ServiceNow to make Remote Support Command API calls.
- Go to /login > Management > API Configuration.
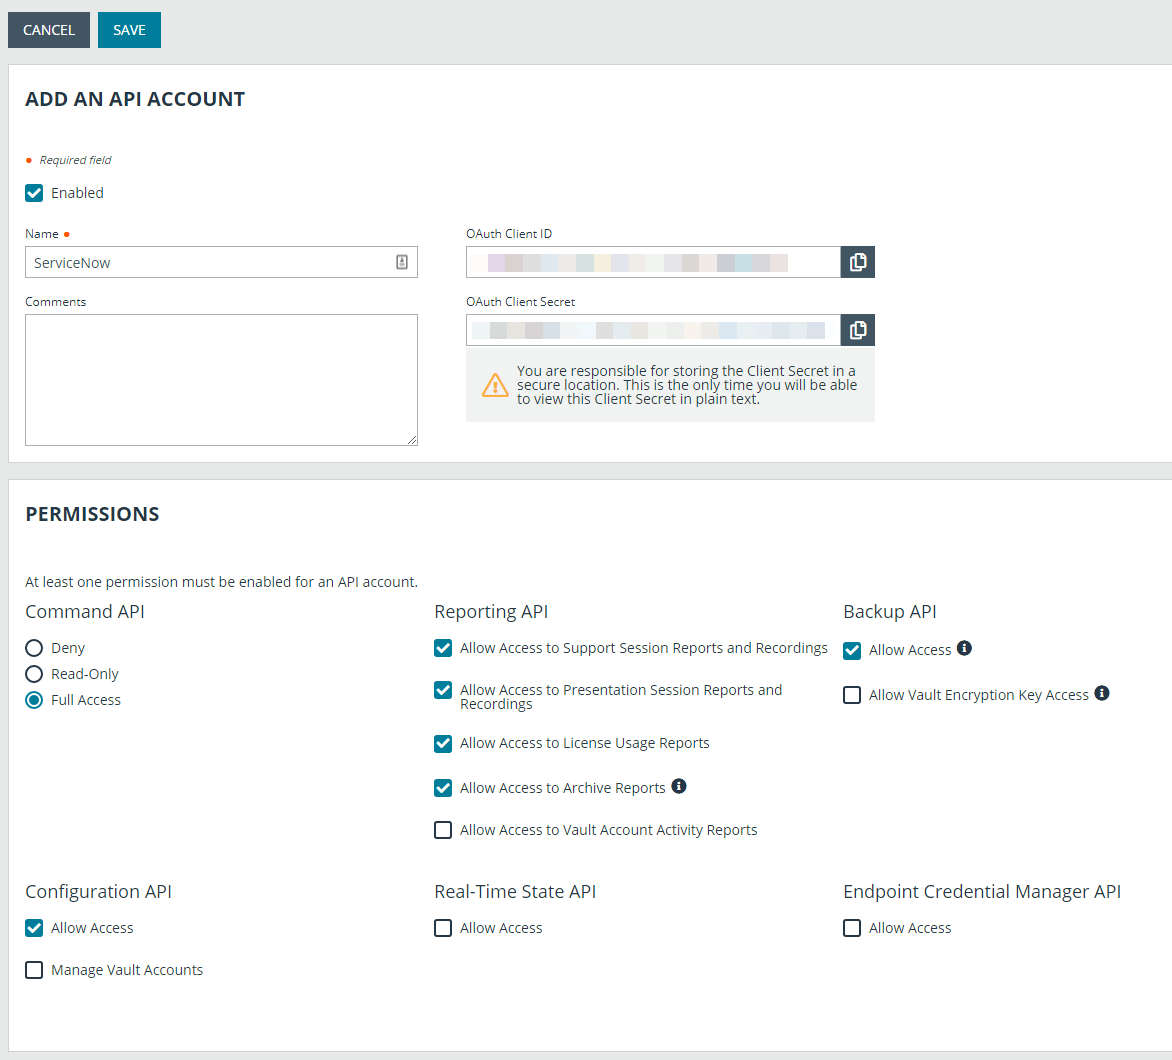
- Click Add to create a new API account. Name it ServiceNow or something similar.
- Set Command API to Full Access.
- Under Reporting API, check all options.
- The OAuth Client ID and OAuth Client Secret are used during the OAuth configuration step in ServiceNow. Make note of these and store them in a secure location.
- Click Save.
Set Up Session Send
There are two ways to send sessions from Remote Support to ServiceNow: as Outbound events in Remote Support, or as scheduled jobs in ServiceNow. Outbound events sends sessions as they end. Scheduled jobs pull sessions at specified intervals. The preferred option depends on your workflow preferences and session volumes. You can use only one method, but you can change methods by reconfiguring session sending.
Add Outbound Events for Session Import
Outbound events are used to notify ServiceNow that a Remote Support session has finished and is ready to be imported into ServiceNow.
- Go to /login > Management > Outbound Events.
- Click Add and name the new HTTP recipient ServiceNow Integration or something similar, depending on your ServiceNow instance.
- Enter the URL https://example.service-now.com/api/x_bmgr_support_ent/outbound_event/session_end, where example.service-now.com is the ServiceNow instance name.
- If using an outbound event token for added security, append outbound_event_token=YOUR-TOKEN to the end of the URL, so that the entire URL resembles https://support.example.com/api/x_bmgr_support_ent/outbound_event/session_end?outbound_event_token=YOUR-TOKEN. You must also store this token with the appliance configuration record in ServiceNow.
- Scroll to Events to Send and check the following events:
- Support Session End
- Customer Exit Survey is Completed
- Representative Survey is Completed
- At the top of the page, click Save.
Set up Schedule Job for Session Import
Rather than using outbound events to notify ServiceNow that a Remote Support session is ready to be imported, you can use a mechanism in ServiceNow known as a scheduled job. Using a scheduled job, you can poll the Remote Support Reporting API for the latest sessions on any schedule you prefer. Scheduled jobs are configured in ServiceNow.
For information on how to set up a scheduled job, please see Set up Scheduled Job for Session Import.
Set Up the Custom Link
Remote Support custom links can be configured to allow representatives to quickly access the ServiceNow incident that is associated with the session.
- Browse to Rep Console > Custom Links.
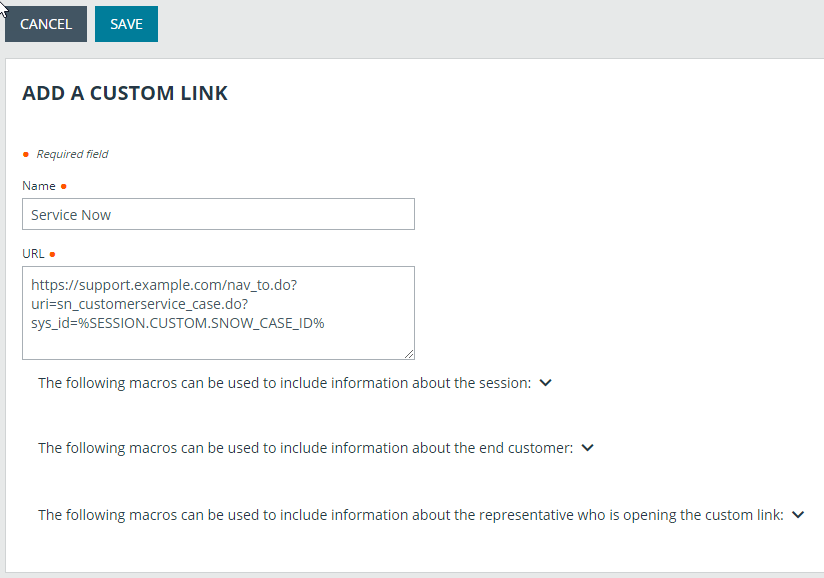
- Click Add to create a new custom link.
- Enter a name for the link, and then set the URL, according to the task view, where support.example.com is the ServiceNow instance name. If needed, you can use any of the available macros to customize the link according to your specifications. The options are:
- Task - Standard View:
https://example.service-now.com/nav_to.do?uri=task.do?sys_id=%SESSION.CUSTOM.SNOW_TASK_ID%
- Task - Agent Workspace View:
https://example.service-now.com/now/workspace/agent/record/task/%SESSION.CUSTOM.SNOW_TASK_ID%
- Interaction - Standard View:
https://example.service-now.com/nav_to.do?uri=interaction.do?sys_id=%SESSION.CUSTOM.SNOW_INTERACTION_ID%
- Interaction - Agent Workspace View:
https://example.service-now.com/now/workspace/agent/record/interaction/%SESSION.CUSTOM.SNOW_INTERACTION_ID%
- Task - Standard View:
If the customer is using an external key to store the task sys_id, then use the macro %SESSION.CUSTOM.EXTERNAL_KEY% instead.
- Click Save to save the new link.
Create Custom Fields
Remote Support custom fields are used to map ServiceNow Tasks (incidents, change requests, problem records, and service catalog requests), call records, and configuration items to Remote Support sessions.
- Browse to Configuration > Custom Fields.
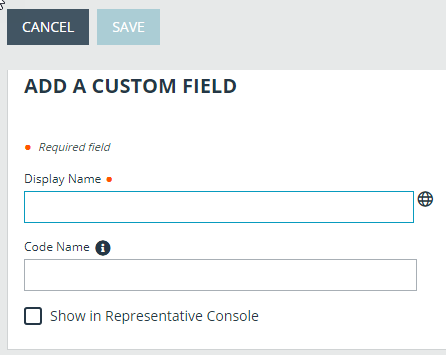
- Click Add to create a new custom field.
- Enter the following values:
- Display Name: ServiceNow Task ID
- Code Name: snow_task_id
- Show in Rep Console: checked
- Click Save to save the new field.
- Repeat these steps for the following custom field values:
- Display Name: ServiceNow Configuration Item ID
- Code Name: snow_cmdb_ci_id
- Show in Rep Console: checked
- Also for the following custom field values:
- Display Name: ServiceNow Call ID
- Code Name: snow_call_id
- Show in Rep Console: checked
- And again for the following custom field values:
- Display Name: ServiceNow Interaction ID
- Code Name: snow_interaction_id
- Show in Rep Console: checked


