Configure ServiceNow for Integration with Remote Support
You must purchase this integration separately for both your Remote Support software and your ServiceNow solution. For more information, contact BeyondTrust's Sales team.
Unless otherwise noted, all of the steps in this section take place in the ServiceNow interface. We recommend that you initially use development or test instances of ServiceNow before installation in the production instance, so that the integration can be thoroughly tested.
Install BeyondTrust Integration
The Integration must be purchased directly from BeyondTrust. After the purchase, it is installed via the ServiceNow Store. There is no mechanism to purchase the integration at the ServiceNow Store. Follow the steps below to request and install the integration.
- Log in to your ServiceNow platform with your corporate account. Please contact your company Now Support (HI) admin if you do not have credentials.

- Search for BeyondTrust Remote Support Enterprise Integration, or go to the app's page.
- Click Request App.
- Request Remote Support with ITSM.
- Within a business day, BeyondTrust approves the request with a $0 purchase price, and sends a copy of these installation instructions to the requester.
- Once you receive the confirmation, return to the app's page in the ServiceNow store.
- Click Complete Purchase.
- Review the contract details.
- If you agree, check Accept the Site Terms of Use.
- Click Complete Purchase.
- The app is ready for installation on your ServiceNow instance(s).
- Repeat the steps below for each instance.
- Login to the ServiceNow instance on which you want to install the app.
- Navigate to System Applications > All Available Applications > All.
- Search for the app you want to install.
- Click Install.
Create Local Update Set
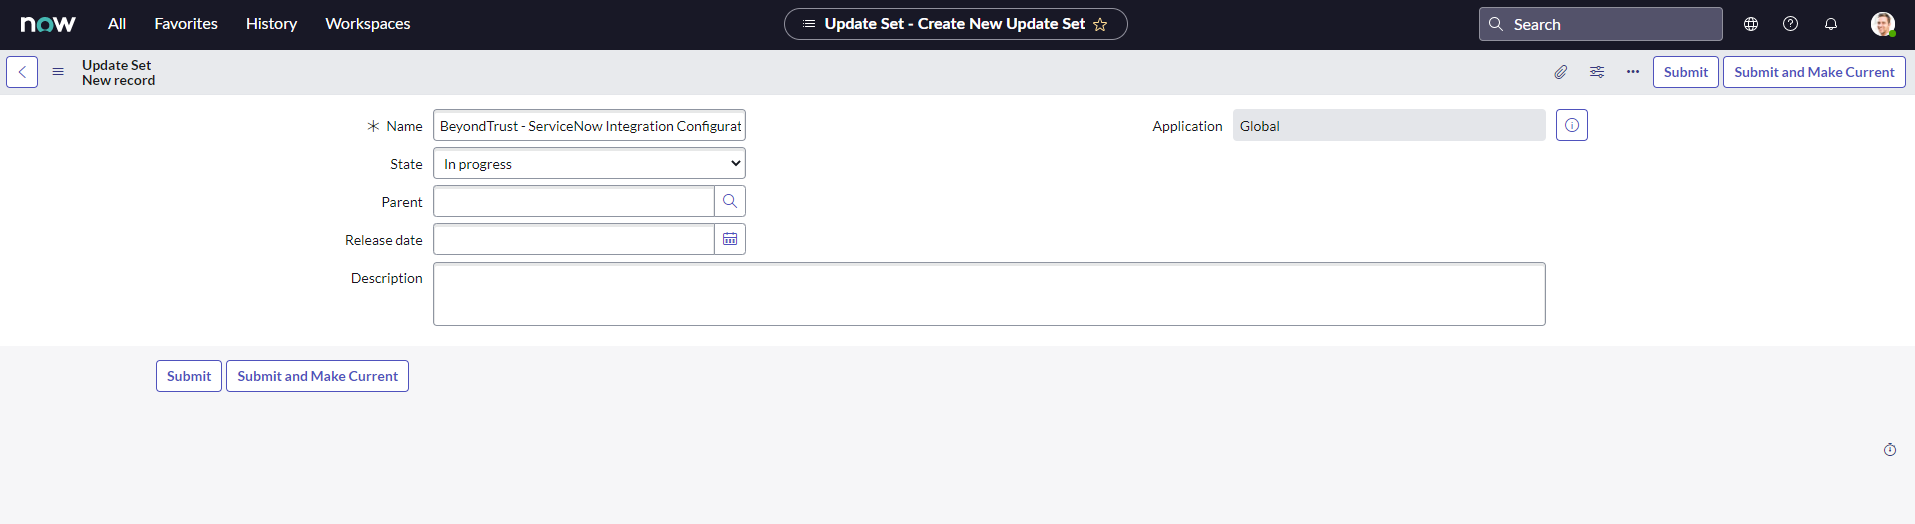
Local update sets are used in ServiceNow to capture configuration changes. They can be used to quickly transfer these configuration changes to other environments.
- Browse to System Update Sets > Local Update Sets and click the New button above the list of update sets to create a new local update set.
- In the Name field, enter BeyondTrust - ServiceNow Integration Configuration (or an equivalent).
- Click Submit and Make Current. This update set captures any changes you make during the configuration process. Just make sure that the BeyondTrust - ServiceNow Integration Configuration update set is selected in ServiceNow's update set dropdown for the following steps.
- Make sure the Application is set to BeyondTrust Remote Support Enterprise Integration. If it is not, use the settings cog in the upper right of the screen to switch to the aforementioned scope.
- After configuration is complete and tested, the local update set can be imported or promoted to new instances of ServiceNow (e.g., the production instance) to quickly replicate the integration. This must be done after transferring the BeyondTrust - ServiceNow retrieved update set.
For more information, please see Transfer the BeyondTrust-ServiceNow Integration Update Sets.
Update BeyondTrust Session Event Types

Event types are used to control which Remote Support events are processed with a Remote Support session import. This step updates the database with all the available event types.
- Browse to BeyondTrust Remote Support > Update Event Types.
- This loads all the available Remote Support session event types into the database, so that unwanted events can be filtered out in a subsequent step when setting up your appliance configuration record.
Clicking the link again does not duplicate records and shows that zero event types were inserted.
Set Up ServiceNow Integration with Remote Support
To set up a ServiceNow integration with Remote Support, follow these instructions:
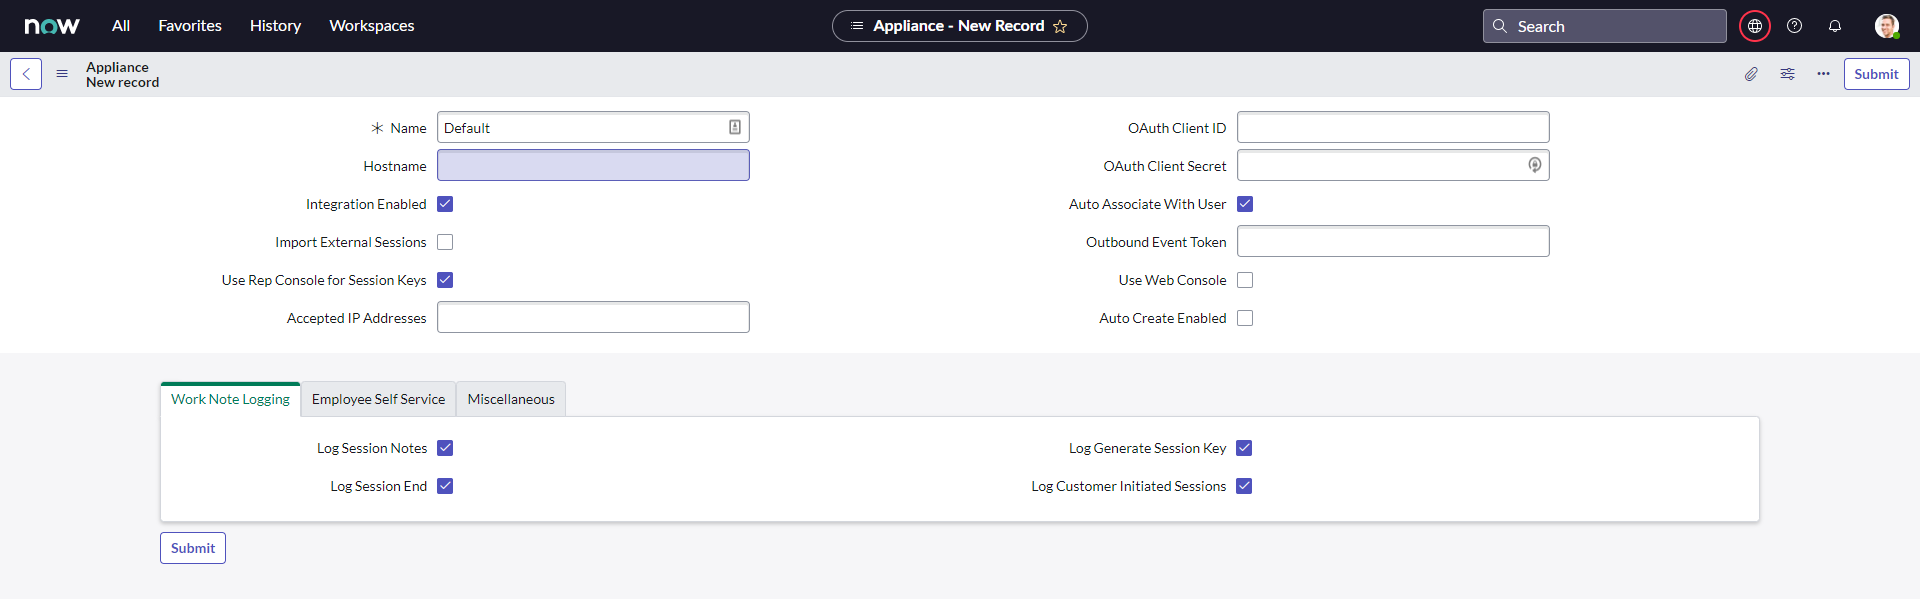
- Browse to BeyondTrustRemote Support > Appliances.
- Click New to add a new Remote Support appliance record and enter the following values:
- Name: Must be Default.
- Hostname: Hostname of the Remote Support deployment.
- OAuth Client ID: The OAuth client ID that is used to authenticate to the Remote Support deployment. This is obtained in a previous step, Create a ServiceNow OAuth API Account.
- OAuth Client Secret: The OAuth client secret that is used to authenticate to the Remote Support deployment. This is obtained in a previous step, Create a ServiceNow OAuth API Account.
- Integration Enabled: Turns the integration on and off.
- Import External Sessions: If checked, session reports for sessions that are started external to ServiceNow are imported into ServiceNow.
- Outbound Event Token: The token that is used as an added security measure to confirm outbound events are coming from the Remote Support deployment that is sending the same token. If left blank, this outbound event token process is ignored. If a value is provided, however, the same value must be sent from all outbound events coming from BeyondTrust as a parameter named outbound_event_token.
- Accepted IP Addresses: A comma-separated list of IP addresses from which this integration accepts outbound events.
- Auto Associate With User: If checked, when the session report is imported, the integration attempts to associate a ServiceNow user with the session. The lookup is based on the session's primary representative username.
- Use Rep Console for Session Keys: By default, session keys are provided by the Remote Support representative console through the use of BeyondTrust Representative Console Script (BRCS) files. If Use Web Console is checked, session keys are provided by the Remote Support web rep console.
- Work Note Logging
- Log Session Notes: If checked, session notes are logged to the task's work notes field.
- Log Session End: If checked, a session end notice is logged to the task's work notes field.
- Log Generate Session Key: If checked, a work note is logged each time a technician generates a session key.
- Log Customer Initiated Sessions: If checked, a work note is logged each time a user starts a session with a technician from the employee self-service module.
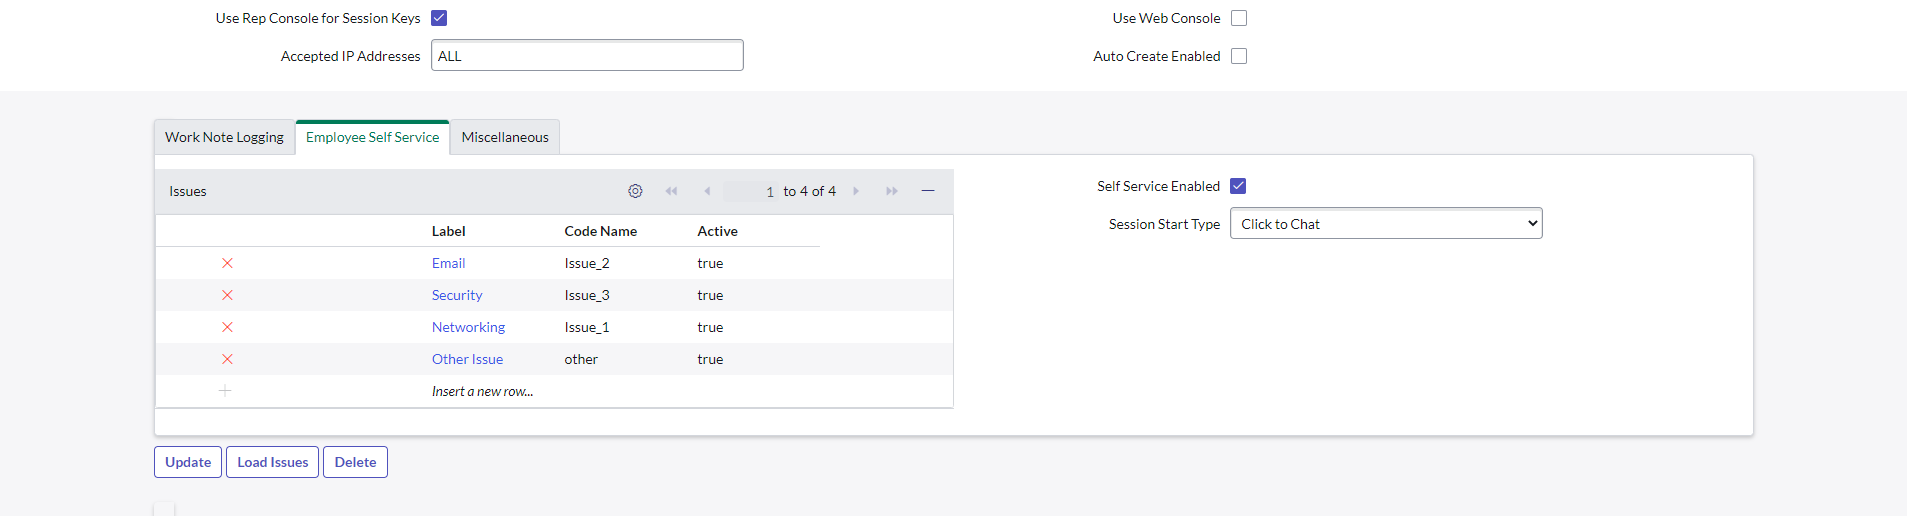
- Employee Self Service
- Issues: A list of issues, each of which must match a Remote Support issue by code name, that is presented to customers in the employee self-service module.
In a subsequent step, you have the option to load issues from the Remote Support deployment with the click of a button.
- Self Service Enabled: If checked, a Get Support Now button is displayed on the incident form that customers in the employee see in the self-service module.
- Session Start Type: Determines how to start a Remote Support session, either by click-to-chat or a full session, for customers requesting support in the employee self-service module.
- Miscellaneous
- Events to Import: A list of BeyondTrust session events to process when importing a BeyondTrust session.
- Issues: A list of issues, each of which must match a Remote Support issue by code name, that is presented to customers in the employee self-service module.
You cannot configure this setting until after the appliance configuration record has been saved.
Configure Events to Import


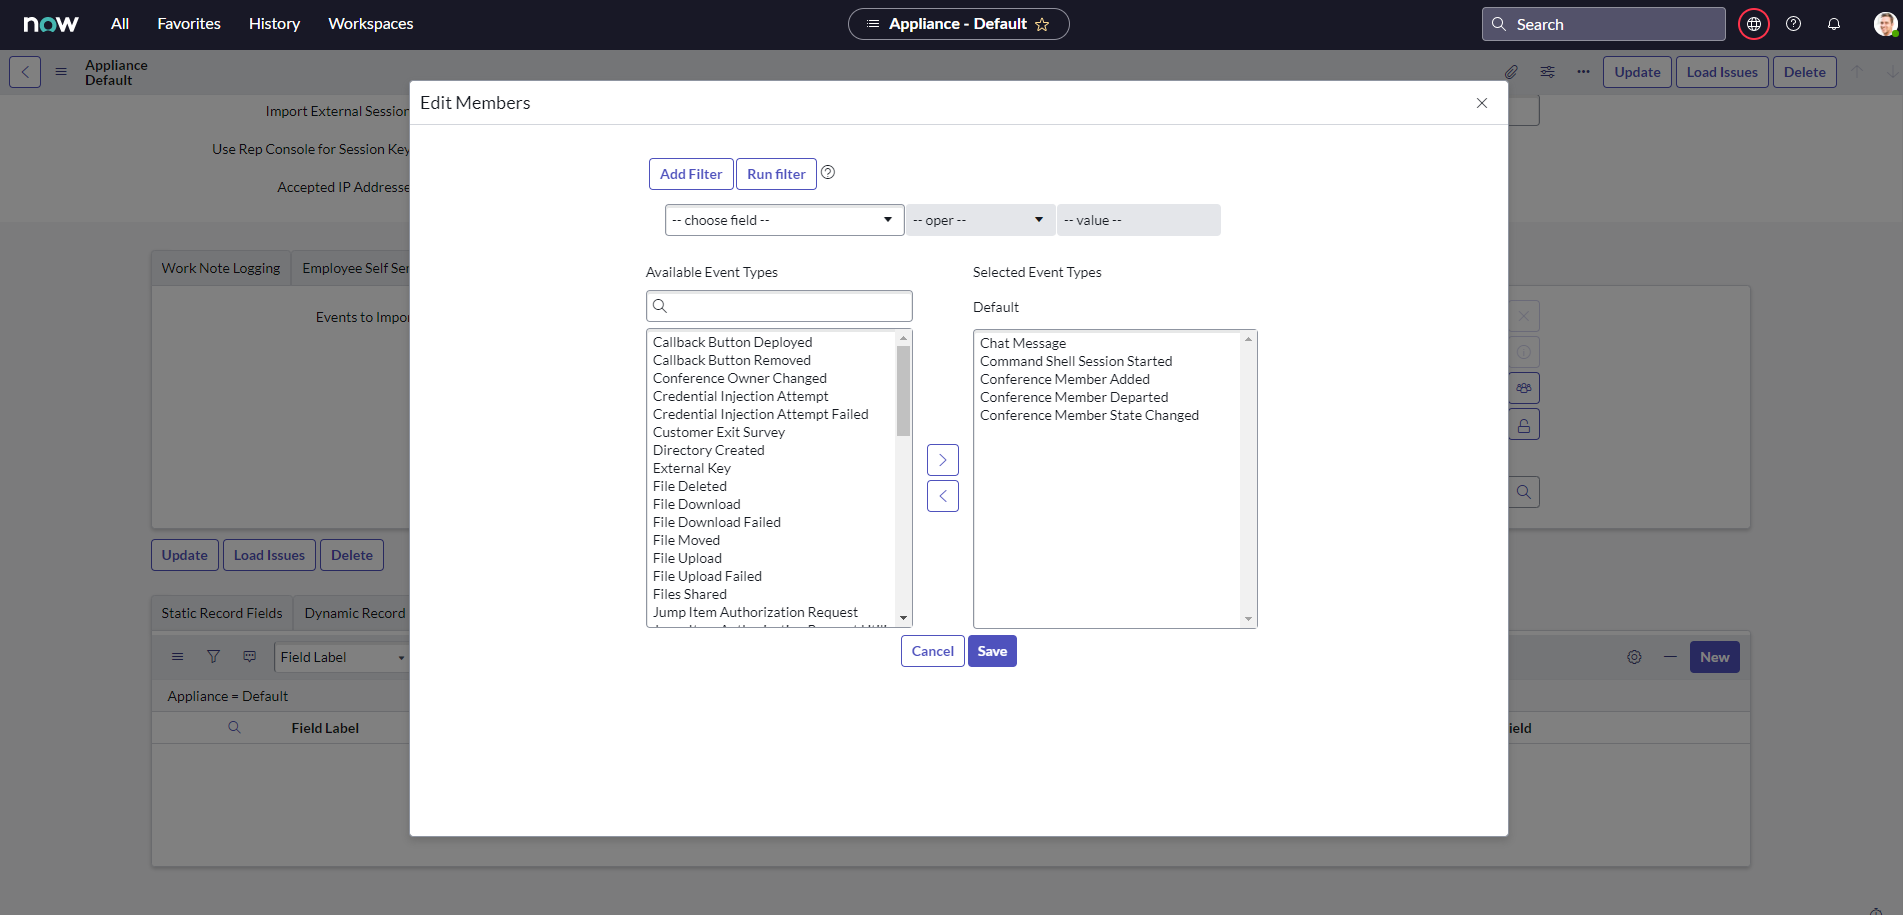
Event types are used to control which Remote Support events are processed with a Remote Support session import. This step defines which events are processed for each Remote Support session import.
- Browse to BeyondTrust Remote Support > Appliances.
- Click the name of your appliance configuration record in ServiceNow.
- Click the Miscellaneous tab.
- Click the Edit Events to Import button (the lock icon).
- Click the Add/Remove multiple button (the group of people icon) located on the right side of the field.
- Select the events you want from the Collection field on the left and use the arrows to move the events to the List field on the right.
You can use CTRL+A to select all events.
- Click the Save button when you are finished.
Configure Self-Service Issues
Issues are used to allow customers to select what type of issue they have when requesting a session with a Remote Support representative. These issues are mapped to Remote Support issues (configured in /login) and can be used to route Remote Support sessions.
- Browse to BeyondTrust Remote Support > Appliances.
- Click the name of your appliance configuration record.
- Click Load Issues in the Appliance title bar to auto-load the issues you want from the Remote Support deployment. You are alerted with a summary of how many issues were added and/or updated.
- Optionally, you can manually add Issues to the list by clicking the Employee Self Service tab, then double-clicking Insert a new row… at the bottom of the list. Double-click each column to set the value. Changes are immediately saved when you press Enter or click outside of the field.
Configure Journal Entry Table
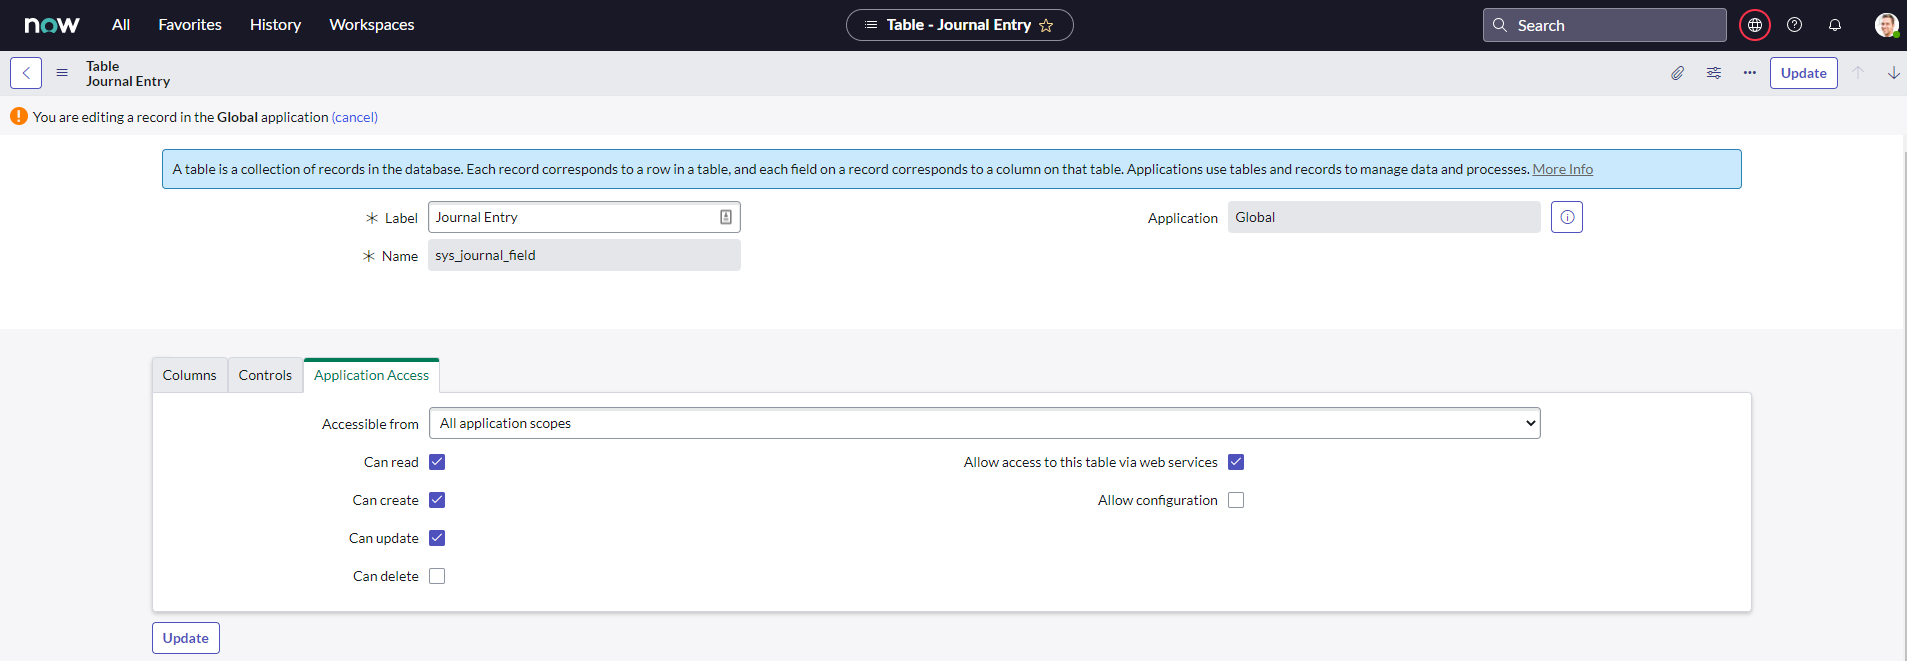
The Journal Entry table (sys_journal_field), which is used to log chat dialogue and session notes, must be set to allow other scopes to insert records.
- Browse to System Definition > Tables.
- Search by Label for Journal Entry.
- Click the link titled Journal Entry.
If prompted to edit the record in Global scope, do so.
- Click the Application Access tab.
- Ensure that the Accessible From field is set to All application scopes.
- Ensure that Can Create and Can Update are checked.
- Click the Update button.
Configure Remote Support Session Related Lists
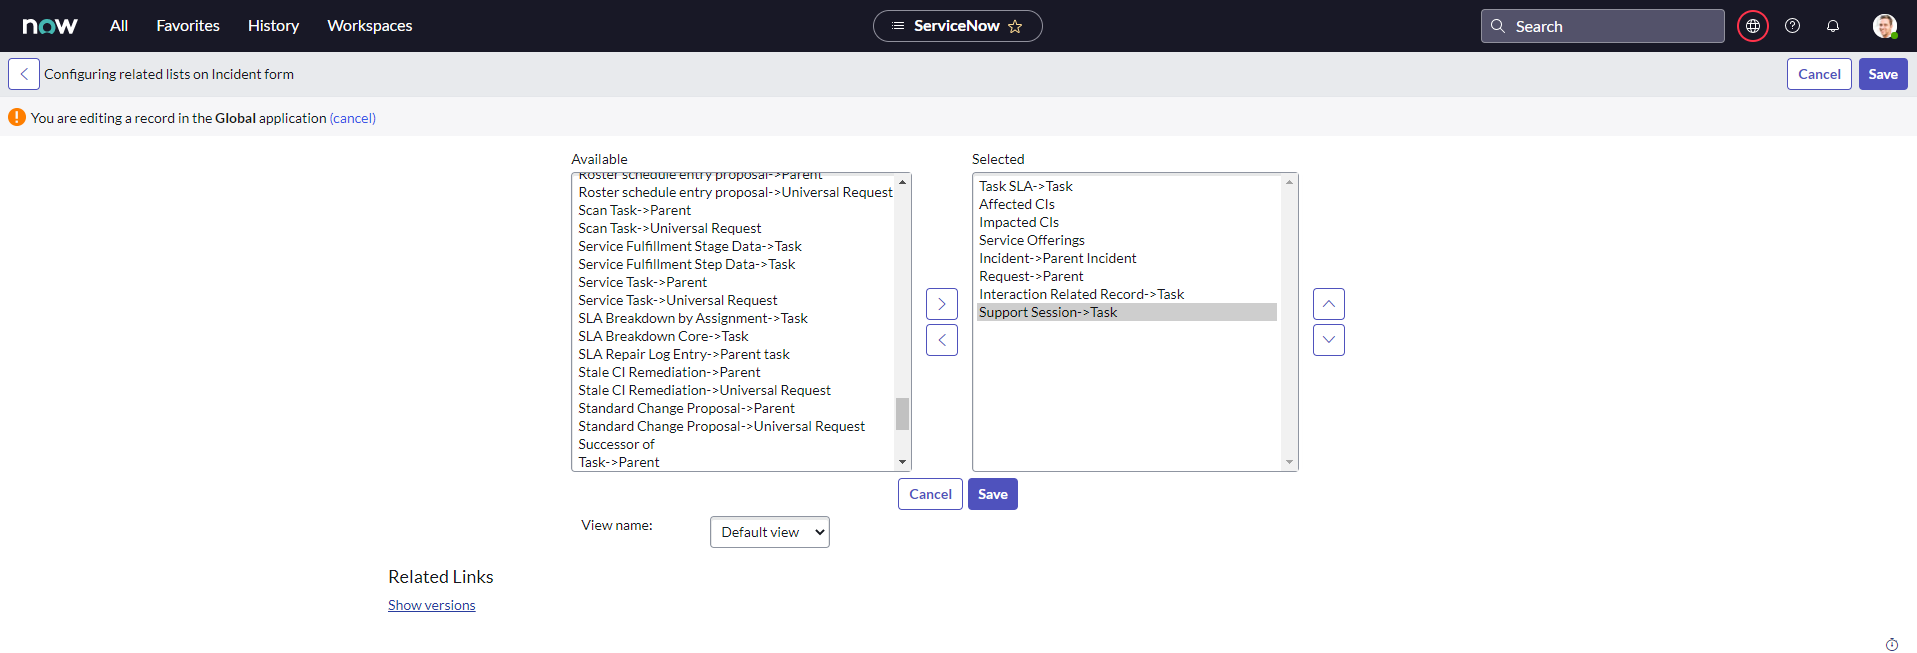
Related lists are used to provide a list of Remote Support sessions that are associated with a task (incident, problem record, change request, or service catalog request), call record, configuration Item, or interaction.
Task Configuration
- Browse to Incident.
- Click Open to see a list of open incidents.
- Select an incident by clicking the Incident Number.
- Right-click the Incident title bar and select Configure > Related Lists.
- Ensure that Support Session > Task has been moved to the Selected column.
- Click the Save button.
- The Remote Support Sessions list appears towards the bottom of the incident form once these steps are complete.
CMDB Configuration
- Browse to Configuration > Servers.
- Click All to see a list of servers.
- Select a server by clicking the Name of a server.
- Right-click the Incident title bar and select Configure > Related Lists.
- Ensure that Support Session > Configuration Item has been moved to the Selected column.
- Click the Save button.
- The Remote Support Sessions list appears towards the bottom of the configuration item form once these steps are complete.
Call Configuration
- Browse to Service Desk.
- Click My Open Calls to see a list of calls.
- Select a call by clicking the Number of a call.
- Right-click the Incident title bar and select Configure > Related Lists.
- Ensure that Support Session > Call has been moved to the Selected column.
- Click the Save button.
- The Remote Support Sessions list appears towards the bottom of the call form once these steps are complete.
Interaction Configuration
- Browse to Interaction.
- Click Open to see a list of open interactions.
- Select an incident by clicking the Interaction Number.
- Right-click the Interaction title bar and select Configure > Related Lists.
- Ensure that Support Session > Interaction has moved to the Selected column.
- Click the Save button.
- The Remote Support Sessions list appears towards the bottom of the interaction form once these steps are complete.
If using the Agent Workspace, the following views should also be configured to display the list of related Remote Support sessions.
Task Configuration — Agent Workspace
- In Agent Workspace, browse to the Open Incidents list.
- Select an incident by clicking the Incident Number.
- Click the User Menu (context menu displayed when clicking the user icon in the upper-right corner) and select Configure Page > Related Lists.
- Ensure that Support Session > Task has moved to the Selected column.
- Click the Save button.
- When you refresh the Agent Workspace view, the Support Sessions list is available alongside the other related items.
- Repeat steps 1-6 for the other task types in use (problem change request, service catalog request).
Interaction Configuration — Agent Workspace
- In Agent Workspace, browse to the Interactions list.
- Select an Interaction by clicking the Interaction Number.
- Click the User Menu (context menu displayed when clicking the user icon in the upper-right corner) and select Configure Page > Related Lists.
- Ensure that Support Session > Interaction has moved to the Selected column.
- Click the Save button.
- When you refresh the Agent Workspace view, the Support Sessions list is available alongside the other related items.
CMDB Configuration — Agent Workspace
- In Agent Workspace, browse to a CMDB list.
- Select an item by clicking the Name.
- Click the User Menu (context menu displayed when clicking the user icon in the upper-right corner) and select Configure Page > Related Lists.
- Ensure that Support Session > Configuration Item has been moved to the Selected column.
- Click the Save button.
- When you refresh the Agent Workspace view, the Support Sessions list is available alongside the other related items.
- Repeat steps 1-6 for other types in use.
CMDB Support Session — Agent Workspace
- Navigate to https://support.example.com/nav_to.do?uri=%2Fslushbucket.do%3Fsysparm_referring_url%3Dx_bmgr_support_ent_support_session.do%26sysparm_view%3Dworkspace%26sysparm_list%3Dx_bmgr_support_ent_support_session%26sysparm_form%3Drelated_list, where support.example.com is the ServiceNow instance name.
- Ensure the following related lists are selected: Rep, Customer, Custom Attribute, Recording, Customer Exit Survey, Rep Exit Survey, Event, and Team. These should already be selected by default, but add any that might be missing.
- Even if no changes are necessary, click Save.
- Support Sessions now show all the related items within Agent Workspace.
Configure Incident Caller Jump Macros
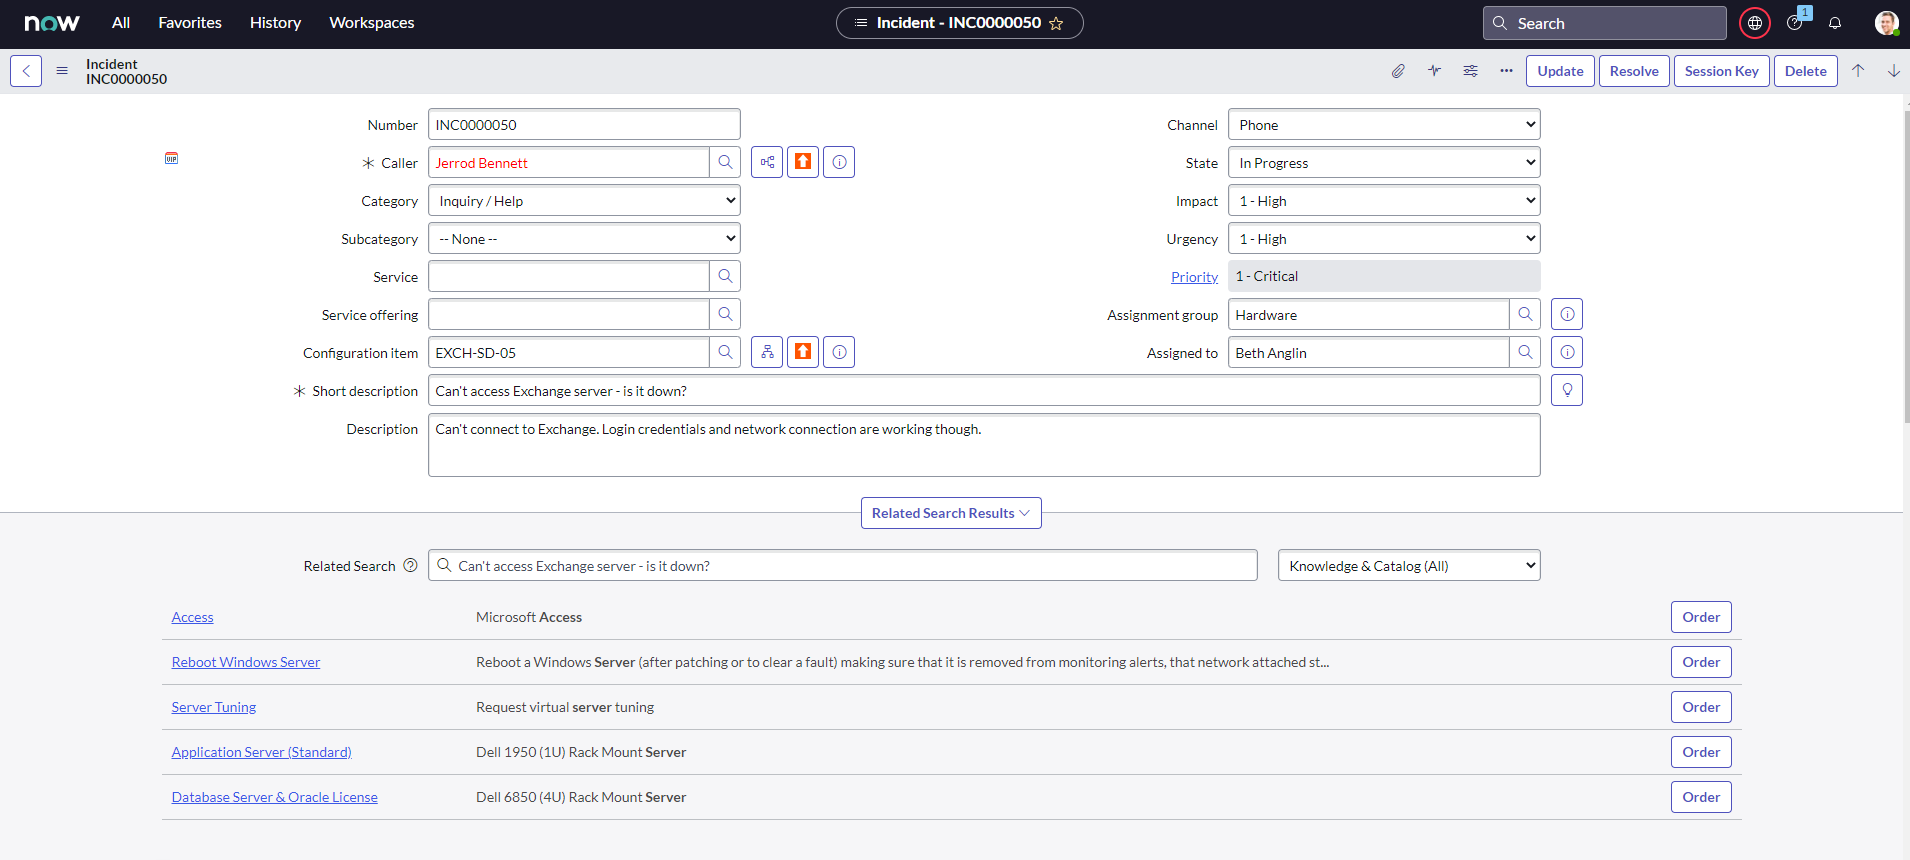
Remote Support Jump technology can be used for unattended access to devices.
- Browse to Incident and click Open to see a list of open incidents.
- Select an incident by clicking the Incident Number. Populate the Caller field by clicking the Magnifying Glass icon, and then selecting an item from the list.
- Once the Caller field is populated, click the Update button on the incident title bar. This returns you to the incident list. Again, click the name of the incident you just updated.
- Right click the Caller Label and click Configure Dictionary.
- Locate the Attributes field and take note of the part of the value that reads ref_contributions=task_show_ci_map.
- Add any of the values listed below as a semicolon-separated item in ref_contributions. For example, ref_contributions=x_bmgr_support_ent_bomgar_user_jump;task_show_ci;show_related_records.
- Click Update to save your changes.
Configure Task CMDB Jump Macros
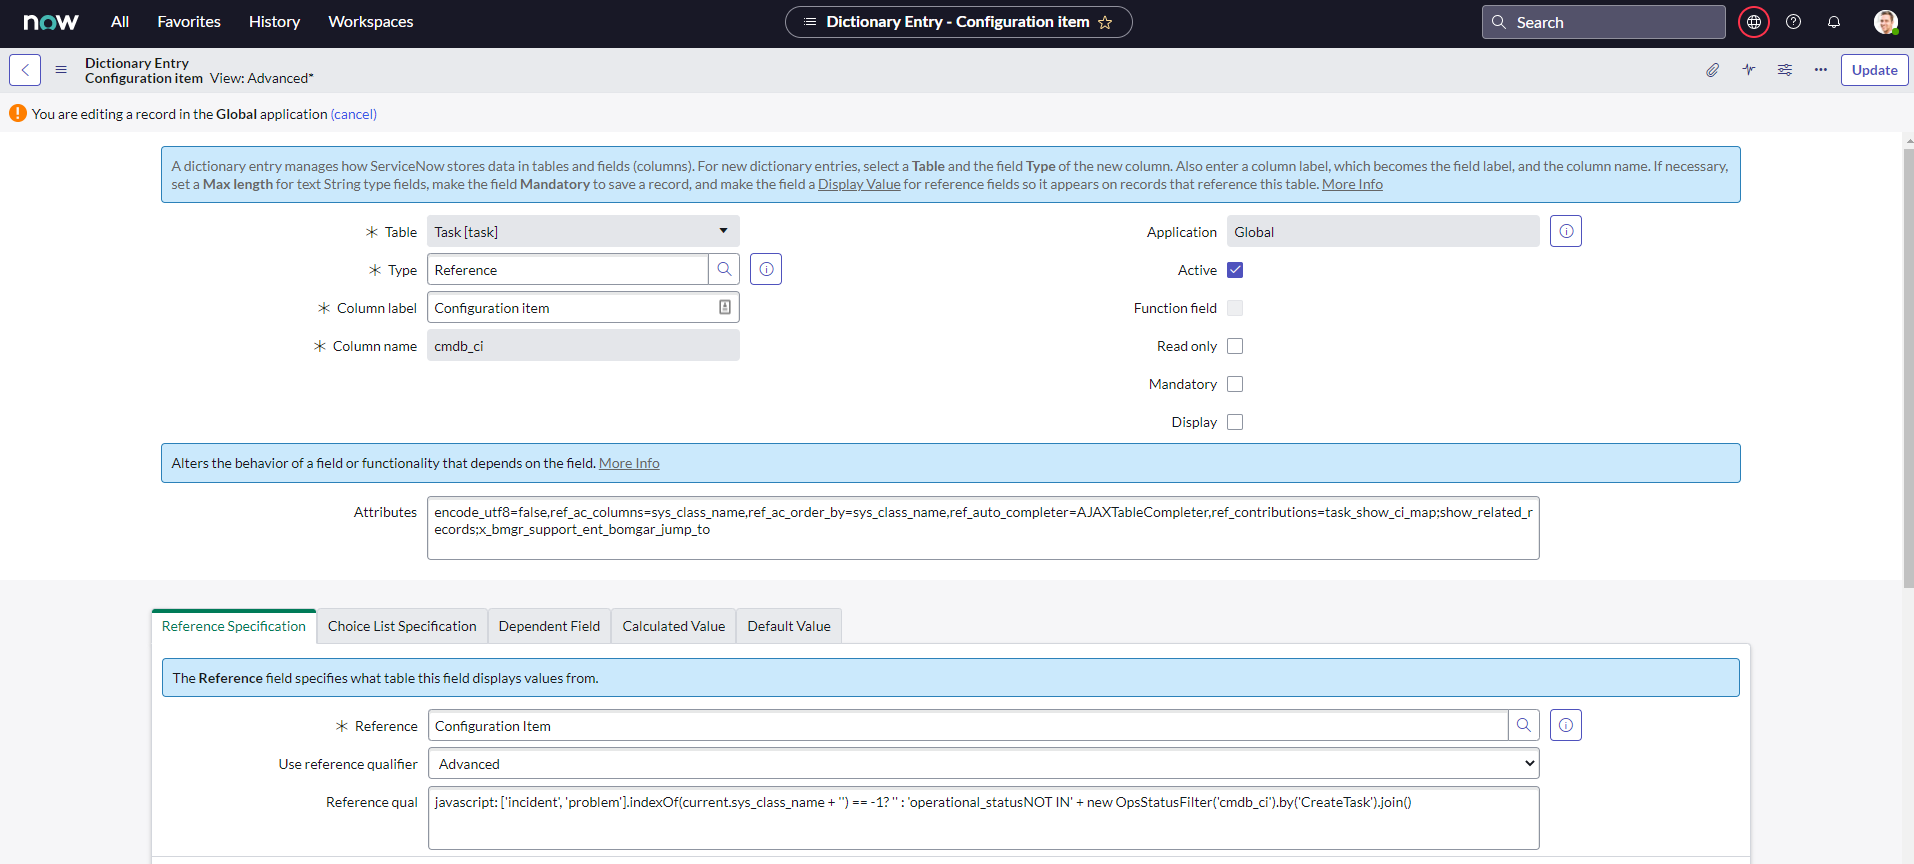
Remote Support Jump technology can be used for unattended access to devices.
- Browse to Task and click Open to see a list of open incidents.
- Select a task by clicking the Task Number. Populate the Configuration Item field by clicking the Magnifying Glass icon, and then selecting an item in the list.
- Once the Configuration Item is populated, click Update on the task title bar. This returns you to the task list. Again, click the name of the task you just updated.
- Right click the Configuration Item Label and select Configure Dictionary.
- Locate the Attributes field and take note of the part of the value that reads ref_contributions=task_show_ci_map;show_related_records.
- Add any of the values listed below as a semicolon-separated item in ref_contributions. For example, ref_contributions=x_bmgr_support_ent_bomgar_jump_to;task_show_ci;show_related_records.
- Click Update to save your changes.
If the macro icon does not display next to the Configuration Item field when the field is populated with a value, you must verify whether there is a Dictionary Override by following the steps below.
- Right-click the Configuration Item Label and click Configure Dictionary.
- Locate the Dictionary Overrides related list. Determine if there is an entry in this list for the type of task you are working with (e.g. change_request), and click the item if it exists.
- If the Override attributes field is checked, then the attributes are being overridden and you must add the macro to the Attributes field.
- Locate the Attributes field and take note of the part of the value that reads ref_contributions=task_show_ci_map;show_related_records.
- Add any of the values listed above as a semicolon-separated item in ref_contributions.
Set up Scheduled Job for Session Import
If you have set up the integration using Add Outbound Events for Session Import, do not set up a scheduled job.
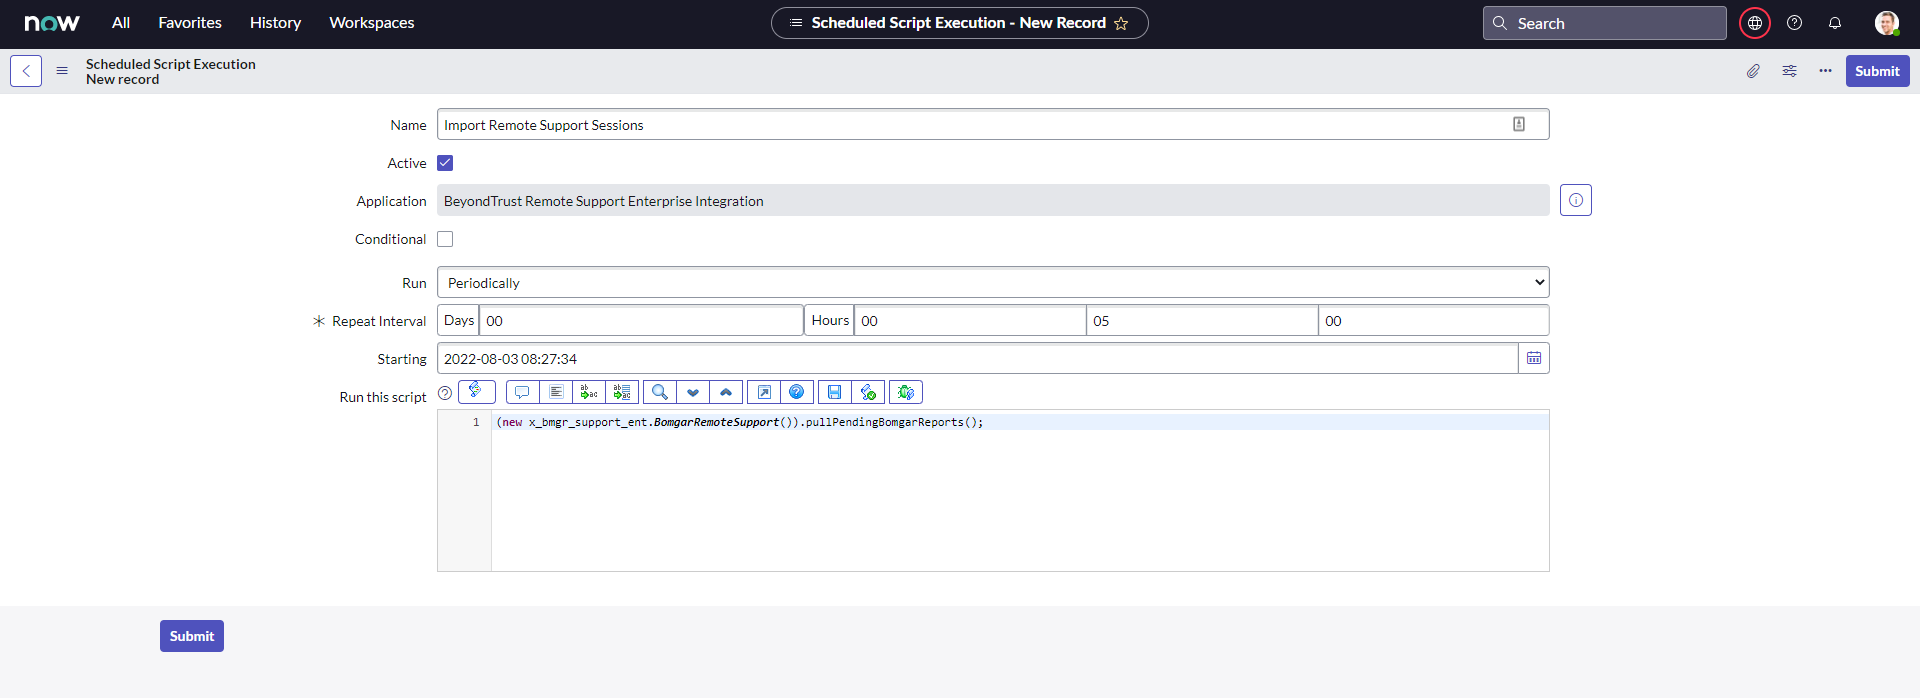
- Browse to System Definition > Scheduled Jobs and click New at the top of the list.
- Click the link titled Automatically run a script of your choosing.
- Provide the following values:
- Name: Import Remote Support Sessions
- Run: Periodically
- Repeat Interval: 05 (representing 5 minutes)
- Run this script: (new x_bmgr_support_ent.BomgarRemoteSupport()).pullPendingBomgarReports();
- Click Submit to save the job.
Activate the Pull Sessions Module Option
As a way to test the retrieval of Remote Support sessions and as a means to manually pull Remote Support sessions, we have a module which is inactive by default, but which can easily be activated and used.
- To activate the module, browse to System Definition > Modules.
- Search for text with the value Pull Support Sessions.
- Click the record titled Pull Support Sessions.
- Find the check box labeled Active, check the box, and click Update.
The Pull Support Sessions link is now visible beneath the BeyondTrust Remote Support Integration menu. Clicking this link pulls only sessions that have occurred after the latest session imported into ServiceNow. If no sessions have been imported into ServiceNow, sessions which occurred over the past 24 hours are retrieved.
Configure Incident States
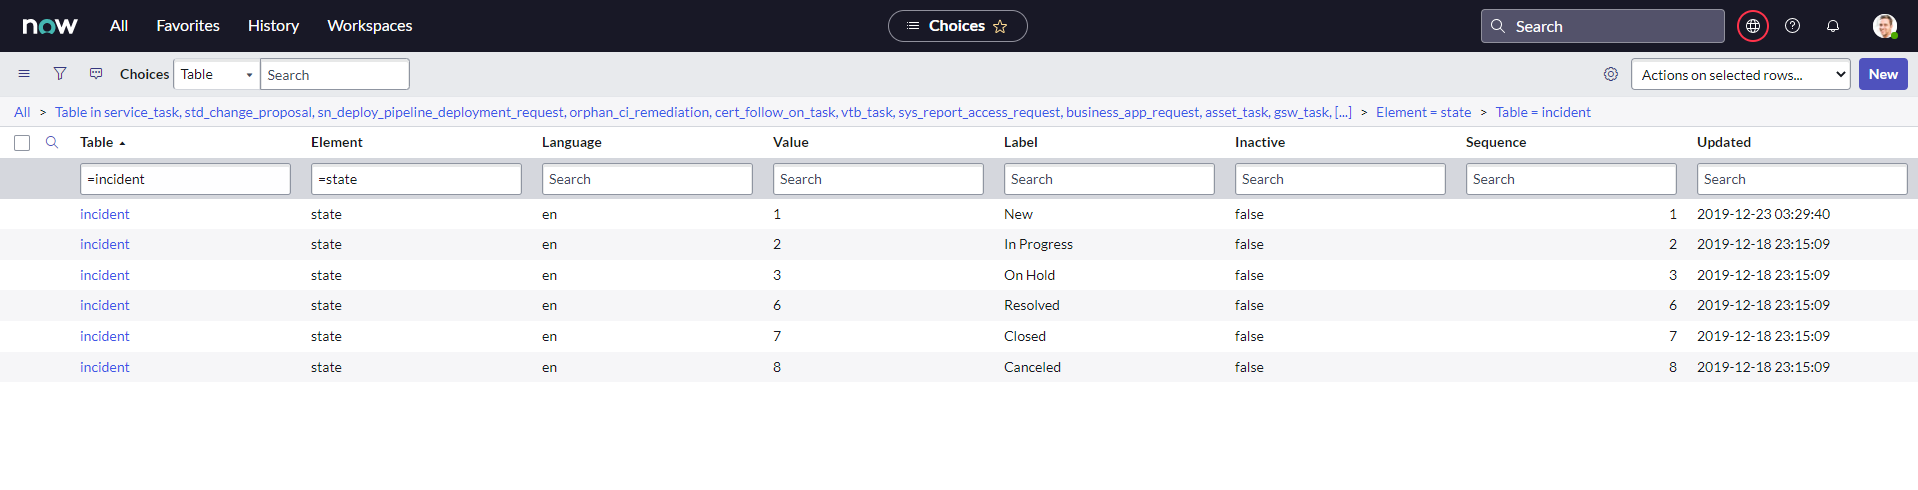
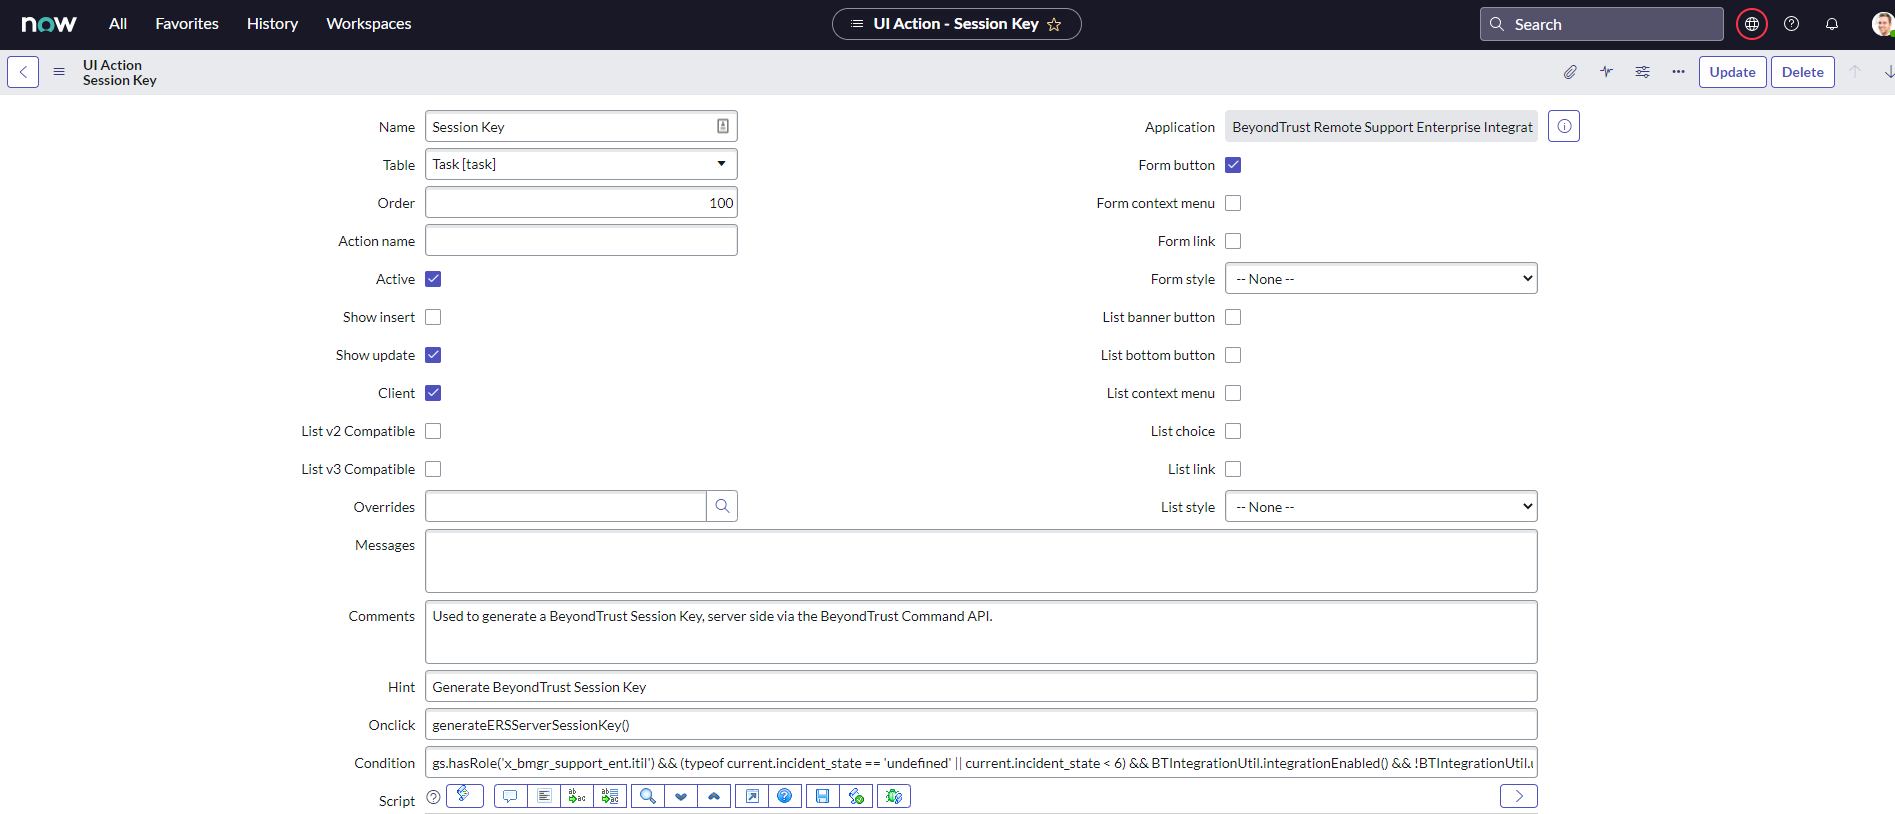
Incident states are used in the Remote Support integration, specifically UI actions (like Generate Session Key) to control when the button shows up on incident forms.
- Browse to Incident.
- Click Open to see a list of open incidents.
- Select an incident by clicking the Incident Number.
- Right-click the label State and select Show Choice List.
- Filter the list by Table=incident. Take note of the different incident choices, specifically the value of incidents with a label of Resolved or Closed and any custom incident states for which BeyondTrust Session Key should not appear.
- Return to the incident and right-click the Session Key button located in the Incident title bar.
- Select Configure > UI Actions.
- In the UI Actions list, click BeyondTrust Session Key.
- Focus the Condition field and ensure current.incident_state is configured to include the IDs of the incident states for which the Session Key button should not appear.
- If the Resolved and Closed fields you took note of earlier have values of 6 and 7, then the Condition field mentioned above should include the code current.incident_state < 6 so as not to show a Remote Support Session Key button on resolved or open incidents. If there are custom incidents (e.g., Complete), then the condition field may require logic such as && current.incident_state != 8.
For example, if the button should not appear for incident states 6, 7, and 10, while it should appear for states 1-5, 8, and 9, then the following can be used: gs.hasRole('itil') && current.incident_state != 6 && current.incident_state != 7 && current.incident_state != 10.
Configure Remote Support Username and Authentication
- Log in to your BeyondTrust /login interface with the same credentials as a ServiceNow user who is expected to use BeyondTrust.
- Download and install a BeyondTrust representative console from the /login > My Account tab.
Troubleshoot Login Failure
If the login fails, check the following:
- Make sure that BeyondTrust and ServiceNow are checking credentials against the same LDAP server(s), if appropriate. Check the LDAP server in the BeyondTrust interface under /login > Users & Security > Security Providers.
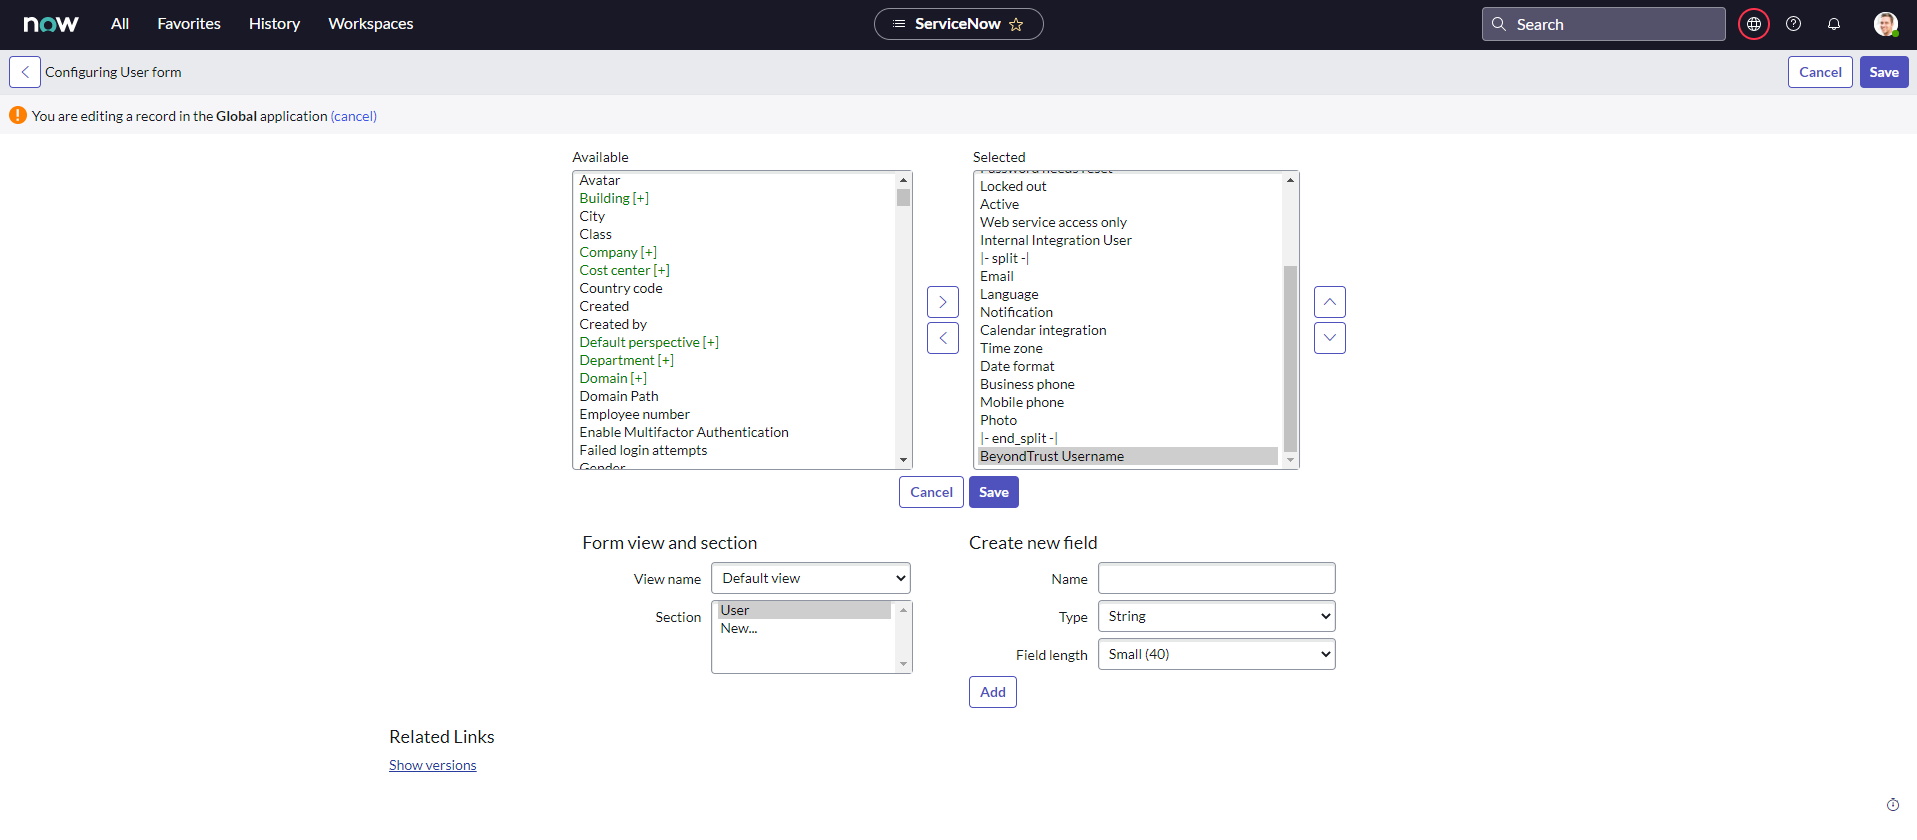
- If LDAP authentication is not being used, log in to ServiceNow. Select User Administration > Users, and then select the user to be used for testing and focus on the BeyondTrust Username field.
- If this field does not exist while viewing a user, hover over the icon next to User on the title bar, and then select Configure > Form Layout and move the BeyondTrust Username field from the Available list to the Selected list. Once done, enter the name of a known-working BeyondTrust user account in this field and save.
For more information on how to check the LDAP server for ServiceNow, please see LDAP Integration.
Configure Email Notifications
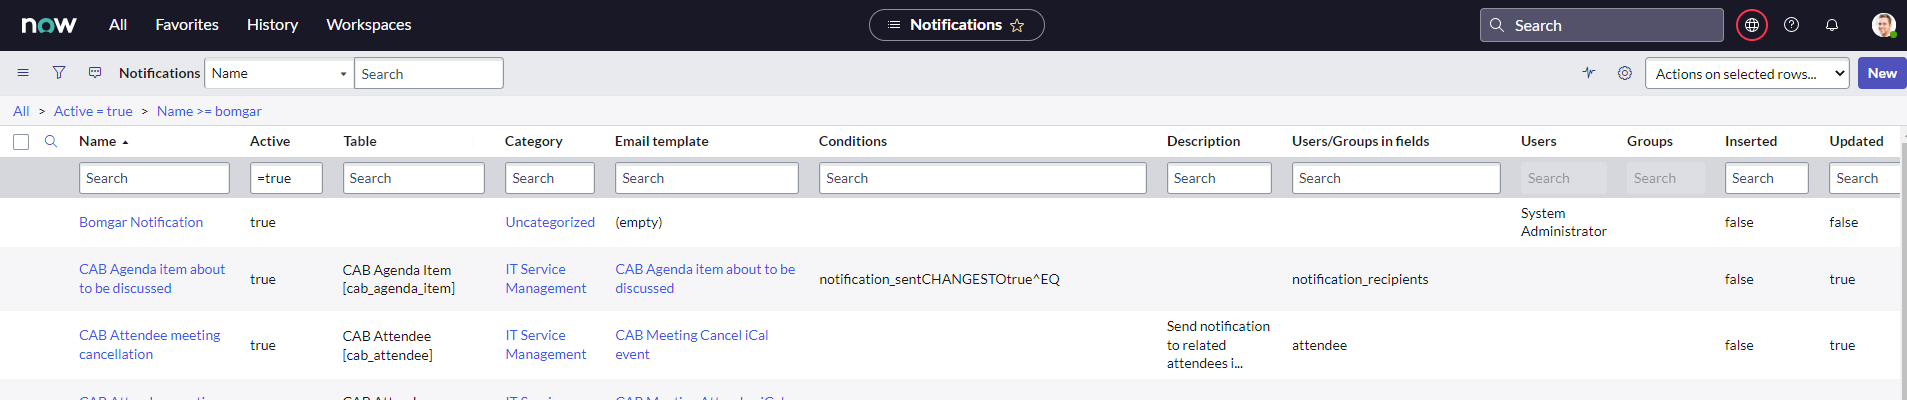
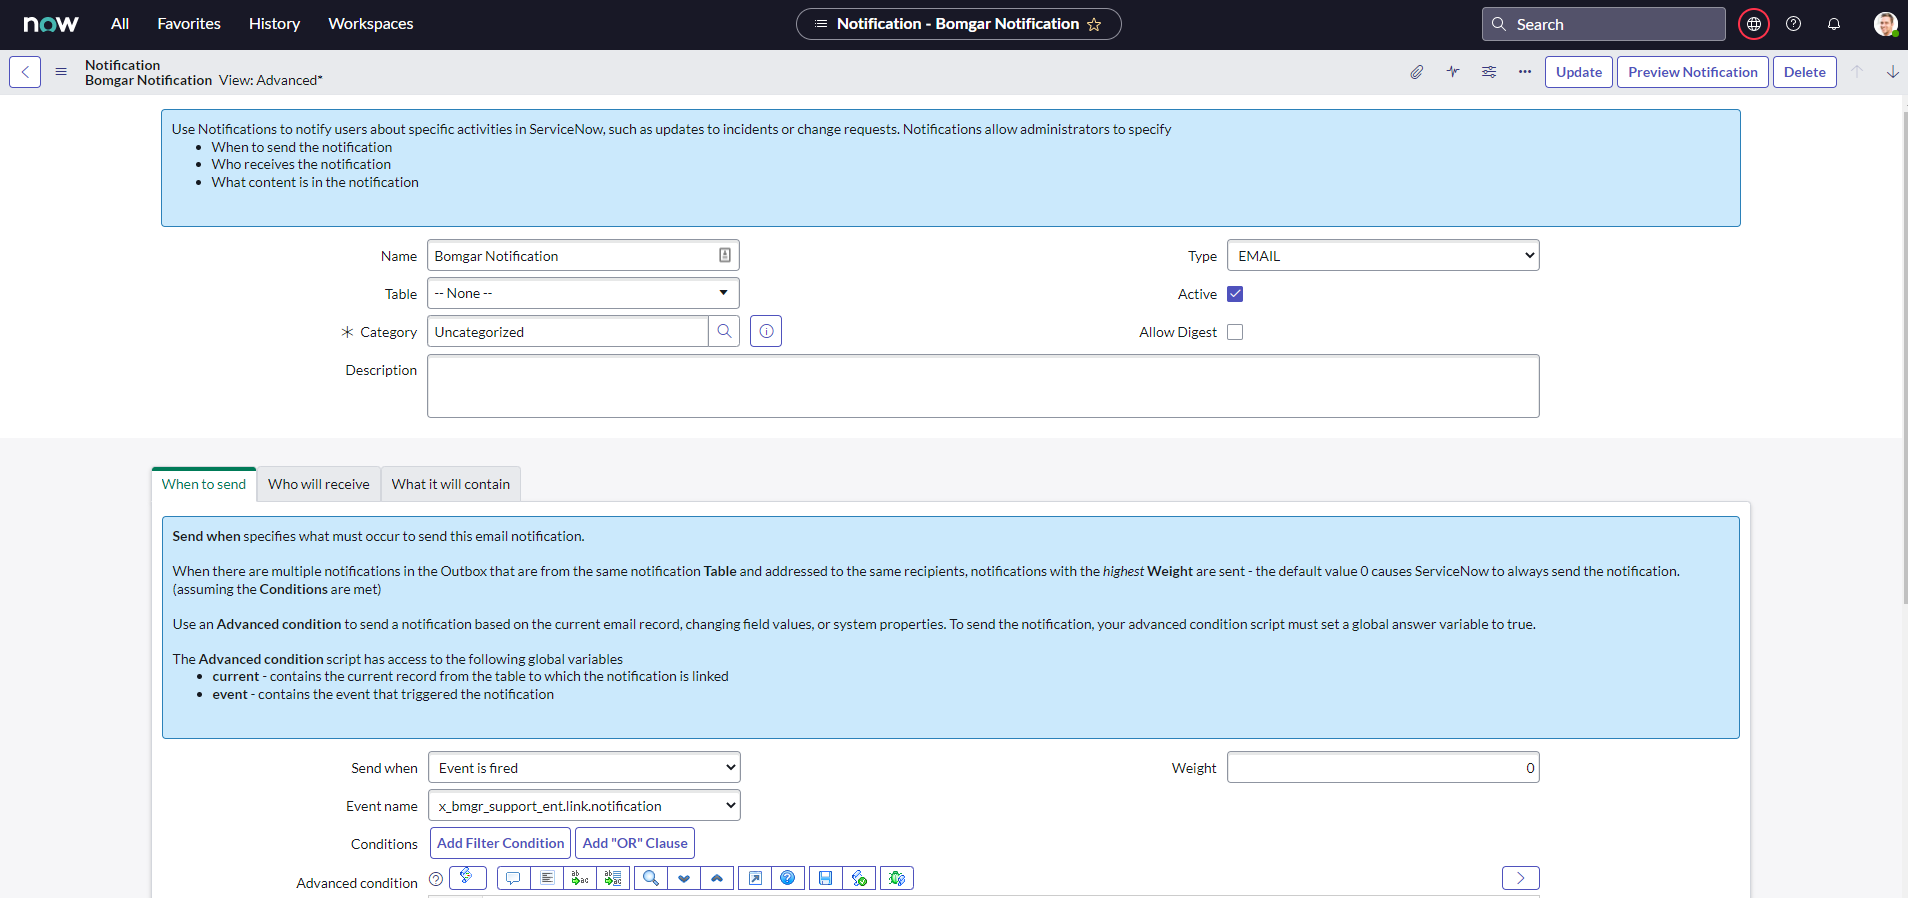
- Browse to System Notification > Email > Notification.
- Filter by Name=Bomgar, and then click Bomgar Notification.
- Verify that:
- When to send > Send When equals Event is fired.
- When to send > Event Name equals x_bmgr_support_ent.link.notification.
- Who will receive > Users/groups in fields equals Caller.
- Table equals Incident [incident].
- Customize the Message text under the section What it will contain. This defaults to the event.parm2 variable. By default, event.parm2 contains only the BeyondTrust session key URL, though this can be changed in the BeyondTrust Integration's Appliance settings.
- Browse to System Properties > Email Properties. Verify that the settings are correct for your network.
Assign Users Appropriate Roles
Give ITIL users who provide technical support using this integration the x_bmgr_support_ent.itil role.
You must elevate the admin's role in order to make the following change.
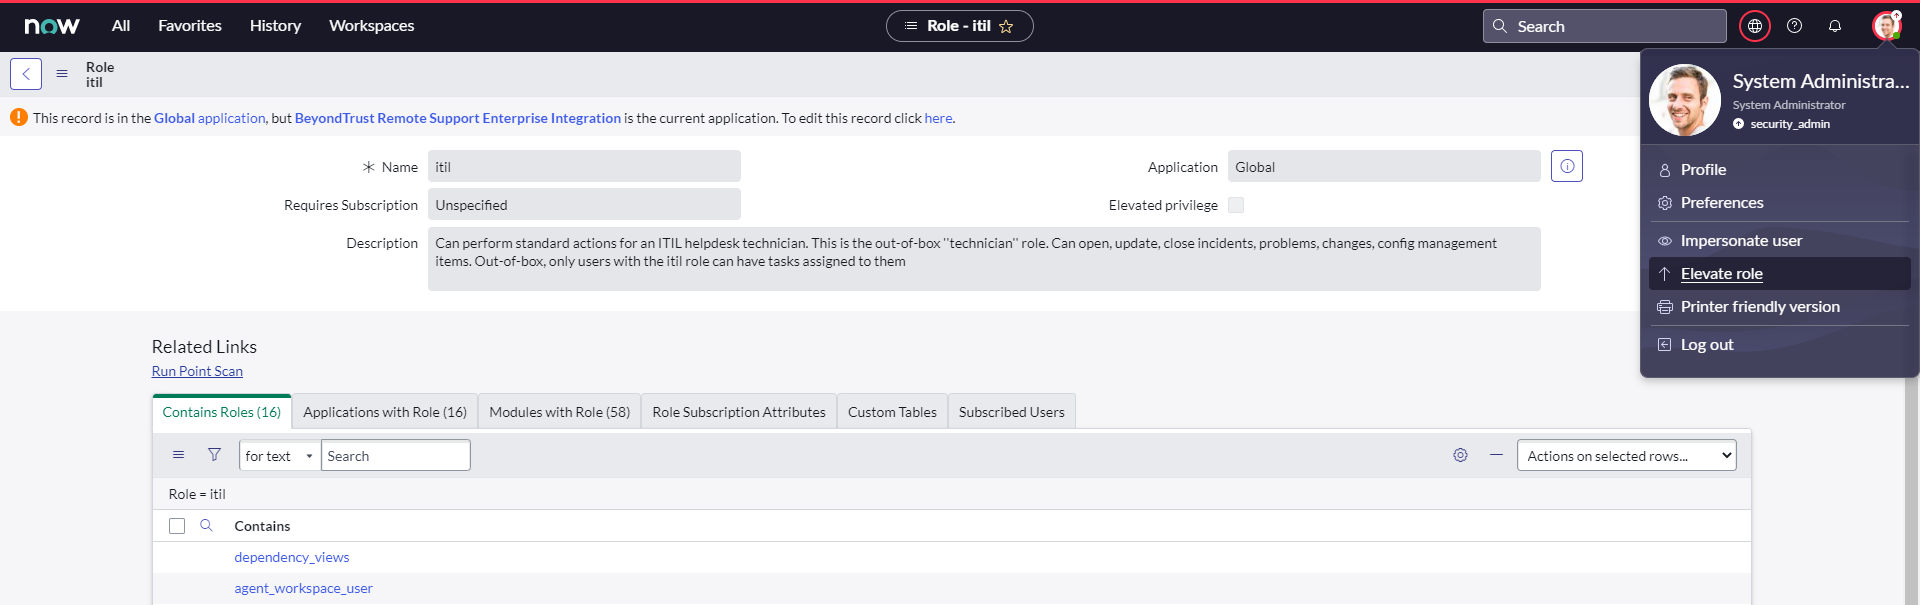
- Browse to User Administration > Users.
- Select a user.
- Find the Roles tab and click the Edit button.
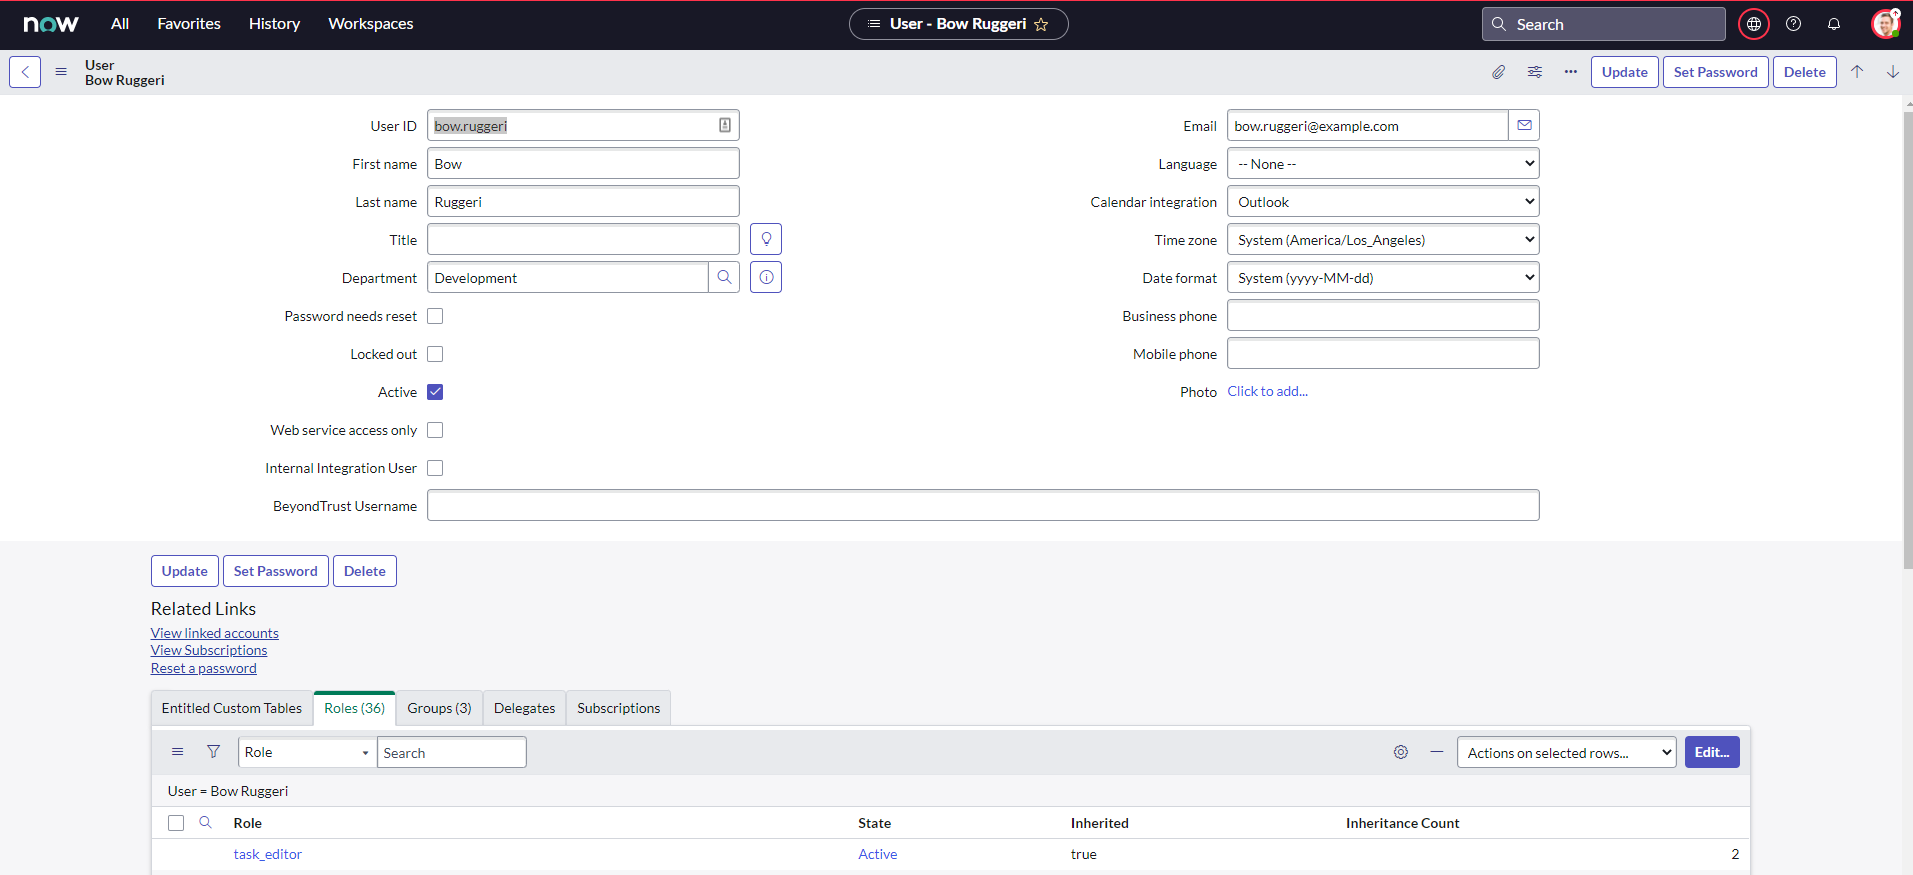
- Add the x_bmgr_support_ent.itil role from the Collection list to the Roles list.
- Click Save.
Use ServiceNow MID Server Option
It is possible to avoid direct connection between ServiceNow and Remote Support by using a MID server for internal Remote Support deployments.
To configure the integration to use a MID server for API requests to a Remote Support site, specify the MID server to use on the individual outbound REST messages:
- In ServiceNow, navigate to System Web Services > Outbound > REST Message.
- Filter to show only messages for the BeyondTrust application being configured.
- Click the Name of one of the messages to edit its properties.
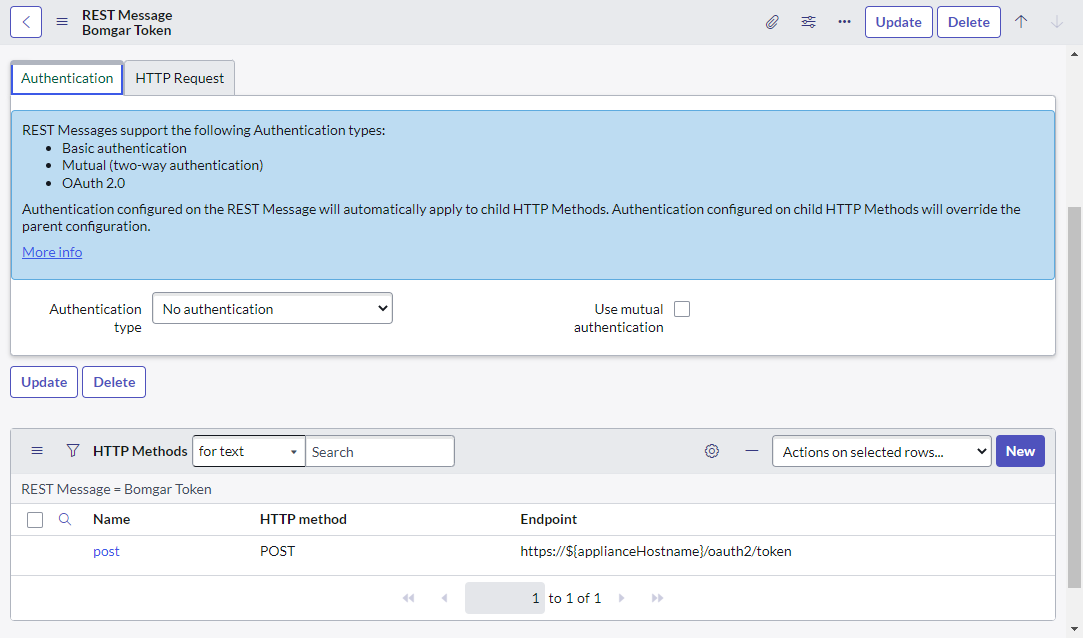
- In the HTTP Methods related list at the bottom, select the Name of the method (typically post).
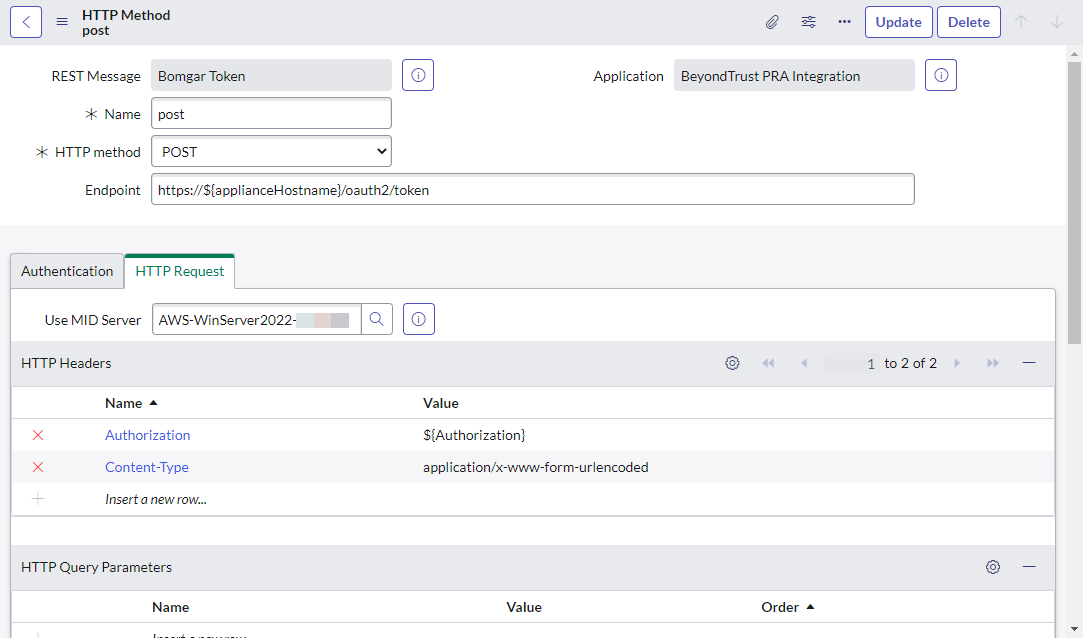
- On the resulting form, select the HTTP Request tab and select your MID server in the Use MID Server field.
- Click Update to save the changes.
Repeat these steps for each outbound REST message that is a part of the application.
For more information on MID servers, please see MID Server.
Use Rep Survey Task Association Option
It is possible to associate Remote Support sessions with ServiceNow incidents by means of a field in the rep exit survey. Several things need to be configured to make this functionality work.
Configure Rep Exit Survey in Remote Support
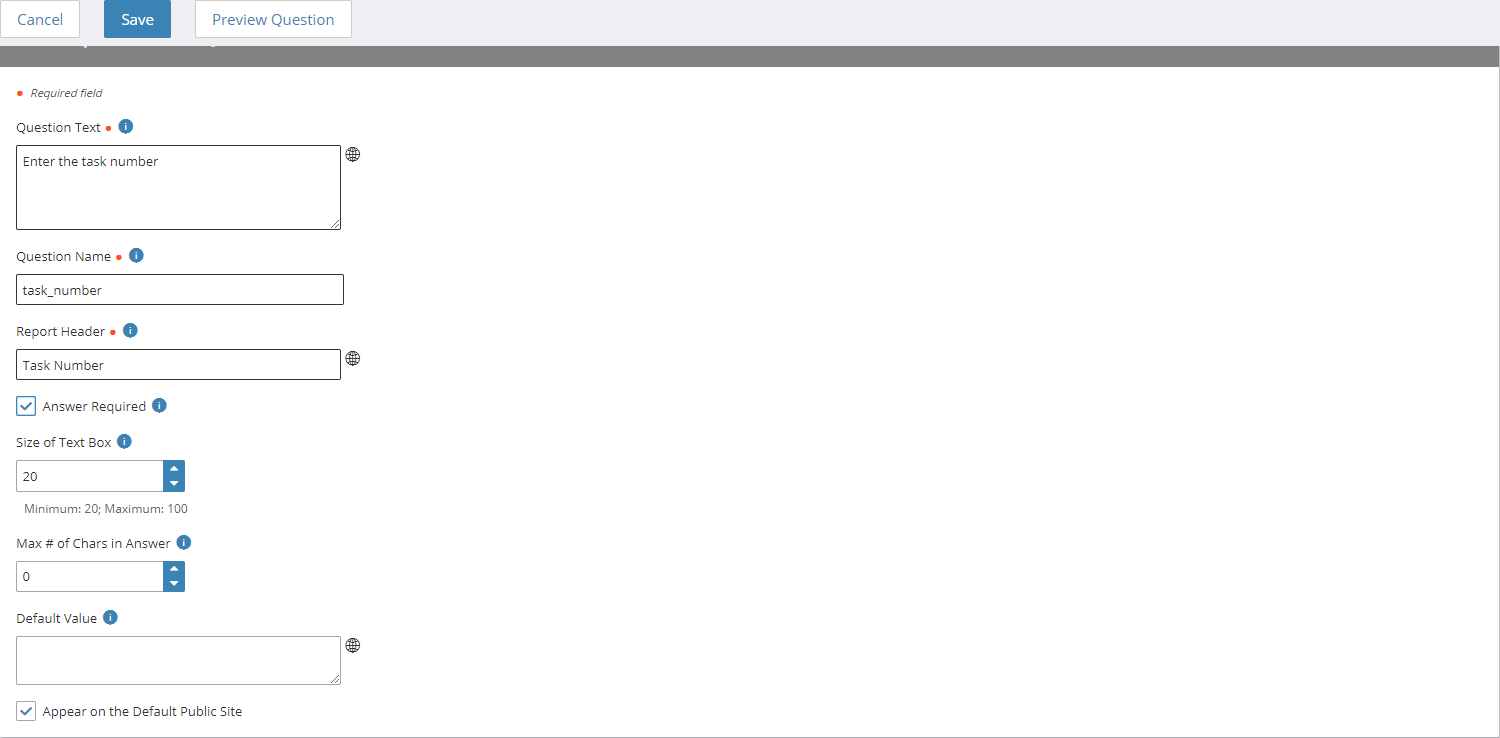
- In Remote Support /login, browse to Public Portals > Exit Surveys.
- Under Representative Survey, click the Add button and select Text Box.
- For Question Text, type Enter the task number. Make sure Question Name has the value of task_number and the Answer Required check box is checked.
Configure Rep Exit Survey Business Rule in ServiceNow
- In ServiceNow, browse to System Definition > Business Rules, search by name for Associate Session via Rep Survey and click the business rule with the same name.
- In the Business Rule record, the Active check box is unchecked by default. Check this box and click Update to save the record.
Once these changes have been made, sessions started outside of ServiceNow are associated with a task record within ServiceNow. The representative pastes the number or sys_id of a task in ServiceNow to that which they want to associate the Remote Support session, at the end of the session.