Start an Access Session through a Jump Client
Once a Jump Client has been installed on a remote computer, permitted users can use the Jump Client to initiate a session with that computer, even if the computer is unattended.
From the Access Console
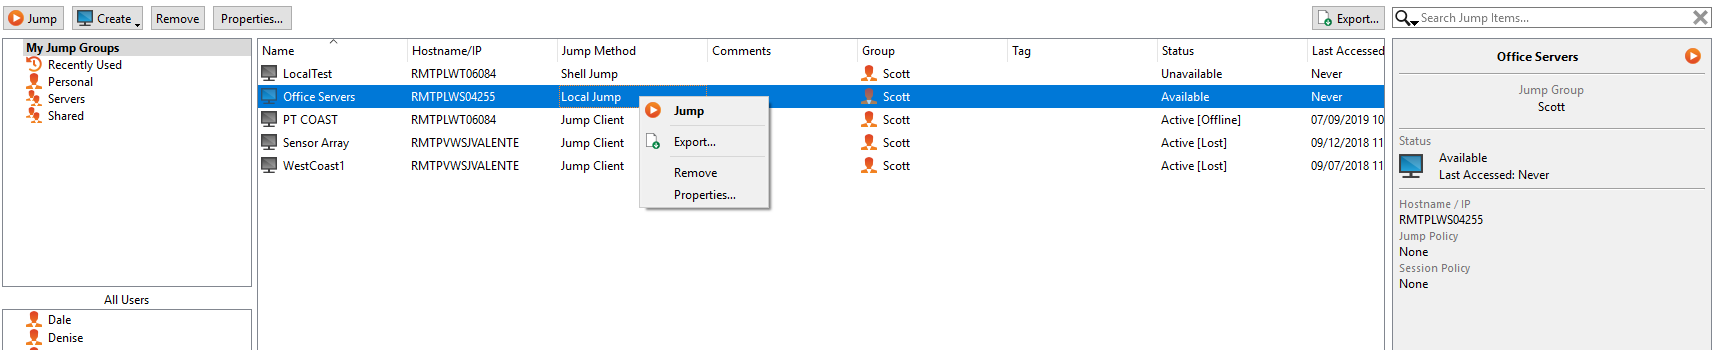
Your Jump Clients are listed in the Jump Interface.
In addition to Jump Clients, you may also see Jump shortcuts for Remote Jumps, Local Jumps, RDP sessions, VNC sessions, and Shell Jumps. Collectively, Jump Clients and Jump shortcuts are referred to as Jump Items. For more information about Jump shortcuts, see the Jumpoint Guide.
Jump Items are listed in Jump Groups. If you are assigned to one or more Jump Groups, you can access the Jump Items in those groups, with the permissions assigned by your admin.
Your personal list of Jump Items is primarily for your individual use, although your team leads, team managers, and users with permission to see all Jump Items may have access to your personal list of Jump Items. Similarly, if you are a team manager or lead with appropriate permissions, you may see team members' personal lists of Jump Items. Additionally, you may have permission to access Jump Items in Jump Groups you do not belong to and personal Jump Items for non-team members.
If a Jump Group contains tagged Jump Items, an arrow appears to the left of the Jump Group name. Click the arrow to show or hide the tags.
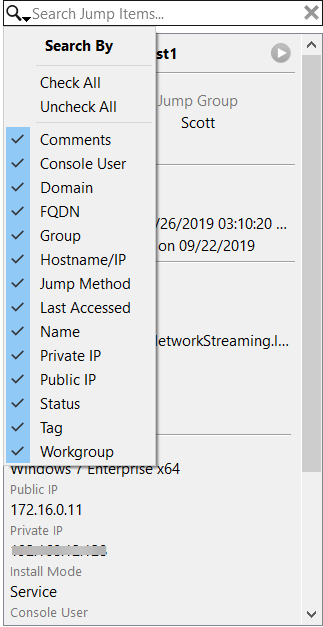
In addition to browsing for Jump Items, you can search based on multiple fields. Enter a string in the search field and then press Enter. To change the fields you are searching, click on the magnifying glass and check or uncheck any of the available fields. Searchable fields include Comments, Console User, Domain, FQDN, Group, Hostname/IP, Jump Method, Last Accessed, Name, Private IP, Public IP, Status, Tag, and Workgroup.
To view additional statistics about a Jump Item, select the Jump Item. Available statistics appear in the right pane.
After a software update, Jump Clients update automatically. The number of concurrent Jump Client upgrades is determined by settings on the /login > Jump > Jump Clients page. If a Jump Client has not yet been updated, it is labeled as Upgrade Pending, and its version and revision number appear in the details pane. While you can modify an outdated Jump Client, you cannot Jump to it. Attempting a Jump does, however, move that Jump Client to the front of the upgrade queue.
When upgrading to a newly built site software package, verify that all certificate stores are managed appropriately and are up-to-date prior to upgrading to a new BeyondTrust version. Failure to do so may cause a majority of your existing Jump Clients to appear offline.
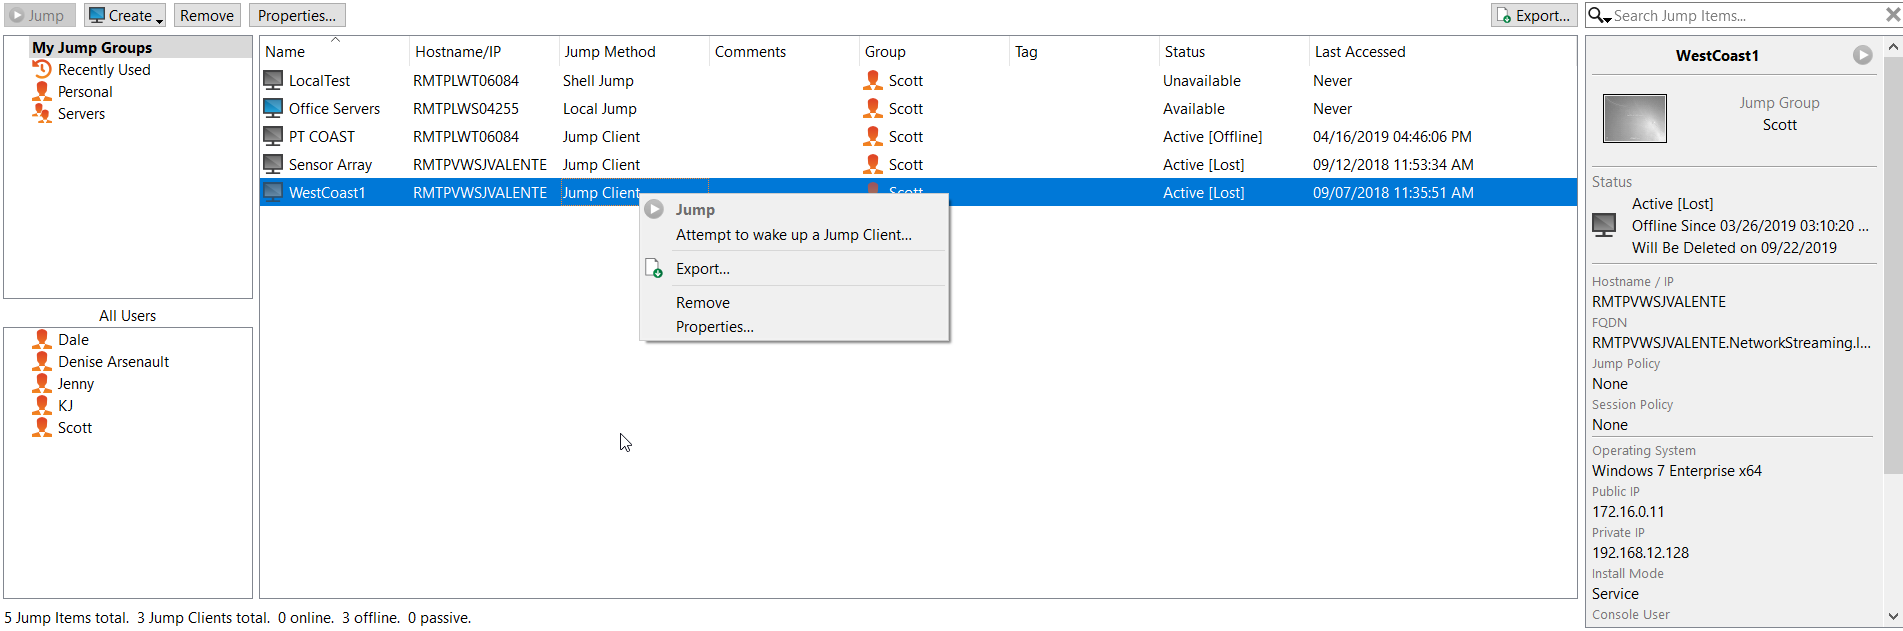
To start a session, double-click the Jump Item or select the Jump Item and click the Jump button from:
- above the Jump interface
- the right-click menu of the Jump Item
- the top of the Jump Item statistics pane
If a Jump Policy is applied to the Jump Item, that policy affects how and/or when a Jump Item may be accessed.
Schedule
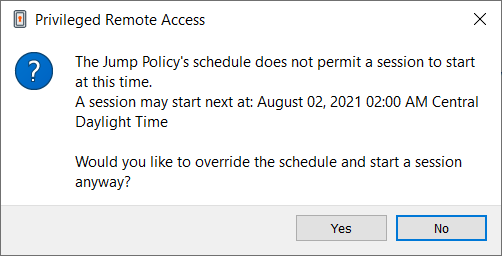
If a Jump Policy enforces a schedule for this Jump Item, an attempt to access the Jump Item outside of its permitted schedule prevents the Jump from occurring. A prompt informs you of the policy restrictions and provides the date and time when this Jump Item is next available for access.
Notification
If a Jump Policy is configured to send a notification on session start or end, then an attempt to access a Jump Item alerts you that an email will be sent. You can choose to proceed with the Jump and send a notification, or you can cancel the Jump.
Ticket ID
If a Jump Policy requires entry of a ticket ID from your external ITSM or ticket ID system before the Jump can be performed, a dialog opens. In the dialog, enter the ticket ID you need, authorizing access to this Jump Item.
Authorization
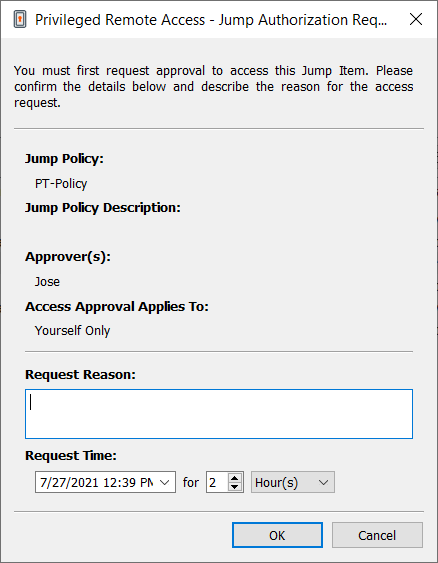
If a Jump Policy requires authorization before the Jump can be performed, a dialog opens. In the dialog, enter the reason you need to access this Jump Item. Then enter the date and time at which you wish authorization to begin, as well as how long you require access to the Jump Item. Both the request reason and the request time are visible to the approver and help them decide whether to approve or deny access.
When you click OK, an email is sent to the addresses defined as approvers for this policy. This email contains a URL where an approver can see the request, add comments, and either approve or deny the request.
If a request was approved by one person, a second can access the URL to override approval and deny the request. If a request was denied, then any other approvers accessing the site can see the details but cannot override the denied status. If a user has already joined an approved session, that access cannot be denied. Although other approvers can see the email address of the person who approved or denied the request, the requestor cannot.Based on the Jump Policy settings, an approved request grants access either to any user who can see and request access to that Jump Client or only to the user who requested access.
In the Jump interface, the Jump Item's details pane displays the status of any authorization requests as either pending, approved, approved only for a different user, or denied. When an approver responds to a request, a pop-up notification appears on the requestor's screen alerting them that access has been either approved or denied. If the requestor has a configured email address, an email notification is also sent to the requestor.
When a user Jumps to a Jump Item which has been approved for access, a notification alerts the user to any comments left by the approver.
When approval has been granted to a Jump Item, that Jump Item becomes available either to any user who can see and request access to that Jump Item or only to the user who requested access. This is determined by the Jump Policy.
Multiple requests may be sent for different times. The requested access times can overlap if the Jump approval request is for the Requestor Only. Access time cannot overlap if the approval is for Anyone Permitted to Request. If a request is denied, then a second request may be sent for the same time.
Revoke an Access Approval Request
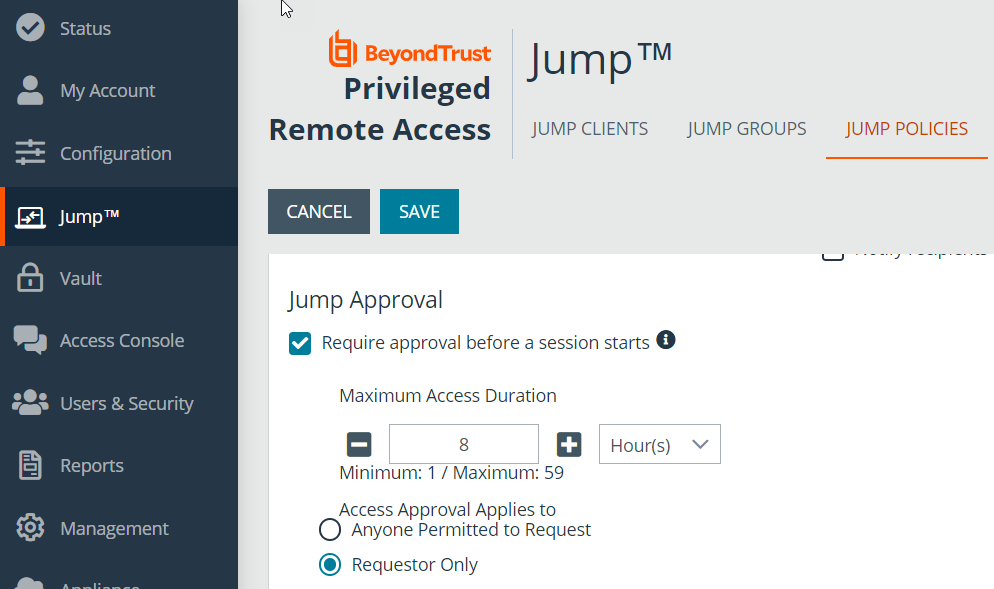
Permission to revoke approved access requests is controlled by Jump Policy. Any user who can approve requests on the Jump Policy can cancel requests, subject to the approval type. In the /login web management interface, go to Jump > Jump Policies. Under Jump Approval you have two options:
- Anyone Permitted to Request
- Requestor Only
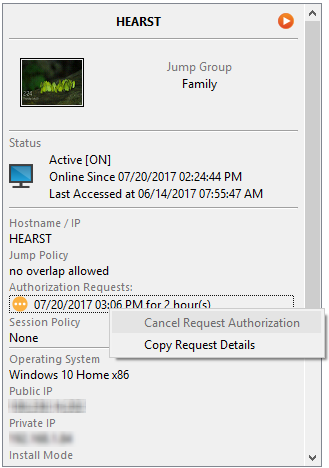
If the Jump Policy is set to requestor Only, and an Access Request is presently approved for User A, User B is asked to create a new Access Request if they attempt to Jump to the Jump Item, since that request does not apply to them. Additionally, if User B attempts to cancel the Access Approval Request, the option is grayed out. The only user who can cancel the approved request is User A, because they are the approved user for the request.
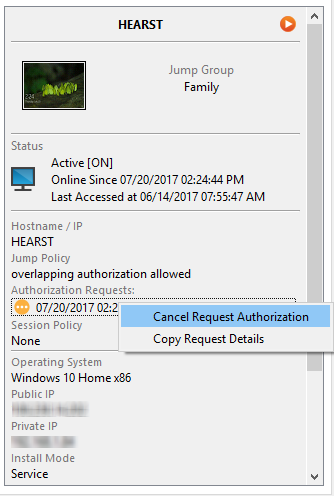
However, if the Jump Policy is set to Anyone Permitted to Request, and an Access Request is presently approved for User A, User B is allowed to start a new session with the Jump Item if they attempt to Jump to it. In addition, anyone with permission to access the Jump Item is allowed to cancel / revoke the request.
Depending on the permissions set by your administrator, you may also be able to wake up a selected Jump Client by broadcasting Wake-on-LAN (WOL) packets through another Jump Client on the same network. Once a WOL is attempted, the option becomes unavailable for 30 seconds before a subsequent attempt can be made. WOL must be enabled on the target computer and its network for this function to work. The default gateway information of the Jump Client is used to determine if other Jump Clients reside on the same network. When sending a WOL packet, the user has an advanced option to provide a password for WOL environments that require a secure WOL password.
If you no longer need access to a remote system, select the Jump Item and click Remove, or right-click on the Jump Item and select Remove from the menu. You may select multiple Jump Items to remove them all at the same time.
If the remote user manually uninstalls a Jump Client, the deleted item is either marked as uninstalled or completely removed from the Jump Items list in the access console. If the Jump Client cannot contact the B Series Appliance at the time it is uninstalled, the affected item remains in its offline state. This setting is available at /login > Jump > Jump Clients. If a Jump Client goes offline and does not reconnect to the B Series Appliance for 180 days, it is automatically uninstalled from the target computer and is removed from the Jump interface.
Organize and manage existing Jump Items by selecting one or more Jump Items and clicking Properties.
To view the properties of multiple Jump Items, the items selected must be the same type (all Jump Clients, all Remote Jumps, etc.).
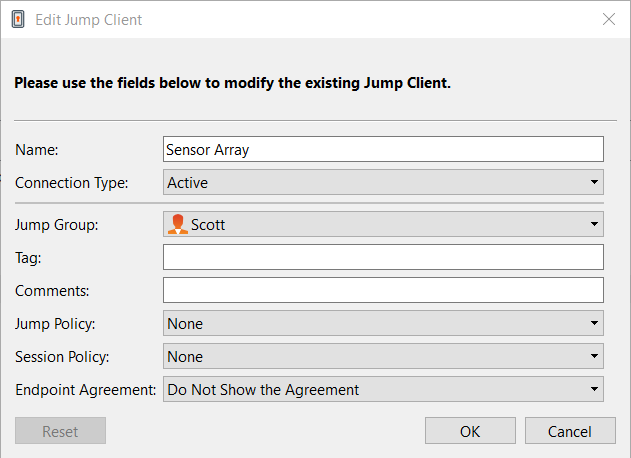
Jump Client Properties
- Move Jump Items from one Jump Group to another using the Jump Group dropdown. The ability to move Jump Items to or from different Jump Groups depends upon your account permissions.
- Further organize Jump Items by entering the name of a new or existing Tag. Even though the selected Jump Items are grouped together under the tag, they are still listed under the Jump Group in which each Jump Item is pinned. To move a Jump Item back into its top-level Jump Group, leave this field blank.
- Jump Items include a Comments field for a name or description, which makes sorting, searching, and identifying Jump Items faster and easier.
- To set when users are allowed to access this Jump Item, if a notification of access should be sent, or if permission or a ticket ID from your external ticketing system is required to use this Jump Item, choose a Jump Policy. These policies are configured by your administrator in the /login interface.
- Choose a Session Policy to assign to this Jump Item. The session policy assigned to this Jump Item has the highest priority when setting session permissions. The ability to set a session policy depends on your account permissions.
From the API
By integrating with the BeyondTrust API, you may programmatically connect to a Jump Item directly from your systems management tool or ticketing system. To start a session with a Jump Item from an external program, you will need to use a BeyondTrust Console Script (BRCS). A BRCS contains a sequence of commands to be executed by the access console. Double-click a BRCS file to have it automatically executed by the access console, or incorporate it into an external application to send commands to the access console from that application.
One method of creating a BRCS is through the client scripting API. This API is located on your B Series Appliance at https://access.example.com/api/client_script, where access.example.com is your BeyondTrust site hostname.
This option has been deprecated as of 16.1 and does not appear to new users. For users upgrading from a version prior to 16.1, the option is still available if you continue to use the deprecated method of authenticating to the API with a user account. If you switch to the preferred method of authenticating with an API account, all API traffic must occur over HTTPS.
Optional Parameters for the start_jump_item_session Command
| jump.method |
If specified, only Jump Items using the designated Jump method are included in the results. Acceptable values for this field are push (remote push), local_push, pinned (Jump Client), rdp, vnc, and shelljump. |
| credential_id |
If specified, only a Jump Item with that specific credential ID associated is returned. This field has a maximum length of 255 characters. |
| search_string |
Identifies the search criteria used to select and return specific Jump Items as results. This parameter is required only if no of the client fields below are specified. |
| client.comments |
If specified, only Jump Items with the given comments are included in the results. This field has a maximum length of 255 characters. Search is partial and case-insensitive. |
| client.hostname |
If specified, only Jump Items with the given hostname are included in the results. This field has a maximum length of 255 characters. Search is partial and case-insensitive. |
| client.private_ip |
If specified, only Jump Clients with the given private IP address are included in the results. This search field applies only to pinned clients. This field has a maximum length of 255 characters. Search is partial and case-insensitive. |
| client.public_ip |
If specified, only Jump Clients with the given public IP address are included in the results. This search field applies only to pinned clients. This field has a maximum length of 255 characters. Search is partial and case-insensitive. |
| client.tag |
If specified, only Jump Items with the given tag are included in the results. This field has a maximum length of 255 characters. Search is partial and case-insensitive. |
| session.custom.[custom field]=[string] |
The code name and value of any custom fields. These fields must first be configured in /login > Management > API Configuration. Each attribute must be specified as a different parameter. Each custom field has a maximum length of 1024 characters. The maximum total size of all combined custom fields, including the external key, must be limited to 10KB. |
At least one client.* parameter must be specified. If multiple client.* parameters are specified, then only clients matching all criteria are returned.
Query Examples: start_jump_item_session
| Start a session with a Jump Item whose hostname contains "ABCDEF02" | https://access.example.com/api/client_script?type=rep&operation=generate&action=start_jump_item_session&client.hostname=ABCDEF02 |
| Start a session with a Jump Item whose comments contain "maintenance" and whose tag contains "server" | https://access.example.com/api/client_script?type=rep&operation=generate&action=start_jump_item_session&client.comments=maintenance&client.tag=server |
| Start a session with a pinned Jump Client whose private IP address begins with "10.10.24" and associate custom attributes with the session |
https://access.example.com/api/client_script?type=rep&operation=generate&action=start_jump_item_session&client.private_ip=10.10.24&jump.method=pinned&session.custom.custom_field1=Custom%20Value&session.custom.custom_field2=123 |
If more than one Jump Item matches the search criteria, then a dialog opens, giving the user the option to select the appropriate Jump Item.
Sending one of the above requests to the API prompts the user to download a BRCS file. After downloading the file, the user can run it to automatically open the access console and start a session with a Jump Item.
In addition to generating a script from the API, you can run a BRCS via the command prompt. From the command prompt, go to the directory which contains the access console. Enter the name of your BeyondTrust access console (e.g., bomgar-acc.exe), followed by one of two commands:
--run-script [BRCS command]
--run-script-file [path to BRCS file]
Examples:
bomgar-acc-x64.exe --run-script "action=start_jump_item_session&client.hostname=ABCDEF02"
bomgar-acc-x64.exe --run-script-file my_script_file.brcs-beta60
All Jump Items which this user is permitted to access are searched. If the search results in only one Jump Item, the session starts immediately. If multiple Jump Items are returned, select one of the Jump Items listed in the selection window and click OK.
For more information about BeyondTrust Access Console Scripting, see the API Guide.
Jump Items can be set to allow multiple users to simultaneously access the same Jump Item. If set to Join Existing Session, other users are able to join a session already underway. The original owner of the session receives a note indicating another user has joined the session, but is not allowed to deny them access. For more information on simultaneous Jumps, please see Jump Item Settings.