Deploy Jump Clients from the Administrative Interface
Jump Clients can be preinstalled on remote computers in anticipation of the need for remote access. This method of installation may be applied to one system or multiple systems simultaneously. You can easily automate the mass deployment of your Jump Client network by allowing customization during installation. The Jump Client command line installer has switches that allow a script to modify a variety of Jump Client parameters when executed. This allows you to create custom mass deployment scripts to pull in variables from other sources and use the variables to modify the Jump Client parameters at install time.
You can easily manage active installers from the Jump Client Installer list. This list shows all previously installed active Jump Client installers. Administrators and privileged users can view, download, delete, or extend Jump Client installers. A warning message appears at the top of the list: Installing more than one Jump Client on the same system is being phased out in a future release. In the Access Console you may use the copy action on a Jump Client to apply different policies to the same endpoint. Click Dismiss to remove the warning message.
- From the /login administrative interface, go to Jump > Jump Clients.
- At the top of the Jump Client Installer List, click Add.
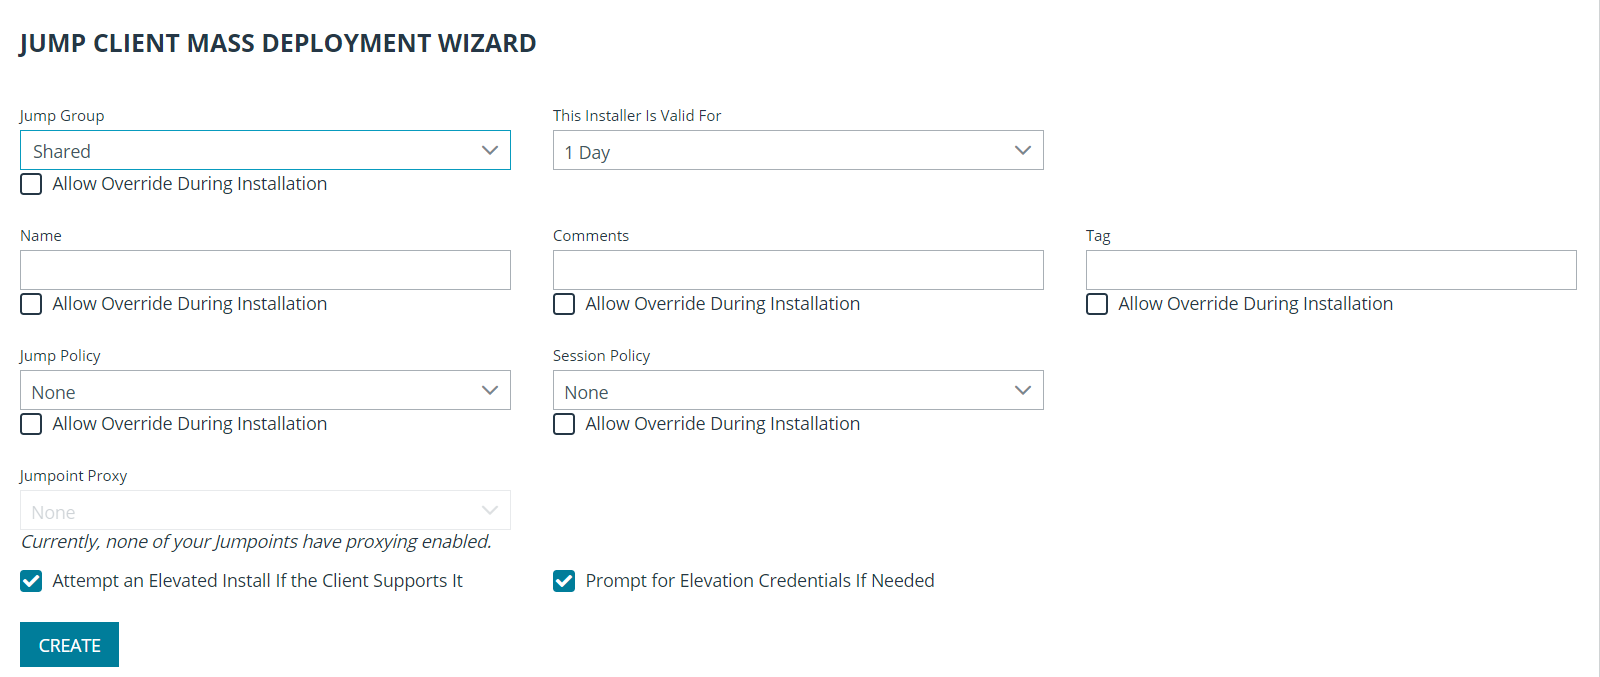
- From the Jump Group dropdown, select whether to pin the Jump Client to your personal list of Jump Items or to a Jump Group shared by other users. Pinning to your personal list of Jump Items means that only you can access this remote computer through this Jump Client. Pinning to a shared Jump Group makes this Jump Client available to all members of that Jump Group.
- You may apply a Jump Policy to this Jump Client. Jump Policies are configured on the Jump > Jump Policies page and determine the times during which a user can access this Jump Client. A Jump Policy can also send a notification when it is accessed or can require approval to be accessed. If no Jump Policy is applied, this Jump Client can be accessed without restriction.
- You may choose a Session Policy to assign to this Jump Client. Session policies are configured on the Users & Security > Session Policies page. A session policy assigned to this Jump Client has the highest priority when setting session permissions.
- If you have one or more Jumpoints set up as proxies, you can select a Jumpoint to proxy these Jump Client connections. That way, if these Jump Clients are installed on computers without native internet connections, they can use the Jumpoint to connect back to your B Series Appliance. The Jump Clients must be installed on the same network as the Jumpoint selected to proxy the connections.
- Add Comments, which can be helpful in searching for and identifying remote computers. Note that all Jump Clients deployed via this installer have the same comments set initially, unless you check Allow Override During Installation and use the available parameters to modify the installer for individual installations.
- The installer remains usable only as long as specified by the This Installer is Valid For dropdown. Be sure to leave adequate time for installation. If someone should attempt to run the Jump Client installer after this time, installation fails, and a new Jump Client installer must be created. Additionally, if the installer is run within the allotted time but the Jump Client is unable to connect to the B Series Appliance within that time, the Jump Client uninstalls, and a new installer must be deployed. The validity time can be set for anywhere from 10 minutes to 1 year. This time does NOT affect how long the Jump Client remains active.
Once a Jump Client has been installed, it remains online and active until it is uninstalled from the local system either by a user from the Jump interface or by an uninstall script. It can also be uninstalled, or extended, from the Jump Client Installer List. A user cannot remove a Jump Client unless the user is given appropriate permissions by their admin from the /login interface.
- If Attempt an Elevated Install if the Client Supports It is selected, the installer attempts to run with administrative rights, installing the Jump Client as a system service. If the elevated installation attempt is unsuccessful or if this option is deselected, the installer runs with user rights, installing the Jump Client as an application. This option applies only to Windows and Mac operating systems.
A Jump Client pinned in user mode is available only when that user is logged in. In contrast, a Jump Client pinned in service mode, with elevated rights, allows that system to always be available, regardless of which user is logged in.
This option does not apply to headless Linux Jump Clients or Raspberry Pi Jump Clients.
-
You can set the Maximum Offline Minutes Before Deletion of a Jump Client from the system. This setting overrides the global setting, if specified.
- If Prompt for Elevation Credentials if Needed is selected, the installer prompts the user to enter administrative credentials if the system requires that these credentials be independently provided; otherwise, it installs the Jump Client with user rights. This applies only if an elevated install is being attempted.
This option does not apply to headless Linux Jump Clients or Raspberry Pi Jump Clients.
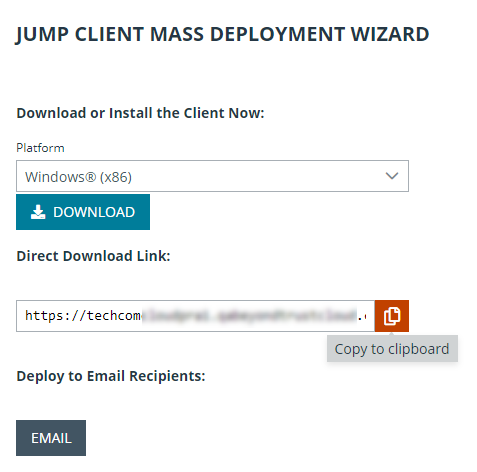
- Once you click Create, you can download the Jump Client installer immediately if you plan to distribute it using a systems management tool or if you are at the computer that you need to later access. You can also email the installer to one or more remote users. Multiple recipients can install the client from the same link. Click on the Direct Download Link to copy the link. The Platform option defaults to the appropriate installer for your operating system. You can select a different platform if you plan to deploy the Jump Client on a different operating system.
Once the installer has run, the Jump Client attempts to connect to the B Series Appliance. When it succeeds, the Jump Client appears in the Jump interface of the access console. If the Jump Client cannot immediately reach the B Series Appliance, then it continues to reattempt connection until it succeeds. If it cannot connect within the time designated by This Installer Is Valid For, then the Jump Client uninstalls from the remote system and must be redeployed.
Install on Windows, Linux, or Mac Systems
For system administrators who need to push out the Jump Client installer to a large number of systems, the Windows, Mac, or Linux executable or the Windows MSI can be used with your systems management tool of choice. You can include a valid custom install directory path where you want the Jump Client to install.
Duplicate installations of Jump Clients or large numbers of installations can lead to installation failures or degraded performance. Please see Review Best Practices for Jump Client Mass Deployment — Windows.
You can also override certain installation parameters specific to your needs. When you mark specific installation options for override during installation, you can use the following optional parameters to modify the Jump Client installer for individual installations. Note that if a parameter is passed on the command line but not marked for override in the /login administrative interface, the installation fails. If the installation fails, view the operating system event log for installation errors.
| Command Line Parameter | Value | Description |
| --install-dir | <directory_path> |
Specifies a new writable directory under which to install the Jump Client. This is supported only on Windows and Linux. When defining a custom install directory, ensure that the directory you are creating does not already exist and is in a location that can be written to. |
| --jc-name | <name...> | If override is allowed, this command line parameter sets the Jump Client's name. |
| --jc-jump-group |
user:<username>jumpgroup:<jumpgroup-code-name> |
If override is allowed, this command line parameter overrides the Jump Group specified in the Mass Deployment Wizard. |
| --jc-session-policy | <session-policy-code-name> |
If override is allowed, this command line parameter sets the Jump Client's session policy that controls the permission policy during an access session. |
| --jc-jump-policy | <jump-policy-code-name> |
If override is allowed, this command line parameter sets the Jump Policy that controls how users are allowed to Jump to the Jump Client. |
| --jc-max-offline-minutes | <minutes> | The maximum number of minutes a Jump Client can be offline before it is deleted from the system. This setting overrides the global setting if specified. |
| --jc-ephemeral |
Sets the maximum number of minutes a Jump Client will be offline before it is deleted from the system to 5 minutes. This is a convenience option that specifies the Jump Client as being ephemeral and is functionally equivalent to specifying --jc-max-offline-minutes 5 |
|
| --jc-tag | <tag-name> |
If override is allowed, this command line parameter sets the Jump Client's tag. |
| --jc-comments | <comments ... > |
If override is allowed, this command line parameter sets the Jump Client's comments. |
| --silent |
If included, the installer shows no windows, spinners, errors, or other visible alerts. |
- Removing leading dashes (--)
- Converting remaining dashes to underscores (_)
- Assigning a value using an equal sign (=)
MSI Example:
msiexec /i bomgar-pec-win32.msi KEY_INFO=w0dc3056g7ff8d1j68ee6wi6dhwzfefggyezh7c40jc90 jc_jump_group=jumpgroup:server_support jc_tag=servers
When deploying an EXE installer, the above parameters can be specified by:
- Adding dashes
- Adding a space between the parameter and the value
EXE Example:
bomgar-pec-[unique id].exe --jc-jump-group jumpgroup:servers --jc-tag servers
Other rules to consider:
- installdir has a dash in the EXE version but no dashes in the MSI version.
- /quiet is used for the MSI version in place of --silent in the EXE version.
Enable a Jump Client on a Mac System
After a Jump Client is installed on a Mac system, it must be enabled by the end user. The exact steps, wording, and screen displays vary depending on the device and software version.

Three types of access are requested: Screen Recording, Accessibility, and Full Disk Access. For the best remote support experience, grant access for all three. Limited support is available if only one or two types of access are granted.
To grant access, the user takes the following steps for each type of access:
- Click Grant Access...
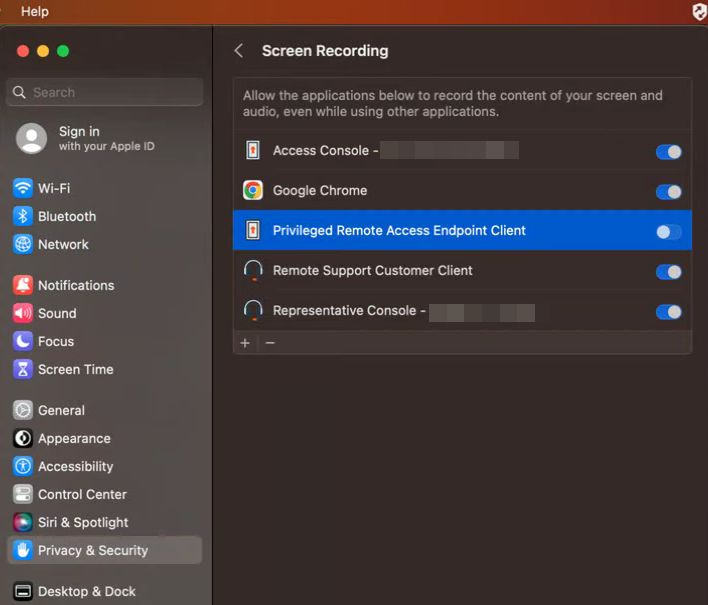
- Under Privacy & Security, applications that have requested access for the selected feature are listed. Toggles indicate if access has been granted. The newly installed client is disabled by default. Click the toggle to grant access to the client for this feature.
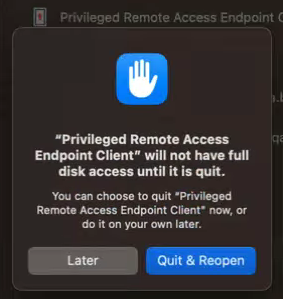
- For the feature Full Disk Access, granting access requires stopping and restarting the client application. Click Quit & Reopen to grant access immediately. Jump Client icon disappears and re-appears within a few minutes.
The end user can grant or deny access at any time by clicking Settings > Privacy & Security, selecting the feature, Accessibility, Screen Recordings, or Full Disk Access, and then clicking the toggle.
Install a Linux Jump Client in Service Mode
To install a Jump Client in service mode on a Linux system, the Jump Client installer must be run by root, but the Jump Client service should not be run under the root user context. A service mode Jump Client allows the user to start a session even if no remote user is logged on, as well as to log off the current remote user and log on with different credentials. A Linux Jump Client installed in user mode cannot be elevated within a session.
Use the following syntax to add executable permissions to the file, wherein {uid} is a unique identifier consisting of letter and numbers:
- Add executable permissions to the file:
sudo chmod +x ./Downloads/bomgar-pec-[uid].bin
-
Run the installer as the root user using the sudo command:
sudo sh ./Downloads/bomgar-pec-[uid].bin
For Privileged Remote Access versions prior to 24.1.1, enter .desktop instead of .bin.

Linux Jump Clients may be installed in service mode. The current status of any Jump Client is shown in the info panel that appears when a Jump Client is highlighted in the representative console’s list of Jump Clients. If a Jump Client shows the Install Mode as Service, it is installed as a service; otherwise, this field reads User, indicating it is installed in single-user context.
A service-mode Jump Client allows the user to start a session even if no remote user is logged on, as well as to log off the current remote user and log on with different credentials. A Linux Jump Client installed in user mode cannot do this, nor can it be elevated to service mode within a session.
To install a Jump Client in service mode on a Linux system, the Jump Client installer must be by run by root, but the Jump Client service should not be run under the root user context. This causes the Jump Client to run as a system service. If a previous Jump Client was installed in user mode, uninstall the existing Jump Client and install a new one as root. The process for doing this varies slightly depending on the distribution of Linux being used, but what follows is typical.
- Log into the access console, right click the existing user mode Jump Client (if there is one), and then click Remove.
- Log into the /login admin web interface of the BeyondTrust site and download a Jump Client installer for Linux from the Jump > Jump Clients tab.
- Launch a terminal and add the executable permission to the installation file:
sudo chmod +x ./Downloads/bomgar-pec-[uid].desktop
- Execute the installation file with sh as the root user using the sudo command:
sudo sh ./Downloads/bomgar-pec-[uid].desktop
For Privileged Remote Access versions prior to 24.1.1, enter .desktop instead of .bin.
Once the installation is complete, a new entry appears in the list of available Jump Clients displayed in the representative console. To test whether the Jump Client is installed as a service or not, you can Jump to the client and log out the active user. If you can still control the screen after logging out, this proves the client is running as a service.
Uninstall the Jump Client Installed Using Service Mode
If you wish to uninstall the Jump Client, you must run its uninstall script.
- Navigate to the uninstall script in the following location: /opt/bomgar/bomgar-pec-xxxxxx.
- Run the uninstall script:
sudo sh ./uninstall
- Remove the Jump Client from the access console.
If the uninstall script is run but the client is not removed from the console, the client is visible but not accessible. Similarly, if the client is removed from the console but the uninstall script is not run, the client is not accessible but the Jump Client files remain on the Linux system.
Install on Headless Linux Systems
To install a Jump Client on a remote Linux system with no graphical user interface, be sure you have downloaded the headless Linux Jump Client installer, and then follow these additional steps:
- Using your preferred method, push the Jump Client installer file to each headless Linux system you wish to access.
- Once the installer file is on the remote system, use a command interface to install the file and specify any desired parameters.
- Install the Jump Client in a location to which you have write permission, using --install-dir <path>. You must have permission to write to this location, and the path must not already exist. Any additional parameters must also be specified at this time, as described below.
sh ./bomgar-pec-{uid}.bin --install-dir /home/username/jumpclient - If you wish to install under a specific user context, you can pass the --user <username> argument. The user must exist and have rights to the directory where the Jump Client is being installed. If you do not pass this argument, the Jump Client installs under the user context that is currently running.
sh ./bomgar-pec-{uid}.bin --install-dir /home/username/jumpclient --user jsmith
- Install the Jump Client in a location to which you have write permission, using --install-dir <path>. You must have permission to write to this location, and the path must not already exist. Any additional parameters must also be specified at this time, as described below.
We do not recommend installing the Jump Client under the root context. If you attempt to install when the current user is root, you receive a warning message and are required to pass --user <username> to explicitly specify the user that the process should run as.
- You can also override certain installation parameters specific to your needs. When you mark specific installation options for override during installation, you can use the following optional parameters to modify the Jump Client installer for individual installations. Note that if a parameter is passed on the command line but not marked for override in the /login administrative interface, the installation fails. If the installation fails, view the operating system event log for installation errors.
sh ./bomgar-pec-{uid}.bin --install-dir /home/username/jumpclient --jc-jump-group jumpgroup:jump_group2Command Line Parameter Value Description --jc-jump-group user:<username>
team:<team-code-name>If override is allowed, this command line parameter overrides the Jump Group specified in the Mass Deployment Wizard. --jc-jump-policy <jump-policy-code-name> If override is allowed, this command line parameter sets the Jump Policy that controls how users are allowed to Jump to the Jump Client.
--jc-tag <tag-name> If override is allowed, this command line parameter sets the Jump Client's tag. --jc-comments <comments ... > If override is allowed, this command line parameter sets the Jump Client's comments.
- After installing the Jump Client, you must start its process. The Jump Client must be started for the first time within the time frame specified by This Installer Is Valid For.
/home/username/jumpclient/init-script startThis init script also accepts the stop, restart, and status arguments. You can use ./init-script status to make sure the Jump Client is running.
-
You must also arrange for init-script start to run at boot in order for the Jump Client to remain available whenever the system restarts. An example system.d service displays once the Jump Client is installed. Copy this information and create the new service for the Jump Client, filename.service (where filename is any name you choose), following these steps:
- cd /etc/systemd/system
- vi filename.service
- Paste copied information
- run chmod 777 filename.service
- Reload the systemctl daemon
- Enable and start the service file
Uninstall the Jump Client Installed on a Headless Linux System
- If you wish to uninstall the Jump Client, you must run its uninstall script.
/home/username/jumpclient/uninstall
- Remove the Jump Client from the access console.
If the uninstall script is run but the client is not removed from the console, the client is visible but not accessible. Similarly, if the client is removed from the console but the uninstall script is not run, the client is not accessible but the Jump Client files remain on the Linux system.
Deploy a Jump Client on a Raspberry Pi
To access the File System, Command Shell, and System Info of a remote Raspberry Pi system, you can deploy a Jump Client to that system.
- From the /login administrative interface, go to Jump > Jump Clients.
- From the Jump Group dropdown, select whether to pin the Jump Client to your personal list of Jump Items or to a Jump Group shared by other users. Pinning to your personal list of Jump Items means that only you can access this remote computer through this Jump Client. Pinning to a shared Jump Group makes this Jump Client available to all members of that Jump Group.
- You may apply a Jump Policy to this Jump Client. Jump Policies are configured on the Jump > Jump Policies page and determine the times during which a user can access this Jump Client. A Jump Policy can also send a notification when it is accessed or can require approval to be accessed. If no Jump Policy is applied, this Jump Client can be accessed without restriction.
- You may choose a Session Policy to apply to this Jump Client. A session policy assigned to this Jump Client has the highest priority when setting session permissions.
We recommend that you not set a session policy for a headless Jump Client.
- Adding a Tag helps to organize your Jump Clients into categories within the access console.
- Set the Connection Type to Active or Passive for the Jump Clients being deployed. An active Jump Client maintains a persistent connection to the B Series Appliance, while a passive Jump Client instead listens for connection requests.
- If you have one or more Jumpoints set up as proxies, you can select a Jumpoint to proxy these Jump Client connections. That way, if these Jump Clients are installed on computers without native internet connections, they can use the Jumpoint to connect back to your B Series Appliance. The Jump Clients must be installed on the same network as the Jumpoint selected to proxy the connections.
- Add Comments, which can be helpful in searching for and identifying remote computers. Note that all Jump Clients deployed via this installer have the same comments set initially, unless you check Allow Override During Installation and use the available parameters to modify the installer for individual installations.
-
The installer remains usable only as long as specified by the This Installer is Valid For dropdown. Be sure to leave adequate time for installation. If someone should attempt to run the Jump Client installer after this time, installation fails, and a new Jump Client installer must be created.
In addition to expiring after the period given by the This Installer is Valid For option, Jump Client mass deployment packages invalidate when their B Series Appliance is upgraded. The only exception to this rule is live updates which change the license count or license expiration date. Any other updates, even if they do not change the version number of the B Series Appliance, invalidate the Jump Client installers from before the upgrade.
Once a Jump Client has been installed, it remains online and active until it is uninstalled from the local system either by a user from the Jump interface or by an uninstall script. It can also be uninstalled, or extended, from the Jump Client Installer List. A user cannot remove a Jump Client unless the user is given appropriate permissions by their admin from the /login interface.
- The options Attempt an Elevated Install if the Client Supports It and Prompt for Elevation Credentials If Needed do not apply to headless Jump Clients.
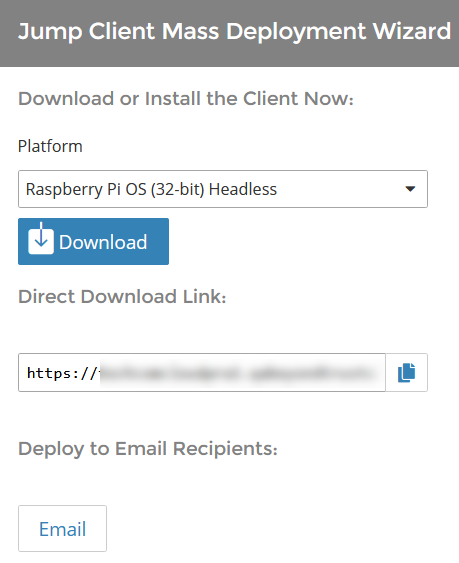
- Once you click Create, select the Raspberry Pi OS option, and then click Download.
- Using your preferred method, push the Jump Client installer file to each headless system you wish to access.
- Once the installer file is on the remote system, install the file in a location to which you have write permission, using --install-dir <path>. You must have permission to write to this location, and the path must not already exist. Any additional parameters must also be specified at this time, as described below.
sh ./bomgar-pec-{uid}.bin --install-dir /home/pi/<dir> - You can also override certain installation parameters specific to your needs. When you mark specific installation options for override during installation, you can use the following optional parameters to modify the Jump Client installer for individual installations. Note that if a parameter is passed on the command line but not marked for override in the /login administrative interface, the installation fails. If the installation fails, view the operating system event log for installation errors.
Command Line Parameter Value Description --jc-jump-group user:<username>
jumpgroup:<jumpgroup-code-name>If override is allowed, this command line parameter overrides the Jump Group specified in the Mass Deployment Wizard. --jc-public-site-address <public-site-address-hostname> If override is allowed, this command line parameter associates the Jump Client with the public portal which has the given hostname as a site address. If no public portal has the given hostname as a site address, then the Jump Client will revert to using the default public site. --jc-session-policy-not-present <session-policy-code-name> If override is allowed, this command line parameter sets the Jump Client's session policy that controls the permission policy during a support session if the customer is not present at the console. --jc-jump-policy <jump-policy-code-name> If override is allowed, this command line parameter sets the Jump Policy that controls how users are allowed to Jump to the Jump Client.
--jc-tag <tag-name> If override is allowed, this command line parameter sets the Jump Client's tag. --jc-comments <comments ... > If override is allowed, this command line parameter sets the Jump Client's comments.
- After installing the Jump Client, you must start its process. The Jump Client must be started for the first time within the time frame specified by This Installer Is Valid For.
/home/username/jumpclient/init-script startThis init script also accepts the stop, restart, and status arguments. You can use ./init-script status to make sure the Jump Client is running.
-
You must also arrange for init-script start to run at boot in order for the Jump Client to remain available whenever the system restarts. An example system.d service displays once the Jump Client is installed. Copy this information and create the new service for the Jump Client, filename.service (where filename is any name you choose), following these steps:
- cd /etc/systemd/system
- vi filename.service
- Paste copied information
- run chmod 777 filename.service
- Reload the systemctl daemon
- Enable and start the service file
- If you wish to uninstall the Jump Client, you must run its uninstall script.
/home/pi/<dir>/uninstall
Separately and in addition to running the uninstall script, you must remove the Jump Client via the access console. Otherwise, the Jump Client remains in the access console, though it is not accessible. Relatedly, removing the Jump Client via the access console only prevents it from being accessed but leaves the Jump Client files on the system.
For more information, please see the following:
- Jump Policy at https://www.beyondtrust.com/docs/privileged-remote-access/getting-started/admin/jump-policies.htm
- On setting up Jumpoints as proxies, the Jumpoint Guide