Upgrade Endpoint Privilege Management for Windows
Before upgrading any versions of Endpoint Privilege Management for Windows software or existing settings, we recommend you test your deployment in a preproduction environment. This will help mitigate any unforeseen compatibility issues, and avoid disruption to the business. In addition, you should export your policies for backup purposes prior to an upgrade.
All Endpoint Privilege Management for Windows MSI and EXE installers automatically remove old versions of BeyondTrust software when installed. Therefore, it is not necessary to manually remove old versions prior to installation.
If you previously installed Endpoint Privilege Management for Windows with a switch, you must ensure you upgrade Endpoint Privilege Management for Windows with the same switch. If you do not use the same switch, the new installation parameters apply and any functionality relating to the previous installation are lost.
Endpoint Privilege Management for Windows guarantees backward compatibility with previous versions, but does not guarantee forward compatibility.
If you are running Endpoint Privilege Management for Windows 22.7 or higher, and are upgrading to a newer version, then a reboot is not mandatory and all existing functions will continue to work. New features may require a reboot, so it is still recommended to reboot at your earliest convenience after an upgrade.
When installing in silent mode, a reboot will occur automatically unless the no restart flag is also used. Therefore, we recommend that upgrades be performed outside of core business hours, or during scheduled maintenance windows, to avoid loss of productivity.
Use Policy Precedence in a Migration Scenario
During any migration from one Endpoint Privilege Management platform to another, you can use the POLICYPRECEDENCE parameter to provide policy redundancy. For example, you are migrating from BeyondTrust's ePO platform to BeyondInsight or EPM, and want to ensure there is zero policy downtime during the migration.
Add the POLICYPRECEDENCE parameter to the client install syntax. Existing policy continues to apply until superseded by the new platform policy.
GPO Clients
POLICYPRECEDENCE="WEBSERVICE,GPO,LOCAL"
ePO Clients
POLICYPRECEDENCE="WEBSERVICE,EPO,LOCAL"
BeyondInsight
POLICYPRECEDENCE="WEBSERVICE,BEYONDINSIGHT,LOCAL"
WebServer
POLICYPRECEDENCE="WEBSERVICE,WEBSERVER,LOCAL"
Msiexec.exe /i PrivilegeManagementForWindows_x.xxx.x.msi IC3MODE=1 POLICYPRECEDENCE="WEBSERVICE,GPO,LOCAL" /qn /norestart
Recommended Steps
As of release 5.5, all releases of this product are signed with BeyondTrust Corporation, rather than Avecto, as the software publisher name. If prior to 5.5 you used the QuickStart Policy Template as a starting point, it is likely that your configuration will include Application Groups which target our own applications based on a publisher match to Avecto. An upgrade to 5.5 or beyond requires you to update your configuration so that it continues to match the versions of the applications and tools that you use. We recommend one of the following two options:
Option 1
Add a copy of any existing application definitions which target Avecto and update those copies to target BeyondTrust Corporation instead; the presence of both sets of application definitions ensure they continue to match both new and existing versions during the implementation of 5.5. This option has an advantage over Option 2, in that it also targets any application definitions that you may have created yourself that target the Avecto publisher.
Option 2
You may copy fragments of the QuickStart policies in version 5.5 to your existing application definitions.
For either option, it is critical that you roll out your configuration changes before you update your Endpoint Privilege Management for Windows software to version 5.5 or later.
Step 1: Upgrade the Endpoint Privilege Management Policy Editor
For steps to upgrade the Endpoint Privilege Management Policy Editor, see Install the Endpoint Privilege Management Policy Editor.
Step 2: Upgrade Application Groups to Match Publisher Name BeyondTrust Corporation (When Upgrading to Version 5.5)
Option 1 - Duplicate application definitions matching Avecto publisher and update to target BeyondTrust Corporation
- Locate all Avecto matches:
- Select the Application Groups node.
- Type Avecto into the Search applications box to filter.
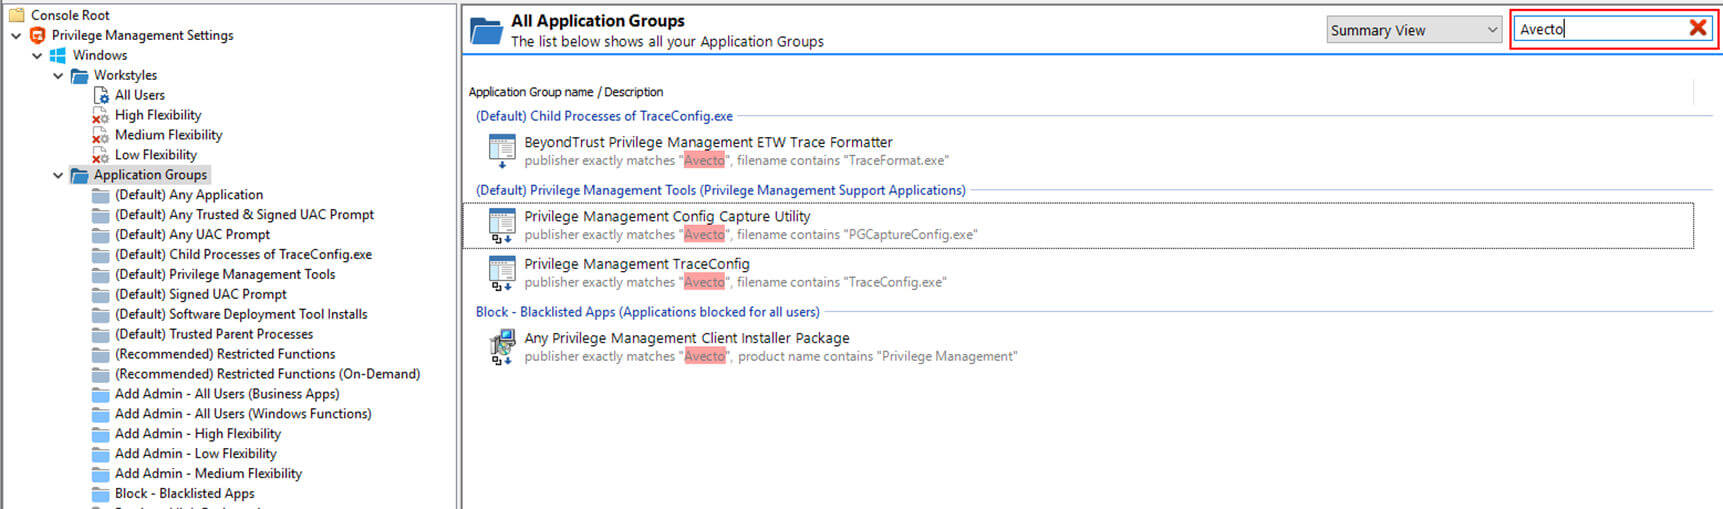
- Create a copy of all definitions in each Application Group found that contain a publisher match on Avecto:
- Copy and paste the existing definitions.
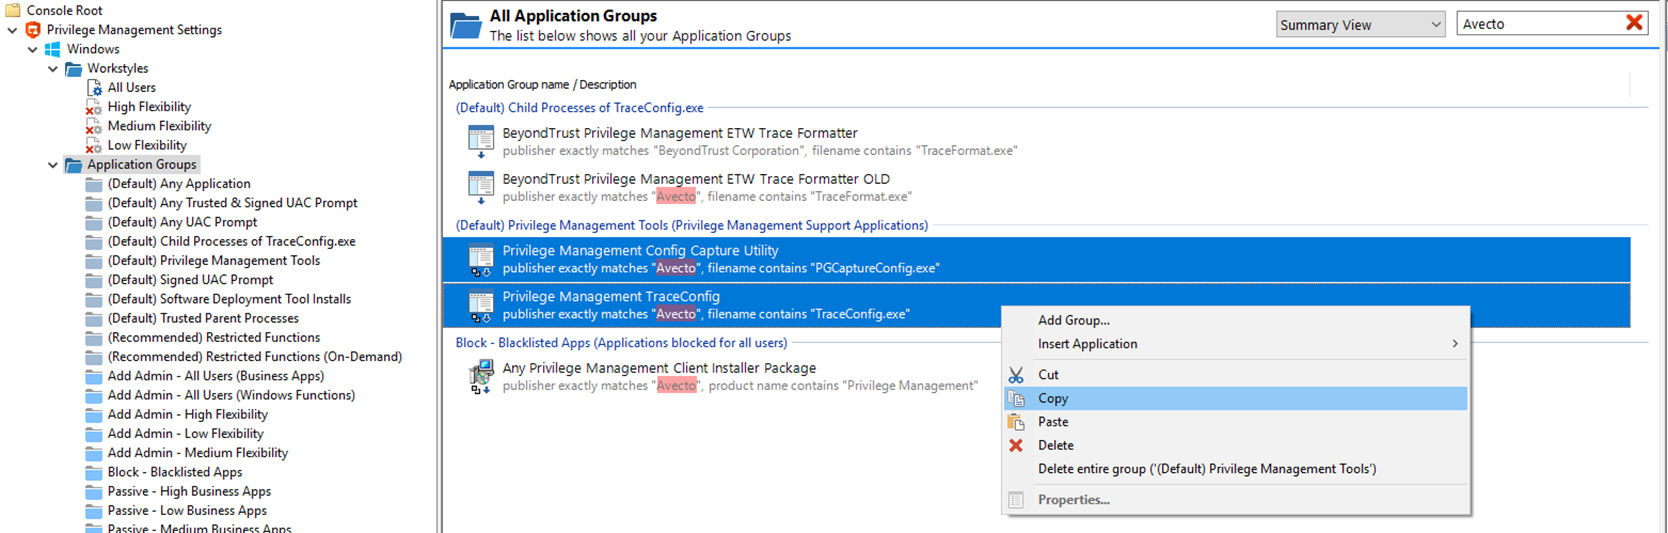
Rename one of the copies to OLD, so it’s easy to tell which to delete after the new application definitions take effect. OLD can be deleted once the 5.5 upgrade is complete.
- Update the new application definitions to match publisher BeyondTrust Corporation.
- Test the updated configuration against the new 5.5 applications.
Option 2 - Insert policy fragments into existing application definitions
- Ensure that Hidden Groups are visible by right-clicking the Endpoint Privilege Management Settings node. Enable Show Hidden Groups.
- Copy the following text:
<ClipboardText><ClipboardResources><Config/></ClipboardResources><ClipboardItems><Application ID="95402cc1-3301-49ec-8108-7ee359c55018" Type="exe" Description="BeyondTrust Privilege Management ETW Trace Formatter" OpenDlgDropRights="true" CheckFileName="true" FileName="TraceFormat.exe" FileStringMatchType="Contains" UseSourceFileName="true" ProductName="BeyondTrust Privilege Management" ProductDesc="BeyondTrust Privilege Management ETW Trace Formatter" CheckCertificate="true" Certificate="BeyondTrust Corporation" CertificateStringMatchType="Exact"/><Application ID="d30f3395-2f7f-4a2e-b8e5-6d3073976dc0" Type="exe" Description="Performance Log Utility" OpenDlgDropRights="true" CheckFileName="true" FileName="logman.exe" FileStringMatchType="Contains" UseSourceFileName="true" ProductName="Microsoft® Windows® Operating System" ProductDesc="Performance Log Utility" CheckCertificate="true" Certificate="Microsoft Windows" CertificateStringMatchType="Exact"/></ClipboardItems></ClipboardText>
- Paste into a text editor and replace new lines with single spaces. Copy the text again.
- Create an Application Group (Default) Child Processes of TraceConfig.exe.
- Select the middle pane and paste what you have copied.
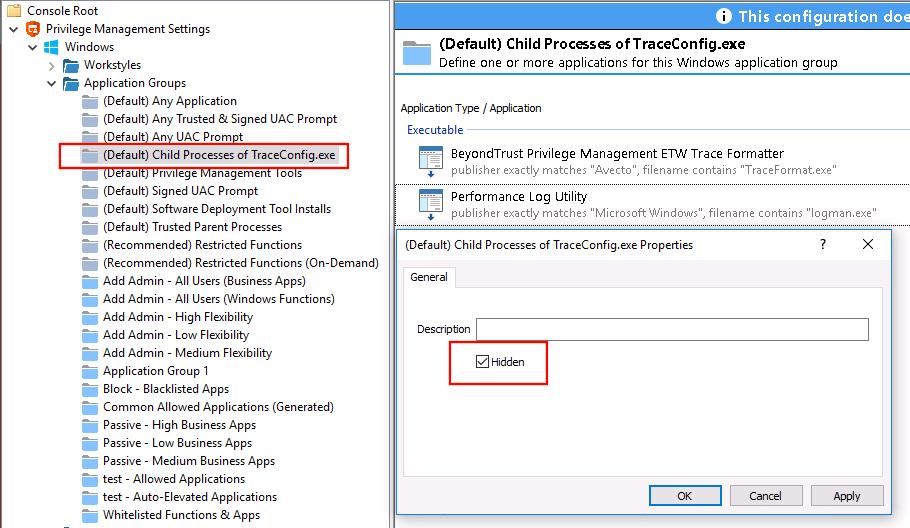
- Right-click the Application Group, select Properties, and check the Hidden box.
- Copy the following text:
<ClipboardText><ClipboardResources><Config/></ClipboardResources><ClipboardItems><Application ID="511e21b7-b059-42ca-bcfe-03ca4c5ecf58" Type="exe" Description="Privilege Management Config Capture Utility" ChildrenInheritToken="true" OpenDlgDropRights="true" CheckFileName="true" FileName="PGCaptureConfig.exe" FileStringMatchType="Contains" UseSourceFileName="true" ProductName="BeyondTrust Privilege Management" ProductDesc="BeyondTrust Privilege Management Config Capture Utility" CheckCertificate="true" Certificate="BeyondTrust Corporation" CertificateStringMatchType="Exact"/><Application ID="7995df95-0031-460f-a5e3-cfd2b12758d8" Type="exe" Description="Privilege Management TraceConfig" ChildrenInheritToken="true" OpenDlgDropRights="true" CheckFileName="true" FileName="TraceConfig.exe" FileStringMatchType="Contains" UseSourceFileName="true" ProductName="BeyondTrust Privilege Management" ProductDesc="BeyondTrust Privilege Management Config Capture Utility" CheckCertificate="true" Certificate="BeyondTrust Corporation" CertificateStringMatchType="Exact" ChildApplicationGroup="a1d8ab16-5b3d-42d1-a90d-e069d741f7b1"/></ClipboardItems></ClipboardText>
- Paste into a text editor and replace new lines with single spaces. Copy the text again.
- Select the Application Group (Default) Privilege Management Tools.
- Select the middle pane and paste what you have copied.
- Double-click the Privilege Management TraceConfig application definition..
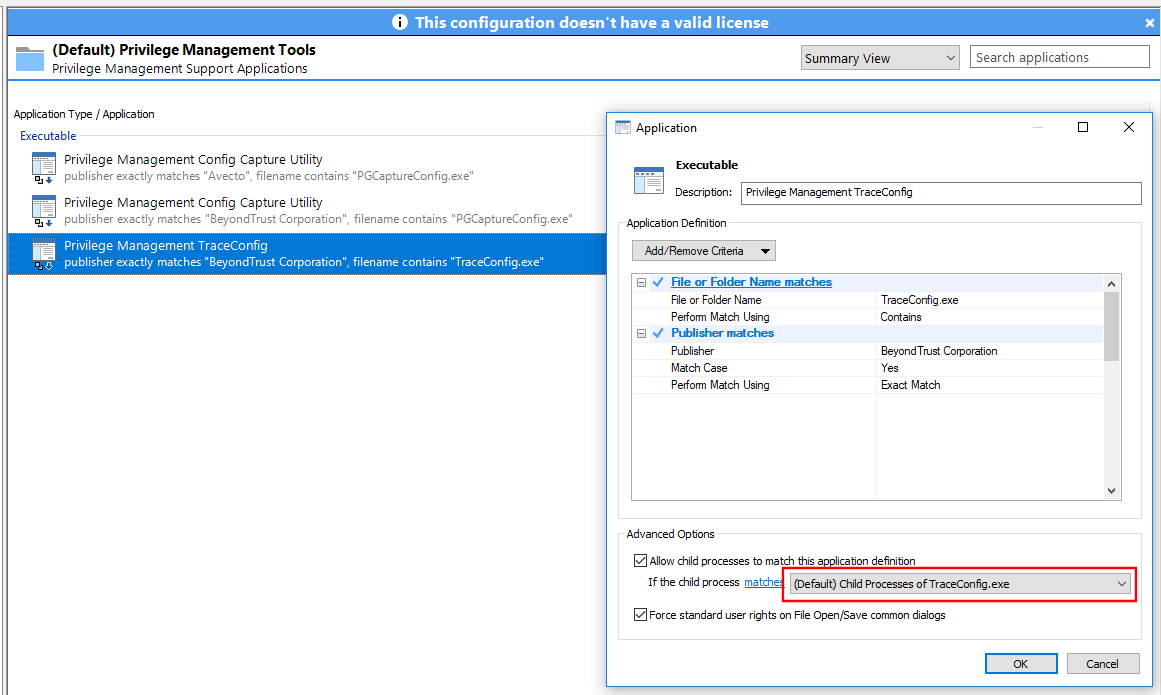
- In the Allow child processes to match the application definition option in the Application dialog, choose (Default) Child Processes of TraceConfig.exe from the dropdown.
- Copy the following text:
<ClipboardText><ClipboardResources><Config/></ClipboardResources><ClipboardItems><Application ID="52a1ef23-b71b-4c3b-836c-c228a7343e33" Type="msi" Description="Any Privilege Management Client Installer Package" ChildrenInheritToken="true" OpenDlgDropRights="true" FileName="*" FilePatternMatching="true" UseSourceFileName="true" CheckProductName="true" ProductName="Privilege Management" ProductNameStringMatchType="Contains" CheckCertificate="true" Certificate="BeyondTrust Corporation" CertificateStringMatchType="Exact"/></ClipboardItems></ClipboardText>
- Paste into a text editor and replace new lines with single spaces. Copy the text again.
- Select the Application Group Block - Blocked Apps.
- Select the middle pane and paste what you have copied.
Step 3: Upgrade Endpoint Privilege Management for Windows Settings
Once the Endpoint Privilege Management Policy Editor has been upgraded, the final step is to roll out new versions of the Endpoint Privilege Management for Windows settings. Although Endpoint Privilege Management for Windows is fully backwards compatible with older versions of Endpoint Privilege Management for Windows settings, this step is required if you want to take advantage of any new features and enhancements in Endpoint Privilege Management for Windows.
Endpoint Privilege Management for Windows settings are automatically saved in the latest format each time a change is made. For details on editing Endpoint Privilege Management for Windows settings, see Deploy Endpoint Privilege Management for Windows Policy.
Once Endpoint Privilege Management for Windows settings have been upgraded, they cannot be downgraded. Therefore, we recommend an upgrade of Endpoint Privilege Management for Windows settings is performed only after all instances of Endpoint Privilege Management for Windows have been upgraded.
Step 4: Upgrade Endpoint Privilege Management for Windows
To upgrade Endpoint Privilege Management for Windows manually, double-click the client installation media for your operating system.
For larger deployments, Endpoint Privilege Management for Windows supports mixed client environments, as it is fully backwards compatible with older versions of Endpoint Privilege Management for Windows settings. This allows for phased roll-outs of Endpoint Privilege Management for Windows, if preferred.
For steps to upgrade Endpoint Privilege Management for Windows using a deployment mechanism, see Install Endpoint Privilege Management for Windows.
Step 5: Delete Old Application Definitions (Upgrade from 5.4)
Once all machines are running version 5.5, it is safe to delete any application definitions still matching the publisher Avecto from your configuration and to deploy that configuration.