Configure the ServiceNow Integration
The following steps configure Endpoint Privilege Management for Windows to use our supported ServiceNow integration script.
In your Endpoint Privilege Management Policy Editor, you need to set up:
- A Workstyle that will target the ServiceNow rule script
- An Application Group that contains the applications you want to target
- A message configured for Challenge / Response
In the Policy Editor:
- Create a Message and configure it for Challenge / Response. Call this message Allow Message (with Challenge). If you do not have an existing Shared Key, ensure you configure one before you continue.
- Create an Application Group called ServiceNow Applications and populate it with application definitions you want your end users to raise a ServiceNow ticket for.
- Create a Workstyle called ServiceNow and add an Application Rule.
In the Application Rule:
- Set the Target Application Group to ServiceNow Applications.
- From the Run a Rule Script list, select Manage Scripts.
- From the Rule Scripts node, click Import Script.
- Navigate to the ServiceNow integration script Log-ServiceNowIncident.ps1 you downloaded previously and click Open.
- Click Settings, and then Import Settings. Navigate to the ServiceNowSettings.json file you downloaded previously.
- At the top of the ServiceNowSettings.json file, navigate to the Authentication section and make the following changes:
- Replace the URL with your ServiceNow URL in the form yourinstance.service-now.com, ensuring you remove the asterisks. Do not use HTTPS. This is a restriction of the ServiceNow API. The secure connection is managed by the client.
- Replace the Username and Password with your ServiceNow user credentials with the itil permission, ensuring you remove the asterisks.
- Click Save and then Close on the Script Manager. The ServiceNowSettings.json file is now associated with your ServiceNow rule script Log-ServiceNowIncident.ps1. Any time you use the ServiceNow rule script, the same Settings file is automatically assigned to it. Any edits to the Settings file need to be made in one place, and they will be used in all instances of that rule script.
- Set the Default Action to Allow Execution.
- Set the Default End User Message to Allow Message (with Challenge).
- Set the Default Access Token to Add Admin Rights.
- Set Raise an Event to On, and click OK to finish configuring the Application Rule.
Verify the Workstyle is enabled, so you can test the ServiceNow integration.
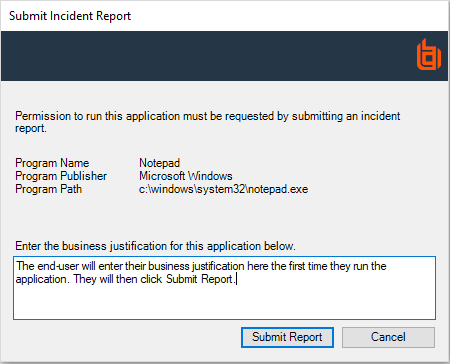
You can confirm the ServiceNow integration is working by running an application that will match on the ServiceNow Applications Application Group. When the ServiceNow script runs successfully, a dialog box like the one below is displayed. A Settings error message may be displayed.
The first time the end user sees this message they will enter their business justification, and click Submit Report.
Once they receive the Challenge Response Code, they can run the application. Then they can click Enter Response Code to enter the Challenge Response Code and run the application.
For more information, see the following:
- The Administration Guide for your Policy Editor for details on any of these steps if required. This summary is intended for those who are familiar with editing policy in Endpoint Privilege Management Policy Editor.
- ServiceNow Integration Error Codes

