Policy Editor utilities
Policy Assistant (beta)
Use the Policy Assistant to learn more about your policy configuration. The assistant detects if there are errors in configuration and provides remediation details. For example, duplicate Application Rules that potentially contradict each other, or duplicated user accounts in a Workstyle account filter.
The Policy Assistant validates the following areas of the policy:
- Accounts filters
- Application rules
- Licensing
- On-demand rules
- Trusted application protection settings
- Workstyles
If there are no issues identified by the Policy Assistant, then the current set of checks hasn't detected issues. However, there could be potential issues not covered by the checks currently running.
Policy checks can run without saving the policy; any unsaved changes are checked when you access the Policy Assistant.
To access the assistant:
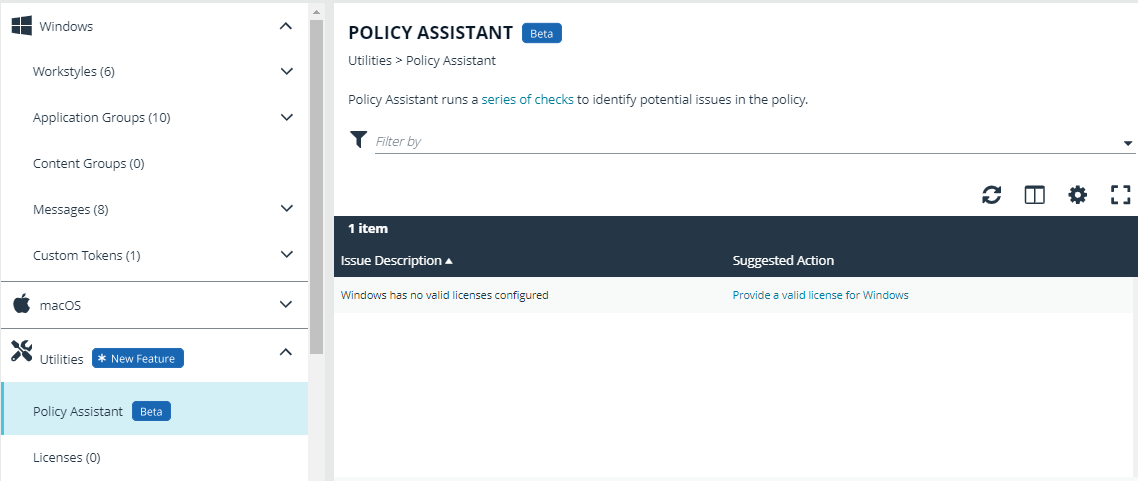
- In the Policy Editor, expand Utilities.
- Click the Policy Assistant tab.
- Click the suggested action link to remediate the potential policy issue identified.
Policy Editor licensing
Endpoint Privilege Management for Windows requires a valid license code to be entered in the Policy Editor. If more than one policy is applied to a computer, you need at least one valid license code for one of those policies.
For example, you could add the Endpoint Privilege Management for Windows license to an Endpoint Privilege Management policy that is applied to all managed endpoints, even if it does not have any Workstyles. This ensures all endpoints receive a valid license if they have Endpoint Privilege Management for Windows installed. If you are unsure, then we recommend you add a valid license when you create the Endpoint Privilege Management policy.
To add a license:
- In the Policy Editor, expand Utilities.
- Click the Licenses tab.
- Click Add.
- Enter the license key, and then click Add License.
Import policy
Policies can be imported to and exported from Group Policy as XML files, in a format common to other editions of Endpoint Privilege Management, such as the Endpoint Privilege Management ePO Extension. Policies can be migrated and shared between different deployment mechanisms.
- In the Policy Editor, expand Utilities.
- Select Import Policy.
- Select one of the following:
- Merge Policy
- Overwrite Policy: If you select to overwrite, you can optionally select Export Existing Policy to save a copy before overwriting the policy.
- Drop the file onto the box or click inside the box to navigate to the file.
- Click Upload File.
Import template policies
You can import a template and merge or overwrite the settings in an existing template.
- In the Policy Editor, expand Utilities.
- Select Template Policies.
- Select one of the following:
- Merge Policy: Merges the configuration to the existing template.
- Overwrite Policy: If you select to overwrite, you can optionally select Export Existing Policy to save a copy before overwriting the policy.
- Select a template from the list: Discovery, QuickStart for Mac, QuickStart for Windows, Server Roles, TAP (High Flexibility), TAP (High Security).
- If you are merging, select Merge Template Policy to save the settings. If you are overwriting, select Overwrite Policy.
Manage audit scripts
When an application is allowed, elevated, or blocked, an event is logged to record details of the action. Actions are recorded in a third party tracking system by using audit scripts. You can write audit scripts in Powershell or Javascript and configure these scripts through the web policy editor.
- In the Policy Editor, expand Utilities.
- Select Manage Audit Scripts.
- Click Upload Script to expand the Upload Script panel.
- Click the following menus to further configure the script:
- Timeout Options
- Context Options
- Click inside the upload box to select the script.
Manage rule scripts
You can upload, view, and delete Power Rules in the Policy Editor.
The script must be a Windows PowerShell script in JSON format.
- In the Policy Editor, expand Utilities.
- Select Manage Rule Scripts.
- Click Upload Script to expand the Upload Script panel.
- Select a value from the Timeout options list.
- Drag and drop the new script into the upload box or click to select a file.
- Click Upload Script to save your changes.
After a script is uploaded, you can delete or upload an updated script at any time.
For more information, see Apply Power Rules Scripts to Your Application Rules.
Advanced Agent Settings
You can configure the Advanced Agent Settings utility through the Policy Editor to deploy additional registry based settings to endpoints that are running EPM-W.
Back up your Windows registry before making any changes. BeyondTrust Technical Support will not provide support for any issues that might occur when you change registry settings.
- In the Policy Editor, expand Utilities.
- Select Advanced Agent Settings.
- Click Add to create a new setting.
- Type the desired value name.
- Select one of the following to designate the type:
- DWORD
- String
- Multi-String
- Click Create to confirm your changes and create the new setting.
Set up agent protection
Add agent protection to your endpoints to prevent admin users from tampering with the product, including stopping the services running or deleting its files from an endpoint.
EPM components protected and the level of protection are provided in the table.
| Action | EPM Component |
|---|---|
| Blocks uninstalls |
|
| Prevents stopping services |
|
| Blocks DLL injections |
|
| Blocks access to registry settings |
|
| File protection (deleting, moving, renaming, writing security attributes, or taking ownership) |
|
Set up protection
The setup is a two-part process:
- Generate public-private key pair.
- The public key is stored in a policy and distributed to all
- The password-protected private key must be stored securely by the administrator. The private key and private key password are required when you want to disable agent protection.
- The public key is stored in a policy and distributed to all
- Enable protection.
Generate key pairs
To generate the key pair:
- In the Policy Editor, expand Utilities.
- Select Agent Protection Settings.
- Click Generate Key.
- Enter a password to encrypt the private key.
- Click Generate Key.
- The private key is automatically downloaded to the local computer. The file name is private.pem. The public key is automatically inserted into the policy.
Enable agent protection
To enable protection:
- In the Policy Editor, expand Utilities.
- Select Advanced Agent Settings.
- Click Add.
- Enter AgentProtectionState in the Name box.
- Select 64 bit.
- Ensure type is DWORD.
- In the Decimal box, set the value to 1. The Hex value automatically populates with the same value. There are three possible states: 0 = off, 1 = enabled, 2 = disabled.
Agent protection is enabled after the policy is deployed and loaded by the Windows computers.
For more information about using agent protection, see Set up Agent Protection.
Regenerate UUIDs
When importing and exporting policies from external sources, it can sometimes be necessary to regenerate the internal policy Universally Unique Identifier (UUID), so that Reporting manages the events correctly. For most normal scenarios in which this is required (policy duplication, for example), this is handled seamlessly.
However, duplication by importing a text XML file will not be covered because sometimes you will not want to regenerate the UUIDs, such as when restoring a policy from a backup.
To regenerate UUIDs:
- In the Policy Editor, expand Utilities.
- Select Regenerate UUIDs.
- Click the Regenerate UUIDs button.
A success message displays at the bottom center of the page.