Configure session monitoring
Session monitoring records the actions of a user while they access your password-protected managed systems. This allows you to identify any suspicious activities while maintaining the integrity of your systems. The actions are recorded in real time with the ability to bypass inactivity in the session, allowing you to view only the actions of the user.
You configure session monitoring when you add or edit a managed system.
There are additional settings you must configure, such as concurrent sessions and screen resolution.
All registry changes must be done on each machine hosting a resource broker.
File location
When a session is complete, the logs are copied to your Azure storage account and they can be played from there. If the copy fails, logs are saved in the folder C:\program files\beyondtrust\resource broker\session manager\data\sessionmonitoring\failed. By default, the file save is attempted three times over a 60 second retry period before it is copied to this folder.
We allocate whatever space is required to retain the data. Session data is retained for 1 year.
Configure concurrent sessions
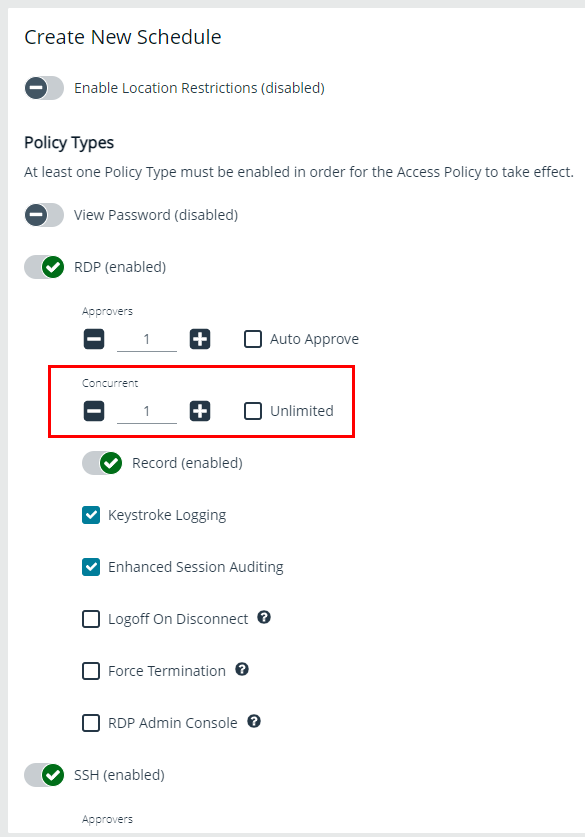
Remote sessions can be limited to a set number of concurrent sessions.
The option to increase or limit the number of sessions a user can open at one time is configured from the schedule settings within an Access Policy.
To modify the number of concurrent sessions:
- Navigate to Configuration > Privilege Access Management Policies > Access Policies.
- Select an Access Policy or create a new one.
- From the Schedule tab, select an existing schedule or click Create New Schedule to create a new one.
- Scroll down to Policy Types and select RDP or SSH.
- Set the number for the Concurrent option.
- Click Update Schedule or Create Schedule to save the schedule.
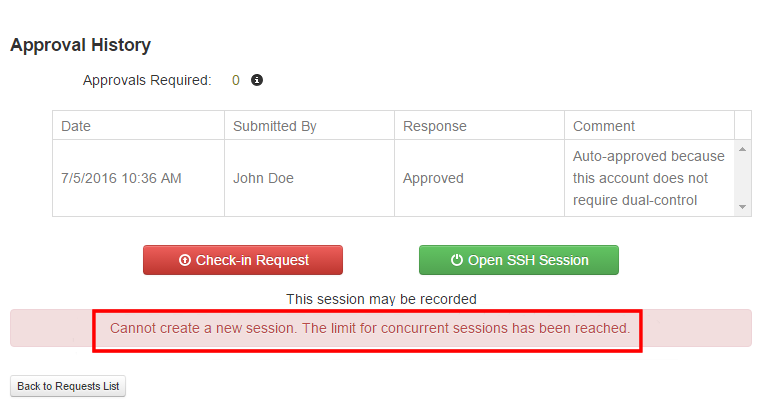
If a user tries to open more sessions than allowed, a message displays on the Requests page.
For more information, please see Configure Password Safe access policies.
Use session masking
Passwords can be hidden from session replays by applying a mask. When session masks are active, an SSH session recording at that time checks the keystrokes against the mask. Any matches are replaced. When the keystroke session is replayed, the viewer sees asterisks instead of the password. More than one mask can be active at a time.
Masks can be created, changed, and deleted. These actions are captured in user auditing.
- Navigate to Configuration > Privileged Access Management > Session Masks.
- To create a mask:
- Click Create New Mask above the grid.
- Enter a name for the mask and provide the mask pattern.
- Leave the Active option checked.
- Click Create Session Mask.
- To edit a mask:
- Locate the mask in the grid and click the vertical ellipsis button for it.
- Select Edit Session Mask.
- Edit the name and pattern for the mask as desired.
- Check or uncheck the Active option as appropriate.
- Click Update Session Mask.
- To delete a mask, click the vertical ellipsis button for the mask, and then select Delete.
Configure keystroke logging
Password Safe records keystrokes for all recorded sessions. Keystroke logging is enabled by default. When you open a recorded session, the pane on the right displays keystrokes. You can select a keystroke entry to view where that keystroke occurred. You can also filter keystroke entries by date, time, or keystroke in the Search box.
Turn off keystroke logging
You can turn off keystroke logging for ISA users and admin sessions as follows:
- Navigate to Configuration > Privileged Access Management > Global Settings.
- Under the Session Monitoring settings, clear the applicable keystroke logging options.
- Click Update Session Monitoring Settings.
Keystroke logging can be enabled for all other users when setting the scheduling options for an access policy.
For more information, please see Configure Password Safe access policies.
Enhanced session auditing
Enhanced session auditing captures and records all mouse activity in the Keystrokes menu of Recorded Sessions for RDP and RDP application sessions. Enhanced session auditing is enabled by default. It uses the rules in the access policy for Admin Session multi-session checkouts. During a recorded RDP session, an agent called pbpsmon is installed on the host for the duration of the session. The agent monitors and audits Windows click events.
Session monitoring captures text that is copied in an RDP session window. The copied text is captured only the first time. Any subsequent copy tasks of the same text are not captured for the session.
To use enhanced session auditing, the functional account of the managed Windows host or Remote Desktop Services host must have administrative rights.
Turn off enhanced session auditing ISA users
- Navigate to Configuration > Privileged Access Management > Global Settings.
- Under the Session Monitoring settings, clear the applicable enhanced session auditing options.
- Click Update Session Monitoring Settings.
You can turn off enhanced session auditing for admin sessions and all other non-ISA users, when setting the scheduling options for an access policy.
Troubleshoot enhanced session auditing
The following files are deployed as part of enhanced session auditing:
- pbpsdeploy (Password Safe Deployment Agent service)
- pbpsmon
- pbpslaunch
- pbpsmon and pbpslaunch (These are contained in a cab file that is copied to the Windows directory and extracted to C:\pbps\.)
pbpsdeploy
The pbpsdeploy.exe file resides in the Windows directory (C:\Windows).
- Access to ADMIN$ is required to copy pbpsdeploy.exe from Password Safe to the target server.
- Confirm the service is displayed in the Services snap-in after deployment.
- The output from the deployment service should be in the pbsm logs.
2017/03/07 15:47:12.186 2292 6548 INFO: Pushing pbpsdeploy service to 10.200.28.39 as user backupadmin
2017/03/07 15:47:13.528 2292 6548 INFO: Starting pbpsdeploy service on 10.200.28.39 as user backupadmin
2017/03/07 15:47:13.593 2292 6548 INFO: Copied pbpsmon.cab

2017/03/07 15:47:13.716 2292 6548 INFO: pbpsmon install:
    Using binary directory C:\Windows\
    Created directory C:\pbps
    Extracting File "pbpsmon.exe" (Size: 15872 bytes) -> "C:\pbps\pbpsmon.exe"
    Extracting File "pbpslaunch.exe" (Size: 145408 bytes) -> "C:\pbps\pbpslaunch.exe"
    Extracting File "msvcp120.dll" (Size: 455328 bytes) -> "C:\pbps\msvcp120.dll"
    Extracting File "msvcr120.dll" (Size: 970912 bytes) -> "C:\pbps\msvcr120.dll"
    Extracting File "vccorlib120.dll" (Size: 247984 bytes) -> "C:\pbps\vccorlib120.dll"
    Extracting File "libeay32.dll" (Size: 1359872 bytes) -> "C:\pbps\libeay32.dll"
    Extracting File "ssleay32.dll" (Size: 252928 bytes) -> "C:\pbps\ssleay32.dll"
    Creating registry keys
    Registry keys successfully created
    Creating task
    Task successfully created
pbpsmon
Verify the following setup has been performed by the deployment service:
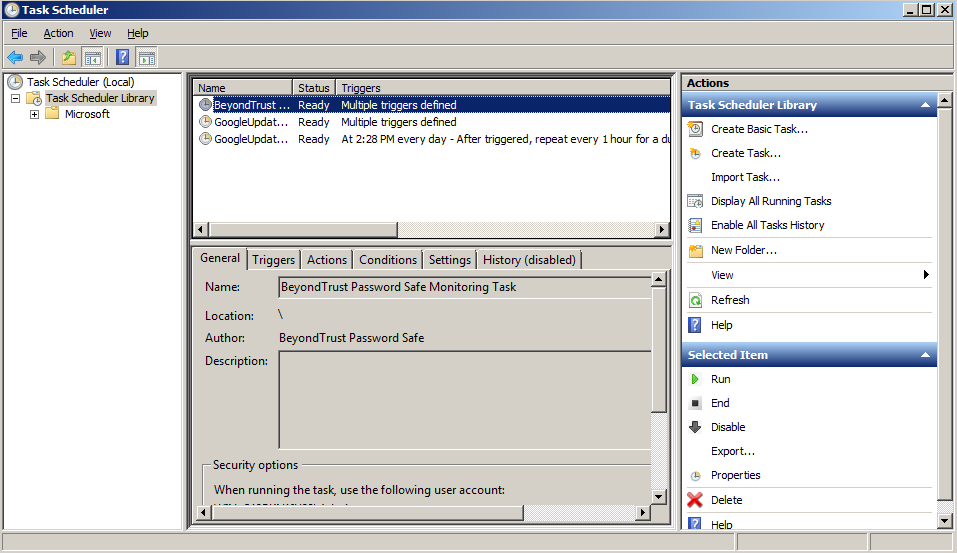
- In Task Scheduler, confirm the following task is created: BeyondTrust Password Safe Monitoring Task, or BeyondTrust Password Safe Disposable Monitoring Task. The task name depends on how enhanced session monitoring was installed.
- In regedit, the following registry key is created, which creates the disconnect event:
HKLM\System\CurrentControlSet\Control\Terminal Server\Addins\PBPSMON
pbpslaunch
Verify the following setup has been performed by the deployment service:
- In regedit, the following registry key is created:
HKLM\Software\Microsoft\Windows NT\CurrentVersion\TerminalServer\TSAppAllowList\Applications\pbpslaunch

- A pbpslaunch entry exists in RemoteApp Manager.
- Locate the log statement Accepting RDP Channel <name>. There should be one for pbpsmon, and if it is an application session, one for pbpslaunch.
2017/03/07 15:47:14.659 3672 4788 INFO: Accepting RDP Channel PBPSMON
- The Event Viewer on the target server includes setup and cleanup results of pbpsmon and pbpslaunch sent to pbsmd.
- Open Event Viewer.
- Expand Windows Logs.
- Click Application.
- Filter the application log on Source = pbpsdeploy.

Configure Algorithms used by the session monitoring proxy
The encryption algorithms (ciphers), host key algorithms, key exchange (kex) algorithms, and MAC algorithms that may be used by Password Safe between the user's SSH client and the SSH proxy are configurable using the following registry keys:
The encryption algorithms (ciphers), host key algorithms, key exchange (kex) algorithms, and MAC algorithms that may be used by Password Safe between the SSH proxy and the managed system are configurable using the following registry keys:
Each of these keys, if defined, must hold a multi-string value (REG_MULTI_SZ), with one algorithm name per line.
For example, ciphers might be:
- aes128-ctr
- aes192-ctr
- aes256-ctr
This restricts the available encryption algorithms to those named.