Create a Self-Signed Certificate
A self-signed certificate can be used on a temporary basis for testing or installing a BeyondTrust Appliance B Series. Self-signed certificates do not provide the security or features of a certificate from a public certificate authority (CA). A CA-signed certificate is recommended for long-term or production environments.
Self-signed certificates are created in the BeyondTrust /appliance web interface. Once created, the BeyondTrust software must be updated by BeyondTrust Technical Support.
For more information, please see Create a Certificate Signed by a Certificate Authority.
Create the Certificate
Customers with a cloud site environment cannot create a self-signed certificate.
Certificates consist of a friendly name, key, subject name, and one or more subject alternative names. You must enter this information in the BeyondTrust /appliance web interface to create a self-signed certificate.

- Log into the /appliance web interface of your B Series Appliance and go to Security > Certificates.
- Provide the following information to create your self-signed certificate:
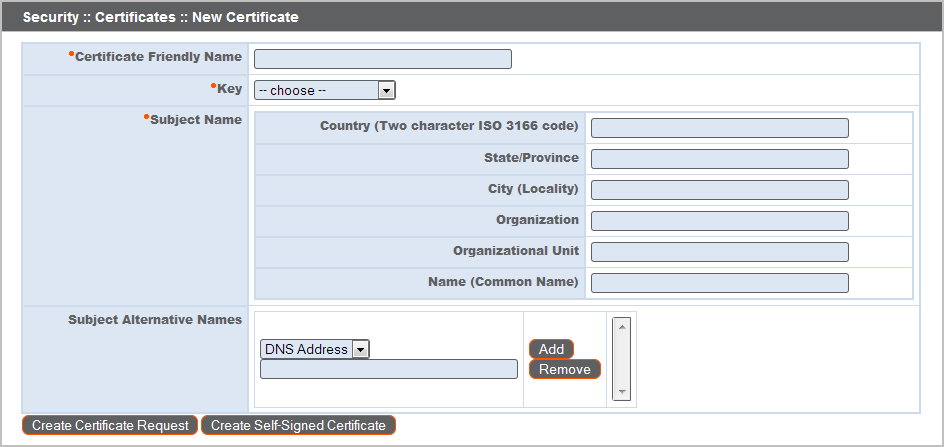
- Certificate Friendly Name: A descriptive title used to identify your certificate request on the B Series Appliance Security > Certificates page. Examples could include your primary DNS name or the current month and year.
- Key: Select a key size from the dropdown. Larger key sizes normally require more processing overhead and may not be supported by older systems. However, smaller key sizes are likely to become obsolete or insecure sooner than larger ones. If using a certificate authority, verify which key strengths they support.
- Subject Name: These fields consist of the contact information for the organization and department creating the certificate along with the name of the certificate.
- Country: The two-character ISO 3166 country code for your organization. If you are unsure of your country code, please visit www.iso.org/iso-3166-country-codes.html.
- State/Province: The full state or province name of your organization, if applicable.
- City (Locality): The city of your organization.
- Organization: Your organization or company name.
- Organizational Unit: The group or department within the organization managing the certificate and/or the BeyondTrust deployment for the organization.
- Name (Common Name): A human-readable title for your certificate. This name must be unique to differentiate the certificate from others on the network, which could include the public internet. It is not recommended that you use your DNS name as the common name.
- Subject Alternative Names: A list of the fully qualified domain names for each DNS A-record which resolves to your B Series Appliance (e.g., support.example.com). After entering each subject alternative name (SAN), click the Add button.
A SAN lets you protect multiple hostnames with a single SSL certificate. A DNS address could be a fully qualified domain name, such as support.example.com, or it could be a wildcard domain name, such as *.example.com. A wildcard domain name covers multiple subdomains, such as support.example.com, remote.example.com, and so forth. If you are going to use multiple hostnames for your site that are not covered by a wildcard certificate, be sure to define those as additional SANs.
If you entered the fully qualified domain name as your subject's common name, you must re-enter this as the first SAN entry. If you wish to use IP addresses instead of DNS names, contact BeyondTrust Technical Support first.
If you plan to use multiple B Series Appliances in an Atlas setup, it is recommended that you use a wildcard certificate that covers both your BeyondTrust site hostname and each traffic node hostname. If you do not use a wildcard certificate, adding traffic nodes that use different certificates will require a rebuild of the BeyondTrust software.
- Click Create Self-Signed Certificate and wait for the page to refresh. The new certificate should now appear in the Security :: Certificates section.
Update the BeyondTrust Appliance B Series
To ensure the reliability of your client software, BeyondTrust Technical Support builds a copy of your certificate into your software. When you create a new certificate, you must send BeyondTrust Technical Support a copy of your certificate and also a screenshot of your Status > Basics page to identify the B Series Appliance being updated.
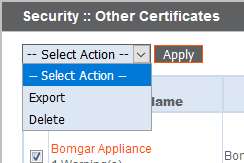
- Go to /appliance > Security > Certificates and export a copy of your new certificate.
- Check the box next to the new certificate in the Security :: Certificates table.
- From the Select Action dropdown menu above the table, select Export. Then click Apply.
- Uncheck Include Private Key, click Export, and save the file to a convenient location.
Do NOT send your private key file (which ends in .p12) to BeyondTrust Technical Support. When exporting your certificate, you have the option to Include Private Key. If a certificate is being exported to be sent to BeyondTrust Technical Support, you should NOT check Include Private Key. This key is private because it allows the owner to authenticate your B Series Appliance's identity. Ensure that the private key and its passphrase are kept in a secure, well-documented location on your private network. If this key is ever exposed to the public (via email, for instance), the security of your B Series Appliance is compromised. Never export your private key when requesting software updates from BeyondTrust. A certificate without the private key usually exports as a file with the .cer, .crt, .pem, or .p7b extension. These files are safe to send by email and to share publicly. Exporting certificates does not remove them from the B Series Appliance.

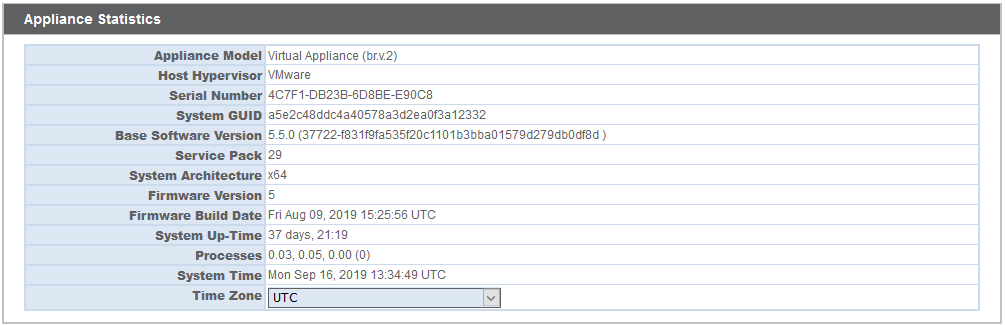
- Go to /appliance > Status > Basics and take a screenshot of the page.
- Add the saved screenshot and the exported certificate to a .zip archive.
- Compose an email to BeyondTrust Technical Support requesting a software update. Attach the .zip archive containing the certificate and screenshot. If you have an open incident with Support, include your incident number in the email. Send the email.
- Once BeyondTrust Technical Support has built your new software package, they will email you instructions for how to install it. Update your software following the emailed instructions.
After these steps are complete, it is advisable to wait 24-48 hours before proceeding further. This allows time for your BeyondTrust client software (especially Jump Clients) to update themselves with the new certificate which BeyondTrust Technical Support included in your recent software update.
SSL Certificate Auto-Selection
BeyondTrust uses Server Name Indication (SNI), an extension to the TLS networking protocol, to allow any SSL certificate stored on the B Series Appliance to be served to any client. Because most TLS clients send SNI information at the start of the handshaking process, this enables the B Series Appliance to determine which SSL certificate to send back to a client that requests a connection.
You may choose a default certificate to serve to clients who do not send SNI information with their request, or to clients who do send SNI information, but which does not match anything in the B Series Appliance database.

- Go to /appliance > Security > Certificates.
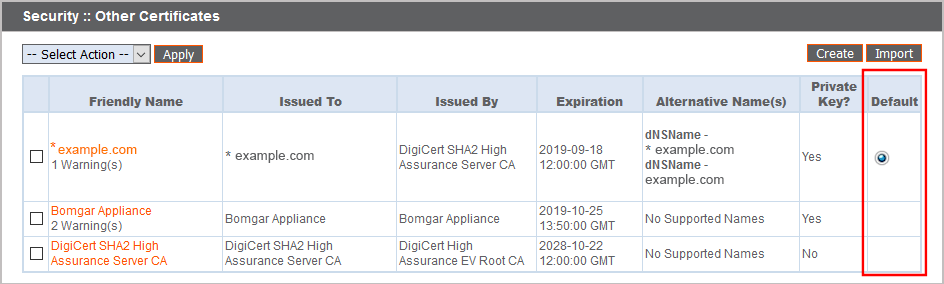
- In the Default column, select the radio button for the certificate you wish to make default.
Once your certificate is installed and your appliance is updated, the B Series Appliance should be operational and ready for testing.
For information on long-term or production deployments, see Create a Certificate Signed by a Certificate Authority