Install a Jump Client on a Mac System
You can override certain installation parameters specific to your needs. These parameters can be specified using a systems administration tool or the command line interface. When you mark specific installation options for override during installation, you can use the following optional parameters to modify the Jump Client installer for individual installations. Note that if a parameter is passed on the command line but not marked for override in the /login administrative interface, the installation fails. If the installation fails, view the operating system event log for installation errors.
It is common to receive an error message during the install, regarding a layout or appearance issue. This can be disregarded.
| Command Line Parameter | Value | Description |
|---|---|---|
| --jc-name | <name...> | If override is allowed, this command line parameter sets the Jump Client's name. |
| --jc-jump-group |
user:<username>
|
If override is allowed, this command line parameter overrides the Jump Group specified in the Mass Deployment Wizard. |
| --jc-public-site-address | <public-site-address-hostname> |
If override is allowed, this command line parameter associates the Jump Client with the public portal which has the given host name as a site address. If no public portal has the given host name as a site address, then the Jump Client reverts to using the default public site. |
| --jc-session-policy-present | <session-policy-code-name> |
If override is allowed, this command line parameter sets the Jump Client's session policy that controls the permission policy during a support session if the customer is present at the console. |
| --jc-session-policy-not-present | <session-policy-code-name> |
If override is allowed, this command line parameter sets the Jump Client's session policy that controls the permission policy during a support session if the customer is not present at the console. |
| --jc-jump-policy | <jump-policy-code-name> |
If override is allowed, this command line parameter sets the Jump Policy that controls how users are allowed to Jump to the Jump Client. |
| --jc-tag | <tag-name> |
If override is allowed, this command line parameter sets the Jump Client's tag. |
| --jc-comments | <comments ... > |
If override is allowed, this command line parameter sets the Jump Client's comments. |
| --silent |
If included, the installer shows no windows, spinners, errors, or other visible alerts. |
|
|
If --silent is selected, sudo must be used, otherwise the installation will fail as a prompt during installation does not display. |
||
A Jump Client can also be installed in service mode.
Enable a Jump Client on a Mac System
After a Jump Client is installed on a Mac system, it must be enabled by the end user. The exact steps, wording, and screen displays vary depending on the device and software version. Screen images show the Privileged Remote Access endpoint client, installed on a macOS desktop, however the process is similar for the Remote Support customer client and with other devices.

Three types of access are requested: Screen Recording, Accessibility, and Full Disk Access. For the best remote support experience, grant access for all three. Limited support is available if only one or two types of access are granted.
To grant access, the user takes the following steps for each type of access:
- Click Grant Access...

- Under Privacy & Security, applications that have requested access for the selected feature are listed. Toggles indicate if access has been granted. The newly installed client is disabled by default. Click the toggle to grant access to the client for this feature.
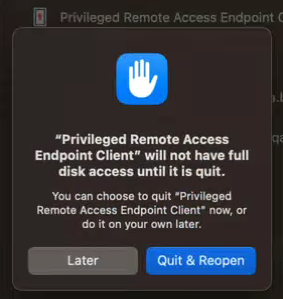
- For the feature Full Disk Access, granting access requires stopping and restarting the client application. Click Quit & Reopen to grant access immediately. Jump Client icon disappears and re-appears within a few minutes.
The end user can grant or deny access at any time by clicking Settings > Privacy & Security, selecting the feature, Accessibility, Screen Recordings, or Full Disk Access, and then clicking the toggle.
Uninstall a Jump Client
To uninstall a Jump Client, remove it from the representative console.
If the client is not connected when it is removed from the console, the files are removed next time the client authorizes with the server.
For information about Jump Client settings, please see Configure Jump Client Settings.