Install the Endpoint Privilege Management Reporting Database
Prerequisites
To install the Privilege Management Reporting database, the MS OLE DB v19 SQL Database Driver must be installed. The driver has a dependency on both the X86 and X64 versions of the Microsoft Visual C++ 2015-2022 Redistributable v14.34 (and later). Both components must also be installed.
The Privilege Management Reporting database EXE installer checks if the correct versions of the MS OLE DB driver and VC++ redistributable are already installed. If not, the components are automatically installed by the Privilege Management Policy Editor EXE installer.
If using the MSI to install the Privilege Management Reporting database, the prerequisites need to be manually installed if they don’t already exist on the machine where the installer is being run.
Visit the following websites to install these components separately.
For more information, see:
The installation of the Microsoft Visual C++ Redistributables can require a reboot. Plan the installation accordingly.
- If using the Privilege Management Reporting database EXE to install these components: If a reboot is required, there will be one request to reboot at the end of the installation.
- If installing the X86 and X64 versions of the Microsoft Visual C++ Redistributables separately: If a reboot is required, there may be a separate reboot request at the end of each of the installations.
Installation
To install Endpoint Privilege Management Reporting database, run the Endpoint Privilege Management Reporting Database installation package with the Database Creator user that you set up when you created the required user accounts.
The Endpoint Privilege Management Reporting Database installer assigns specific privileges to the user accounts that you created previously.
- Run the installation package and click Next to continue. The License Agreement dialog box appears.
- To accept the agreement, select I accept the terms in the license agreement and click Next. The Database Server dialog box appears.
- Set the Database server to use for Endpoint Privilege Management audit data as (local) if you are using the same machine for your database server and you didn't create an instance. If you did create an instance, you need to add it here, for example (local)\BeyondTrustReporting, where the instance is BeyondTrustReporting. The database servers are available from the dropdown menu.
- Type a new name in the Name of database catalog for Endpoint Privilege Management audit data field.
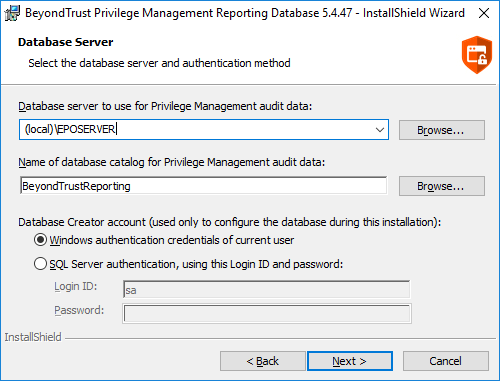
- Select to either use the Windows credentials of the current user or you can use SQL server authentication. If you choose SQL server authentication you need to enter the Login ID and Password before you can proceed.
- Click Next. The Configure Event Parser Database User dialog box appears.
- If you are using the default Endpoint Privilege Management Reporting database users for BeyondTrust Reporting, check the Configure a user in the database for the event parser service box. Select your EventParser user. In this example we are using a Windows user that we've previously created.
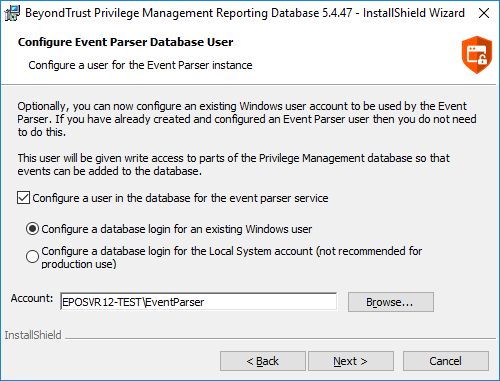
- Click Browse and navigate to the EventParser user that you created.
Once you have selected a local or domain machine, ensure you select a user that you know exists in that location; otherwise, the installation will fail.
- Click Next. The Configure Reporting Services Database User dialog box appears.
- If you are using the default Reporting users for Endpoint Privilege Management Reporting, check the Create or configure a user in the database to read data for the reports box. Select to either use an existing Windows user or create a new SQL server user. In this example we use a Windows user that we previously created.
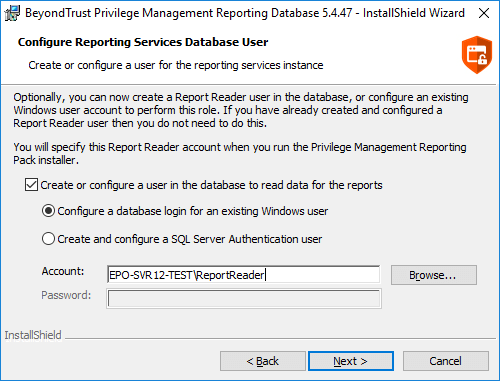
- Click Browse to navigate to the ReportReader user that you created.
Once you have selected a local or domain machine, ensure you select a user that you know exists in that location; otherwise, the installation will fail.
- Click Next. The Configure Data Admin Database User dialog box appears.
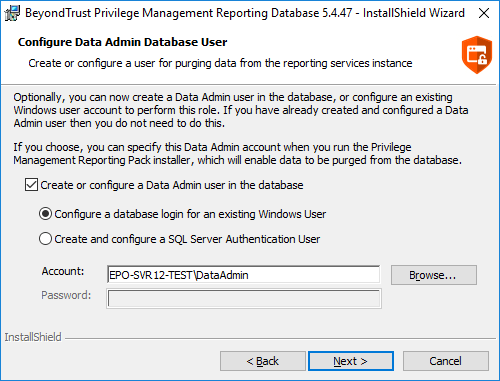
- If you are using the default Reporting users for Endpoint Privilege Management Reporting, check the Create or configure a Data Admin user in the database box. Select to either use an existing Windows user or create a new SQL server user. In this example we use a Windows user that we previously created.
- Click Browse to navigate to the DataAdmin user that you created.
Ensure you select a user that you know exists on the domain or local machine that you've selected; otherwise, the installation will fail.
- Click Next and then Install to finish the installation. You have now installed the Endpoint Privilege Management Reporting database.
For more information, see Create the Required Database User Accounts.