Application Rules
Application Rules are applied to Application Groups. Application Rules can be used to enforce allowlisting, monitoring, and assigning privileges to groups of applications. They are a set of rules that apply to the applications listed in the Application Group.
You must have an Application Group before you can create an Application Rule.
Application Rules are color coded in the interface:
- Blue: A Power Rule is assigned to the Application Rule. This could be an allow or block action.
- Green: The default action is allow.
- Orange: The default action is block.
For more information, see the following:
Insert an Application Rule
Click Application Rules to view, create, or modify the following for each Application Rule:
| Target Application Group |
Select from the Application Groups list.
|
| Run a Rule Script |
This option allows you to assign a Rule Script that runs before the Application Rule triggers.
You need to use Manage Scripts from the dropdown to import your Rule Script before you can select it.
Select the Rule Script you want to use from the dropdown list.
|
| Action |
Select from Allow Execution or Block Execution. This is what happens if the application in the targeted Application Group is launched by the end user. |
| End User Message |
Select whether a message will be displayed to the user when they launch the application. We recommend using messages if you blocking the execution of the application, so the end user has some feedback on why the application doesn't launch. |
| Password Safe Account Name |
If you deploying the BeyondInsight management console, you can integrate Password Safe with Endpoint Privilege Management for Windows. These features are detailed in the BeyondInsight Integration Guide.
|
| Access Token |
Select the type of token to pass to the target Application Group. You can select from:
- Passive (no change): No changes are made to the token. This is essentially an audit feature.
- Enforce User's default rights: Removes all rights and uses the user's default token. Windows UAC always tries to add administration rights to the token being used so if the user clicks on an application that triggers UAC, the user cannot progress past the UAC prompt.
- Drop Admin Rights: Removes administration rights from the user's token.
- Add Full Admin (Required for installers): Use the full admin token in scenarios where your users require privileges SeDebugPrivilege or SeLoadDriverPrivilege. An example use case is MSI files running in a client/server mode where SeDebugPrivilege is required to interact with the server component which runs as SYSTEM. This only applies to cases where the standard user needs to run the MSI directly.
- Add Basic Admin Rights: Permits elevation of most applications and tasks. We recommend using this token as the default elevation token. This access token is essentially full admin but excludes the following privileges: SeDebugPrivilege and SeLoadDriverPrivilege. If users need to debug applications or access drivers, then use the full admin token.
- Privilege Management Support Token: Applies Add Full Admin privileges with tamper protection removed.
- Keep Privileges - Enhanced:This token behaves similar to the Passive (no change) token in that there is no change to privilege, elevation, or integrity level. The token uses the same privileges of the original process token and adds some additional context to it: the token is added to the anti-tamper group and will be tracked by the advanced parent tracking feature. This access token can only be used with application rules.
|
| Auditing
|
| Raise an Event |
By default, user and computer information is included in all audit events. Events are forwarded to a local event log file.
To not include user and computer information in the audit, set Raise an Event to On (Anonymous).
Event fields that contain user directory information may still contain a username within the file path.
|
| Run an Audit Script |
This option allows you to select an audit script to run after the Application Rule.
You need to use Manage Scripts from the dropdown to import your audit script before you can select it.
Select the audit script you want to use from the dropdown list.
|
| Privilege Monitoring |
Raises a privileged monitoring event. |
|
McAfee ePO Reporting Options
This option is only available if you checked the McAfee integration box when you installed the Endpoint Privilege Management Policy Editor.
|
| ePO Threat Events |
Select this option to raise an ePO threat event. These are separate from Endpoint Privilege Management reporting events. |
| Endpoint Privilege Management Reporting (in ePO) |
Select this option to raise an Endpoint Privilege Management reporting event. These are available in BeyondTrust Reporting. |
| |
|
| BeyondInsight Reporting |
|
| BeyondInsight Events |
When configured, sends BeyondInsight events to BeyondInsight. |
| Endpoint Privilege Management Reporting |
When configured, sends Endpoint Privilege Management reporting events to BeyondInsight. |
For more information, see the following:
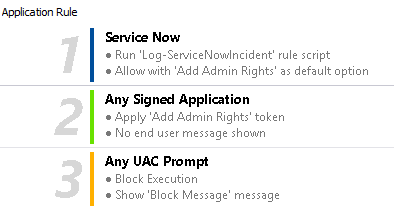
Application Rule Precedence
If you add more than one Application Rule to a Workstyle, entries that are higher in the list have a higher precedence. Once an application matches an Application Rule, no further rules or Workstyles are processed. If an application can match more than one Workstyle or rule, then it is important that you order both your Workstyles and rules correctly. You can move Application Rules up and down to change the precedence.