Use ServiceNow to manage user requests
Integrate Endpoint Privilege Management with ServiceNow to manage user requests. In a typical Endpoint Privilege Management scenario, the end user tries to launch an application that requires elevated privileges or falls outside of existing policy rules. With this integration, the user sends a request to run the application from EPM to their existing ServiceNow instance as a ticket.
The following ServiceNow ticket types are supported in the EPM integration: Incident, Change Request, Service Catalog - Task, and Service Catalog - Requested Item.
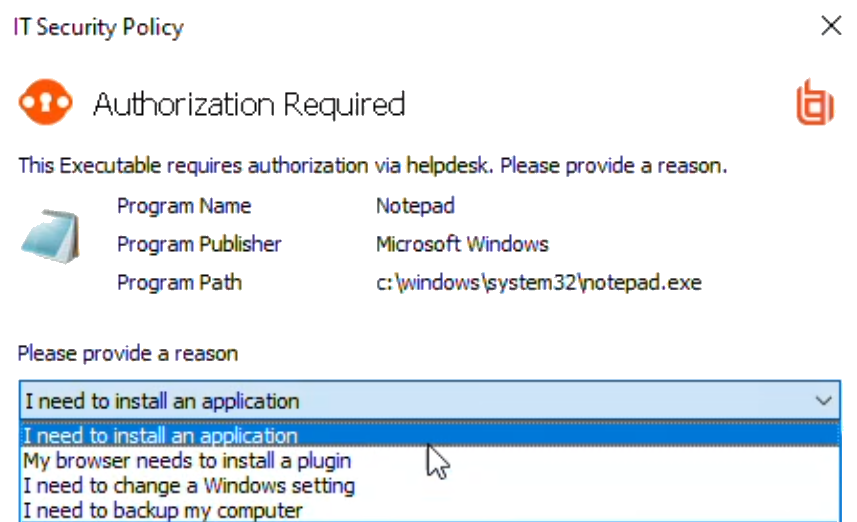
The screen capture shown here is an example of how the messages appear for the end user in a ServiceNow integration. Similar to other Application Rules in Endpoint Privilege Management, the user can select from a list of reasons for the request, or use free-form text.
Configuration includes:
- Download the BeyondTrust Endpoint Privilege Management Integration app from the ServiceNow store.
- Create a user account in ServiceNow, with required role.
- Activate and configure a connection to ServiceNow in EPM.
- Configure the connection details to EPM in ServiceNow.
- Create an Application Rule in the Policy Editor and apply messages to the rule that are specific to ServiceNow authorization.
Download and install the Endpoint Privilege Management app
- Go to the ServiceNow Store.
- Search for BeyondTrust. The search displays all BeyondTrust products that integrate with ServiceNow.
- Find the BeyondTrust Endpoint Privilege Management Integration app.
- Download and install the app into your ServiceNow tenant.
Create an OAuth client for EPM
If the OAuth client for EPM has not been created automatically, then install it using these steps. Otherwise, proceed to creating a user account in ServiceNow.
EPM must be added as an OAuth client in ServiceNow.
- In ServiceNow, go to Application Registry.
- Configure the settings as shown.
- Make note of the client ID and client secret. These values are needed for section Configure the ServiceNow Integration in EPM.
Create a user account in ServiceNow
The API Account is used by Endpoint Privilege Management to submit requests via the inbound integration. An OAuth token is also created as an extra layer of security.
When setting up the user account, the x_bmgr_pmc.api role is required.
- Go to User Administration > Users.
- Enter a User ID (pmc_api).
- Enter a password.
- Select Web service access only and click Submit.
- Browse again to User Administration > Users.
- Select the API user.
- Click the Roles tab, and then click the Edit... button.
- From the Collection list, add the x_bmgr_pmc.api role to the Roles list, and then click Save.
Assign users appropriate roles
The following roles must be assigned to specific users in the ServiceNow integration:
- x_bmgr_pmc.itil: Assign to any users that will be providing technical support for the integration.
- x_bmgr_pmc.admin: Assign to any administrator users that you want to manage the ServiceNow integration.
- x_bmgr_pmc.api: Assign to API accounts that are used by BeyondTrust Endpoint Privilege Management to submit requests via the inbound integration.
You must elevate the admin role to assign roles.
To assign a role to a user:
- Go to User Administration > Users.
- Select a user.
- Click the Roles tab, and then click the Edit... button.
- From the Collection list, add the appropriate role for that user to the Roles list:
- x_bmgr_pmc.itil
- x_bmgr_pmc.admin
- x_bmgr_pmc.api
- Click Save.
Configure the ServiceNow integration in EPM
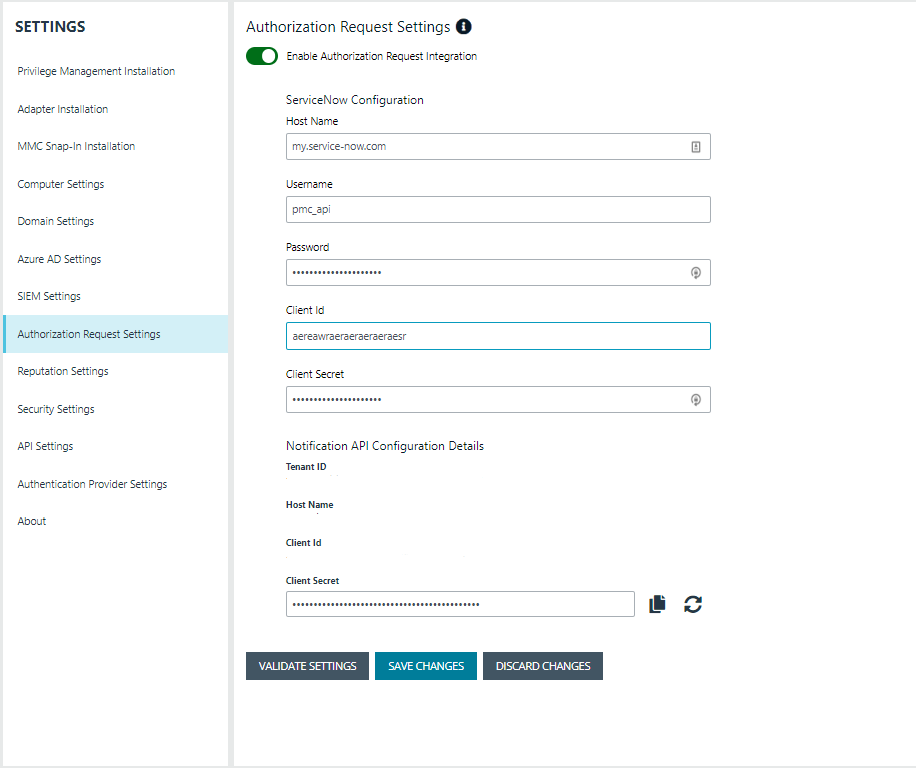
Before you can configure the connection to EPM in ServiceNow, you must generate the Client ID and Client Secret in the EPM console. You need this information to complete the configuration in ServiceNow.
Starting in EPM 24.3, client ID and client secret are generated in API Settings.
To configure the authorization request integration:
- Go to Configuration > Authorization Request Settings.
- To activate the integration, select Enable Authorization Request Integration.
- Under ServiceNow Configuration, enter the following:
- Host name: The host name provided on the Configuration page in ServiceNow. Do not include https:// in the hostname.
- Username and Password: Enter the user account information you created in ServiceNow.
- Client ID and Client Secret: Copy the values generated in ServiceNow. See Create an OAuth Client for EPM.
- Under Notification API Configuration Details, the Tenant ID and Host Name are auto-generated.
- To create the Client ID and Client Secret used by the Integration in ServiceNow, click the Generate button.
- To confirm the connection, click Validate Settings.
- Click Save Changes.
- To copy the Client Secret information, at the right of the Client Secret field, click the Copy button.
You can then proceed with configuring the connection to EPM in ServiceNow, and paste the Client Secret information you just copied.
You must also manually copy and paste the Client ID information from EPM to the ServiceNow BeyondTrust Endpoint Privilege Management Configuration page.
Configure the connection to EPM in ServiceNow
An Endpoint Privilege Management instance is required for full operation. The appliance is setup in ServiceNow to connect ServiceNow with an EPM instance.
- Go to BeyondTrust Endpoint Privilege Management > Configuration.
- To turn on the integration to EPM, select Yes.
- To configure the outbound integration, enter the following:
- PMC Tenant ID: The Tenant ID of the Endpoint Privilege Management appliance.
- PMC Client ID: The OAuth client ID that is used to authenticate to the Endpoint Privilege Management appliance. Copy and paste this from the EPM Authorization Request Settings page.
- PMC Client Secret: The OAuth client secret that is used to authenticate to the Endpoint Privilege Management appliance. Copy and paste this from the EPM Authorization Request Settings page.
- PMC Service Host Name: The hostname of the Endpoint Privilege Management appliance.
- Ticket Type: The ticket type that is generated with a user authorization request. The ticket can be one of four types: Incident, Change Request, Service Catalog - Task, or Service Catalog - Requested Item.
- To configure the application defaults (optional), enter the following:
- Default Assignment Group: The default group assigned.
- Default Category for Task: The default category for tasks created by the application. The default is Software.
- Default Short Description for Incidents and Change Requests: The default short description created by the application when attempting to create an incident or change request based on the task type.
- Default Service Catalog Item Name: The name of the service catalog item used when creating service catalog requests.
- Active State Codes for Change Request: A comma-separated list of states in which the integration actions are available to users. This list is for change requests only. (For example,Implement).
- Active State Codes for Incidents: A comma-separated list of states in which the integration actions are available to users. This list is for incidents only. (For example,New, In Progress).
- Active States for Service Catalog Tasks: A list of states in which the integration actions are available to users. This list is for Service Catalog tasks only.
- Short Description for Service Catalog Task used to approve request: The default short description, which is matched to place the custom form on the created application request.
- Click Save.
Testing the configuration
The ServiceNow Connection Test Tool verifies connectivity to the Endpoint Privilege Management host. It tests the Client ID and Client Secret.
- Go to BeyondTrust Endpoint Privilege Management > Connection Test Tool.
- Click Test.
Restrict access to applications
In the ServiceNow authorization request workflow, you can restrict access to application requests. On an approved request, Help Desk can set a time limit in the ServiceNow ticket. The time limit is the length of time the user can use the application before the approval automatically expires.
Under the Application, Policy, or Decision tab, select a duration.
Access time limit can be one of the following:
- Once: Permits access to the application only one time.
- Hour: Enter the number of hours the user will be permitted access, between 1 and 24.
- Day: Enter a day between 1 and 31.
- Month: Enter a month between 1 and 12.
Click Approve.
After the time expires, the user can no longer access that application. The user must go through the request workflow again, with the Help Desk personnel approving and selecting a duration time for access.
Duration settings are included in the authorization auditing.
The client checks an application's authorization access when the end user attempts to run the program. If the duration settings have been correctly configured, a message appears indicating the outcome of the ServiceNow request. The user receives a new message indicating that the application has been either Denied or Approved once the policy has been updated or when they attempt to run the application again.
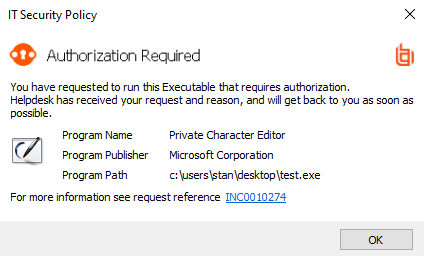
A pending message displays to the end user until a decision on their request is made in ServiceNow.
To view the status on their ServiceNow ticket, the end user can click the request reference link.
Use Service Catalog as the Task Type
You must configure the following if your ServiceNow infrastructure uses Service Catalog to manage user requests.
- In ServiceNow, select Service Catalog - Requested Item (or Service Catalog - Task) as the Task Type on the Authorization Request Settings page.
- In ServiceNow, you must add EPM as a Catalog item.
Specific details on configuring the catalog item depend on your Service Catalog implementation.
Enable VirusTotal reputation score
You can enable the VirusTotal reputation score on ServiceNow tickets to assist with identifying potential malware and malicious content.
- Go to BeyondTrust Endpoint Privilege Management > Configuration.
- Select Reputation Settings from the menu.
- Click the toggle switch Enable VirusTotal Reputation Integration to turn on the feature.
- Enter the VirusTotal API key.
You will need a VirusTotal license before you can generate an API key.
- Click Validate Settings to confirm that the key is valid.
You can click the score link to go to the engine that determined the score.