Configure OpenID Connect

EPM supports OpenID Connect authentication. You can change your authentication provider from the default AzureB2B to OpenID Connect, or update your OpenID Connect settings, without having to contact Support.

You must first set up an EPM instance in your OpenID Connect provider. Steps are provided in the section below.

Configure an Authentication Provider

Authentication Provider Settings panel

When you start from the default configuration, use this procedure to set up the configuration.


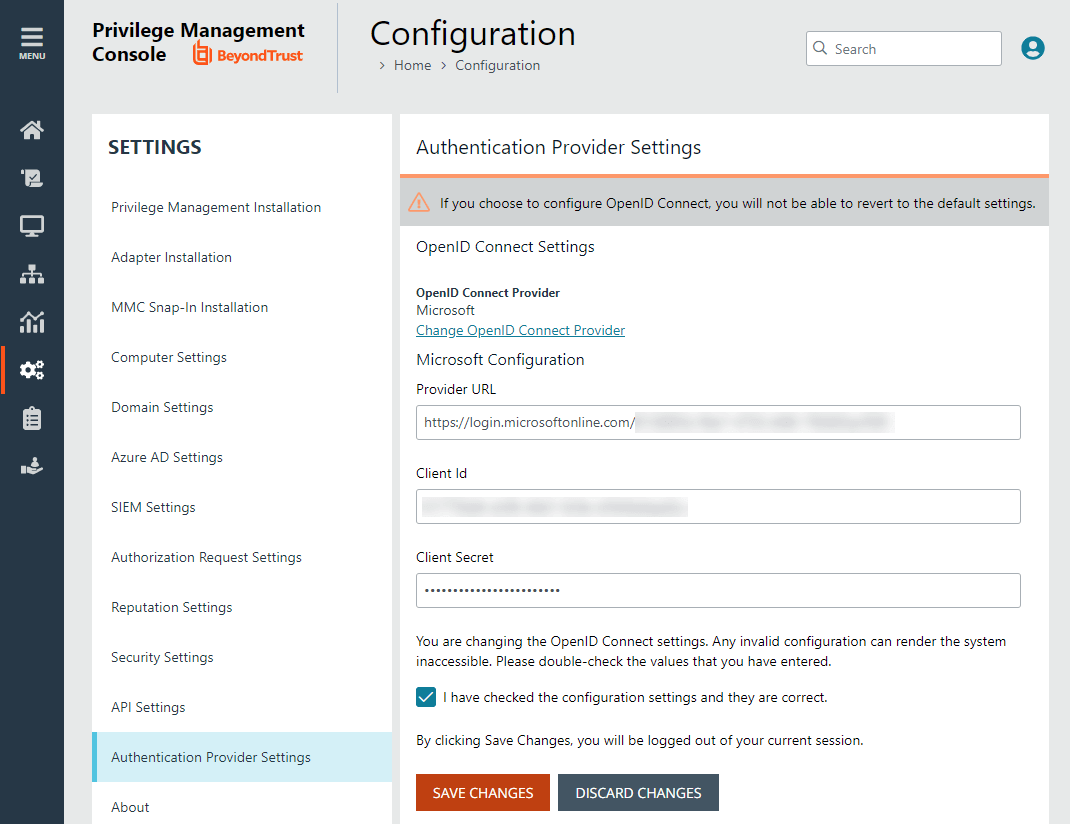
If you choose to configure OpenID Connect, you will not be able to revert to the default settings.

To set up an OpenID Connect provider:

  1. Select the Configuration menu, and then click Authentication Provider Settings.
  2. Click Enable OpenID Configuration. After you have completed and saved the OpenID configuration, this switch no longer appears on this page.
  3. Enter information for the following:
    • Provider URL: Domain for the authentication. Currently supports Microsoft, Okta, and Ping Identity.
    • Client ID: The client ID.
    • Client Secret: Secret key.
  4. Check the box. We recommend reviewing the settings you configured. You can potentially lock yourself out of the system if the settings are incorrect. The Save Changes button is only available after you check the box.
  5. Click Save Changes.


You will be logged out of the EPM console. Once logged out, you need to log back in within 15 minutes, because there is a timer on the page. If you do not log in before the timer expires, the authentication provider settings revert to the previous settings and the new settings are not saved.

If you log on before the timer expires, the newly added authentication provider settings are retained.

EPM OpenID Connect Workflow for Existing Customers

Here is the workflow to get up and running with EPM using OpenID Connect authentication.

  • You will receive an email from BeyondTrust after the request is processed.
  • In the email, click the link to open the BeyondTrust OpenID Setup page.
  • Enter the OpenID Connect information: domain, client ID, and client secret. Click Save Setup. The OpenID credentials are saved.
  • The Endpoint Privilege Management login page opens. Click Log In.
  • EPM opens to the Home page.

Add the EPM Application to Microsoft, Okta, or Ping Identity

EPM supports Microsoft Entra ID, Okta OpenID, and Ping Identity Connect providers. The following sections provide a high-level overview on adding the EPM instance to your respective authentication provider. For complete instructions, refer to the provider's documentation.

The migration to OIDC will work when the email address sent from Okta or Entra ID matches for existing users. If email addresses are different or the domain name is not on the list of allowed domains in EPM, then the authentications will fail.

Add EPM Instance to Microsoft Entra ID Tenant

  1. Log into your Microsoft Entra ID (formerly Azure AD) tenant.
  2. In the menu, click App Registrations.
  3. Click New Registration.
  4. Enter a Name.
  5. Under Supported account types, select Accounts in this org directory only.
  6. Enter the Redirect URI. While providing this now is optional and can be changed later, a value is required for most authentication scenarios.
    • From the dropdown list, select the Web platform.
    • Enter https://<deployment>-services.pm.beyondtrustcloud.com/oauth/signin-oidc where deployment is the name of your EPM tenant. For example, https://example-services.pm.beyondtrustcloud.com/oauth/signin-oidc
  7. Click Register.
  8. After EPM registers, select Authentication in the menu.
  9. Add the following to the Redirect URIs: https://<deployment>-services.pm.beyondtrustcloud.com/oauth/signout-callback-oidc where deployment is the name of your EPM tenant.

Grant admin consent in Microsoft Azure AD configuration

  1. Go to Manage > API Permission, and then select Grant admin consent.


  1. Select Certificates & secrets in the menu.
  2. Click New client secret, and copy the value. The value is visible until you leave the web page. When generating a new secret, you must select an expiry for the secret. We recommend selecting Recommended: 6 months

    After you add EPM to Microsoft Entra ID, you can get the information you need to set up the OpenID Connect authentication. The EPM OpenID connect setup wizard requires these values: OpenID Domain, OpenID Client ID, and Open ID Client Secret.

    Make note of these values before proceeding to step 13.

  3. On the app registration Overview page, copy the client ID and the tenant ID.
    • OpenID Domain:https://login.microsoftonline.com/<Directory (tenant) ID>. The directory or tenant ID uses the format 31b8dbb9-fb8b-437a-8920-f23c8e0188b1.
    • OpenID Client ID: Application (client) ID.
    • OpenID Client Secret: Client secret value.

Add EPM Instance to Okta

Supported Features

The Endpoint Privilege Management for Windows and Mac (also called EPM) - Okta integration allows logging into EPM platform using SP-initiated SSO flow.

Configure the Integration

  1. Access your Okta instance.
  2. Navigate to Applications, and then click the Browse App Catalog button.
  3. Search for an app called BeyondTrust Privilege Management Cloud - Windows and Mac.
  4. Click Add Integration.

Okta configuration showing the General settings for the EPM instance.

  1. Click Done.


Okta configuration for the EPM instance.

  1. While in the new application, navigate to Sign On, and then click Edit.


  1. Navigate to the Advanced Sign-on Settings and provide the Base Service URL which follows the format https://{deployment}-services.pm.beyondtrustcloud.com/. (deployment is the name of your EPM tenant.) Click Save.

Okta configuration showing client ID and client secret for EPM instance.

  1. After you add the EPM App to Okta, you can get the information you need to set up the OpenID Connect authentication.


  1. You must get the following information from the Edit page:
    • Domain or Issuer, for example, https://dev-12345.okta.com
    • Client ID
    • Client Secret

Confirm the domain name configured in Okta. This domain name might be different than the domain configured for your email address. For example, while the domain managed in Okta might be domain.com, the email address might be user@email.com. Both pieces of information are required.

  1. Log in to your EPM instance to complete the configuration. Navigate to Configuration and then Authentication Provider Settings.
  2. Select Okta for the OpenID Connect Provider.

In EPM instance, set up Okta for OpenID Connect.

  1. Provide the domain or issuer URL, client ID, and client secret.
  2. Save and test the configuration.


Add EPM Instance to Ping Identity

We currently support PingOne, the SaaS service from Ping Identity.

  1. Start up your Ping Identity instance.
  2. In the menu, click Connections, and then click Applications.
  3. At the right of the Applications title, click the plus sign (+) to add an application.
  4. Enter a name for the application (required), and then add a short description (optional).
  5. Select OIDC Web App and click Save.
  6. Click the Configuration tab.
  7. To edit the configuration, click the pencil/edit icon.
  8. Under Redirect URLs, click + Add, and then add the sign-in and sign-out URLs. If you are modifying an existing instance, you might need to open the General section dropdown first.
    • Sign-in redirect URL: https://{deployment}-services.pm.beyondtrustcloud.com/oauth/signin-oidc
    • Sign-out redirect URL: https://{deployment}-services.pm.beyondtrustcloud.com/oauth/signout-callback-oidc

    where deployment is the name of your EPM tenant.

  9. Under Token Endpoint Authentication Method, select Client Secret Post, and then click Save.
  10. Click the Resources tab.
  11. To edit the resource, click the pencil/edit icon.
  12. In the Scopes list, click the + next to profile openID to add it to the Allowed Scopes. You can also filter the list of options by OpenID to access this option.
  13. Click Save.
  14. To close the panel, at the top right of the Edit panel, click the X.
  15. At the right of the new application entry, toggle the switch to on to give access to users.
  16. Click the Configuration tab again. For the EPM OpenID Connect set-up wizard, you need to copy the following information from the Configuration page:
    • Issuer: Prefix the protocol HTTPS://
    • Client ID
    • Client Secret

Change the EPM OpenID Connect Settings

Once you have set up your OpenID Connect Settings to use Microsoft, Okta, or Ping Identity, you might need to switch to another one at some point.

To change your existing OpenID Connect settings:

  1. Click the Configuration menu, and then select Authentication Provider Settings.
  2. Click Change OpenID Connect Provider.
  3. Select a different provider, and then enter the Provider URL (or Issuer), Client ID, and Client Secret information.
  4. Review your settings, and then check the verification box.
  5. Click Save Changes.


You will be logged out of the EPM console. Once logged out, you need to log back in within 15 minutes, because there is a timer on the page. If you do not log in before the timer expires, the authentication provider settings revert to the previous settings and the new settings are not saved.

If you log on before the timer expires, the newly added authentication provider settings are retained.