Tenable.io and Password Safe Integration Guide
Use Password Safe as an External Credential Provider for Tenable.io Asset Scans
This guide provides information and steps for integrating Tenable.io with BeyondTrust Password Safe.
Security administrators know that conducting network vulnerability assessments means getting access to, and navigating, an ever-changing sea of usernames, passwords, and privileges.
Tenable.io is a cloud-based vulnerability management platform that is designed to help organizations identify and manage security risks across their entire IT infrastructure. By integrating Tenable applications with BeyondTrust Password Safe, customers have more choice and flexibility.
The benefits of integrating Tenable with Password Safe include:
- Credential updates directly in Tenable applications, requiring less management.
- Reduced time and effort documenting where credentials are stored in the organizational environment.
- Automatic enforcement of security policies in specific departments or business unit requirements, simplifying compliance.
- Reduced risk of unsecured privileged accounts and credentials across the enterprise.
Configure Password Safe
To use the integration, the following items must be configured in Password Safe:
- API registration.
- API account and group with correct permissions.
- Asset must exist in Password Safe with the same asset name as in Tenable.io (case sensitive).
- Managed asset must exist in Password Safe with the same asset name as in Tenable.io (case sensitive).
- Managed account used for Tenable scan. This account must be API enabled and be linked to the managed asset.
The managed account must be a shared account and not a dedicated account.
- Access policy that allows the API group or user to request the managed account.
Create an API Registration
In Password Safe, all APIs must be registered. To register a new API:
- In the BeyondInsight console, go to Configuration > General > API Registrations.
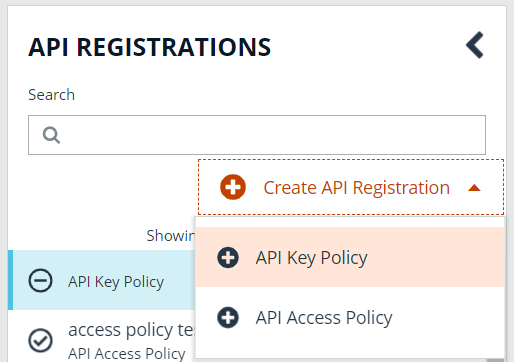
- Click Create API Registration.
- Select API Key Policy.
- Provide a name for the API registration.
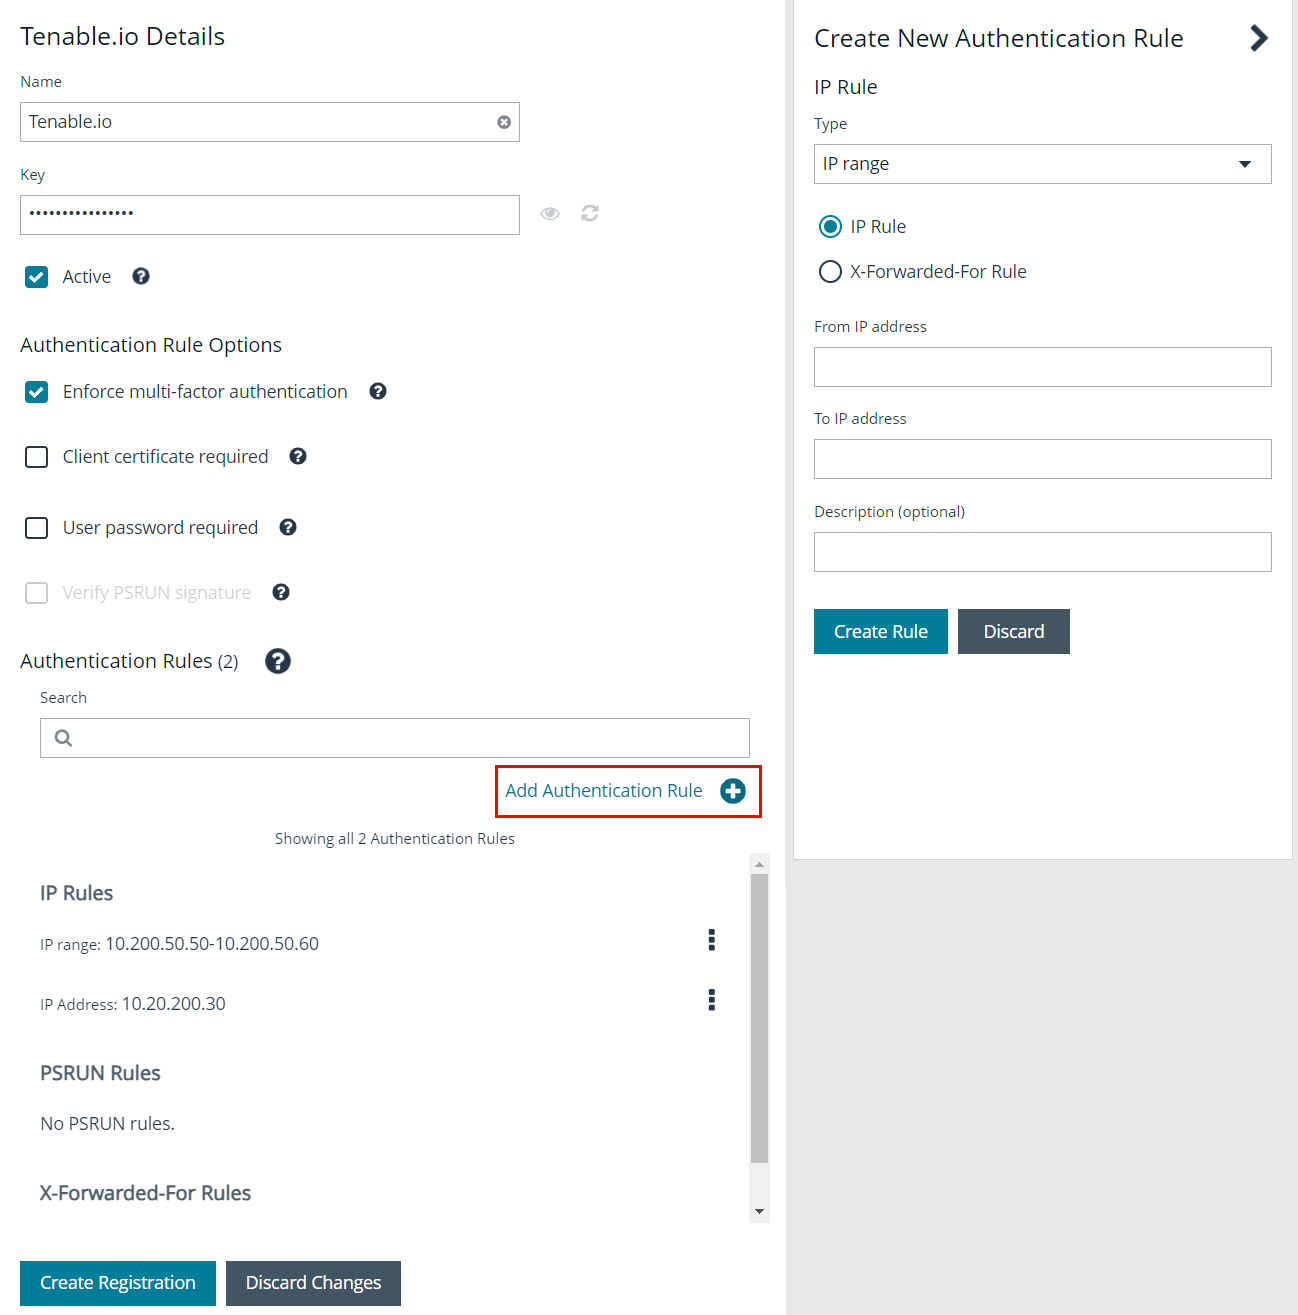
- You must add an IP authentication rule for the address of your Tenable.io instance:
- Click Add Authentication Rule.
- From the Type dropdown, select Single IP Address.
- Leave the IP Rule option selected.
- Provide the IP Address.
- Click Create Rule.
- You must also add the IP range of the managed assets to be scanned.
- Click Add Authentication Rule.
- From the Type dropdown, select IP Range.
- Leave the IP Rule option selected.
- Provide From and To IP addresses.
- Click Create Rule.
- Click Create Registration.
The API Key is required for the Tenable.io configuration.
Create an Access Policy
Before you can configure an API group, you must have an access policy for the group that allows managed accounts to be requested and allows for API callers to override the automatic password changes after they are released. Create the access policy as follows:
- In the BeyondInsight console, go to Configuration > Privileged Access Management Policies > Access Policies.
- Select an existing access policy or create a new one.
- In the access policy, click Create Schedule and select the appropriate options.
- Under Policy Types, toggle View Password to enable it.
- Check the Allow API Rotation Override option. This allows API callers to override the Change Password After Any Release managed account setting for view-type requests.
- Once the new schedule information is completed, click Create Schedule.
Configure API Account and Group
An API account and group must be configured for use by Tenable.io. You can use an existing local account and group, or create new ones.
To create a new user:
- In the BeyondInsight console, go to Configuration > Role Based Access > User Management
- Click the Users tab.
- Click Create New User and select Create a New User.
- Provide user details, such as identification and credentials, and click Create User.
To create a new group and enable features and Smart Groups for that group:
- In the BeyondInsight console, go to Configuration > Role Based Access > User Management.
- Click the Groups tab.
- Click Create New Group and select Create a New Group.
- Provide group name and description, and then click Create Group.
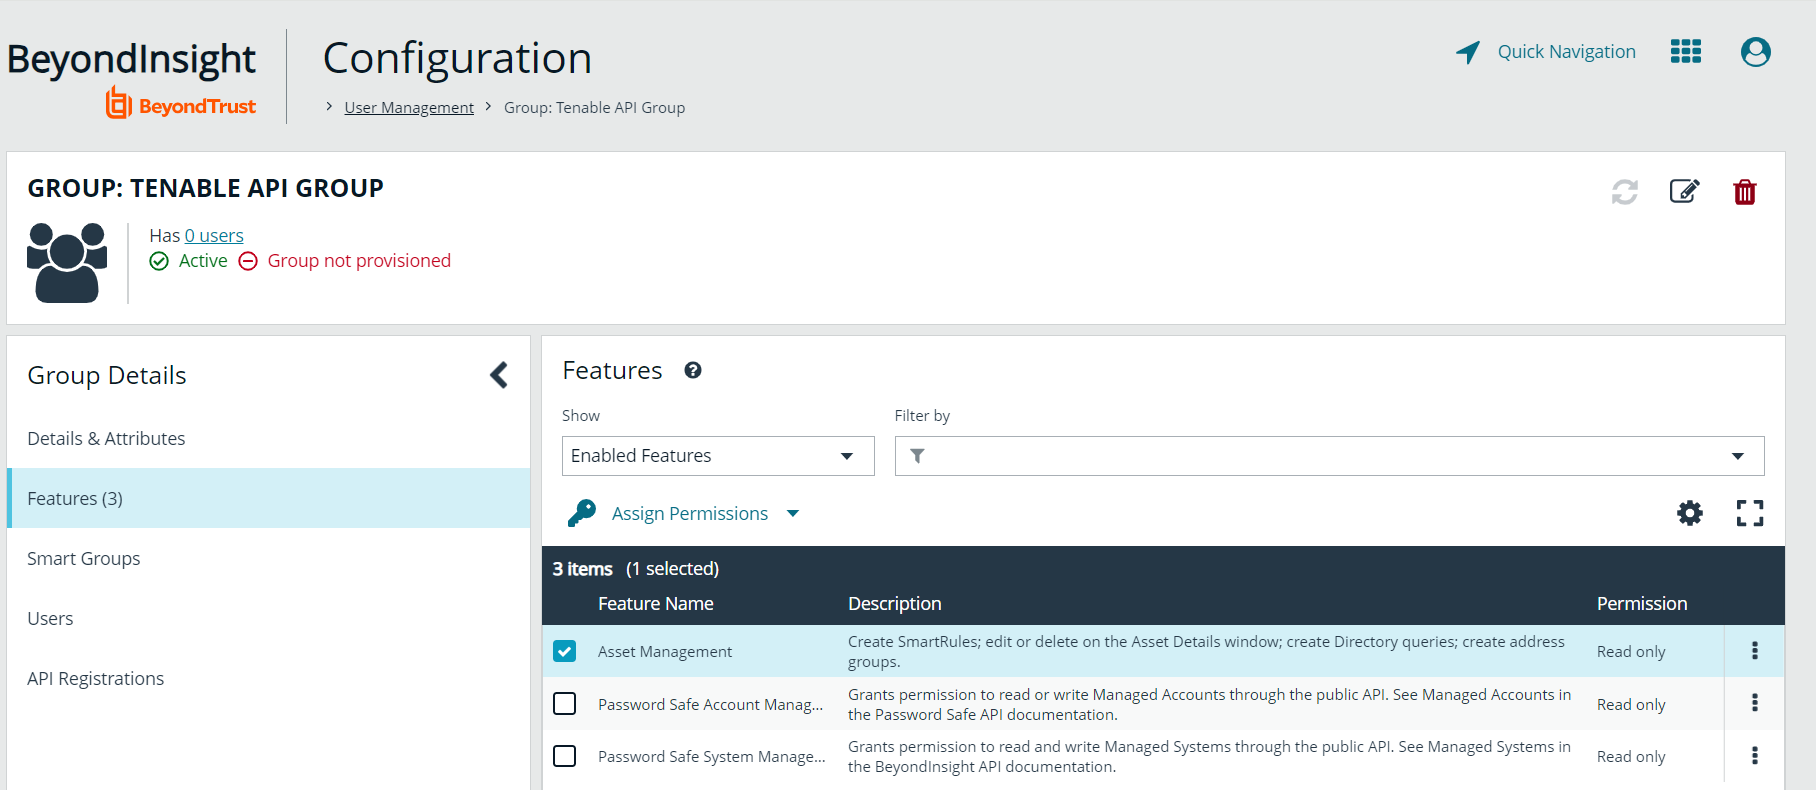
- You are taken to the details for the group, where Features is selected by default.
- In the Features grid, locate the following features, select them, and then click Assign Permissions > Assign Permissions Read Only above the grid:
- Asset Management
- Password Safe Account Management
- Password Safe System Management
Use the filters above the grids to easily locate the features by their names.
- Under Group Details,select Smart Groups.
- In the Smart Groups Permissions grid, locate the following Smart Groups, select them, and then click Assign Permissions > Assign Permissions Read Only above the grid:
- All Assets
- All Managed Accounts
- All Managed Systems
Use the filters above the grids to easily locate the Smart Groups by their names.
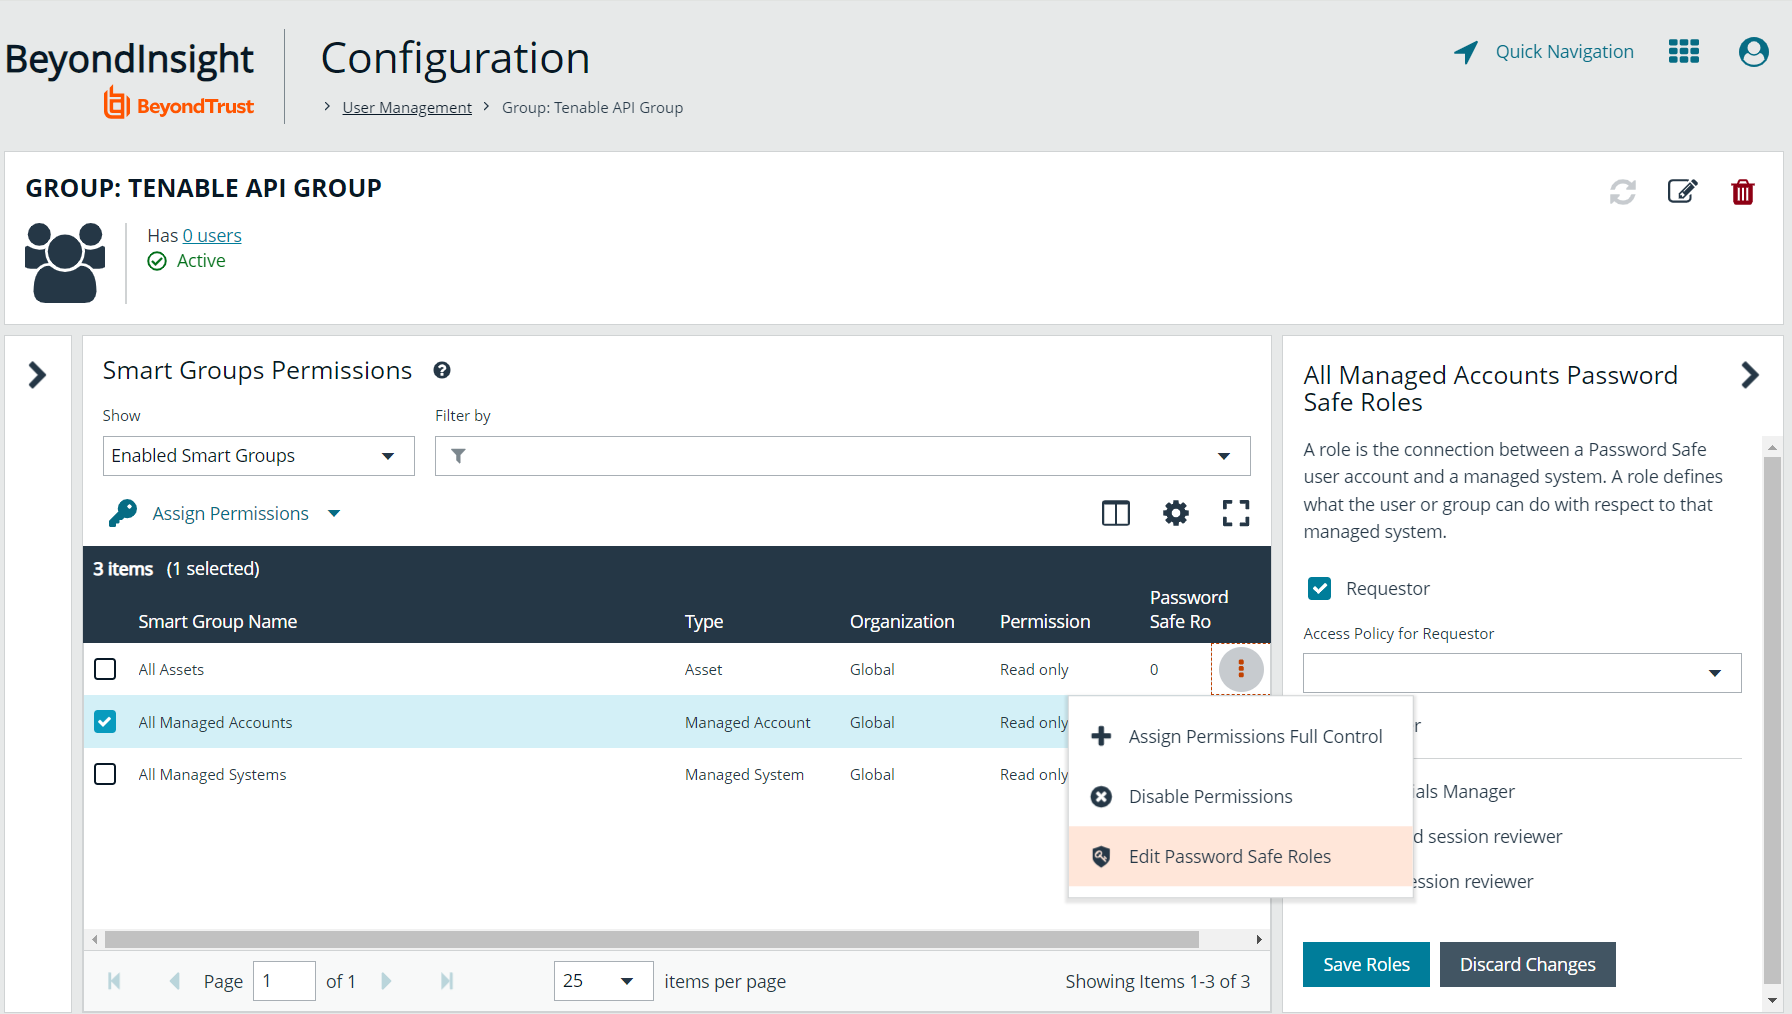
- The All Managed Accounts Smart Group must have Requestor selected as a Password Safe role.
- Click the vertical ellipsis to the right of the Smart Group, and then select Edit Password Safe Roles.
- Check the Requestor box, and then select a policy from the Access Policy for Requestor dropdown. This policy is applied to the managed account that is used for the scan.
- Click Save Roles.
- To add the API user created above to the group:
- Under Group Details, select Users.
- Select Users Not Assigned from the Show dropdown list.
- From the Filter by dropdown , select Username. Type the user name in the Username field.
- Select the user, and then click Assign User above the grid.
- Finally, assign the API that was registered for the integration to this group:
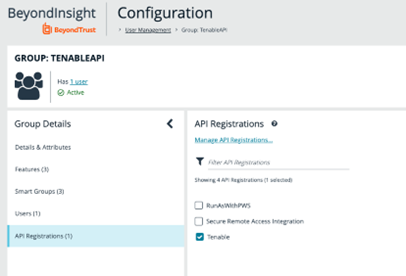
- Under Group Details, select API Registrations. A list of API registrations is displayed.
- Check the box beside the API registration created above.
Verify the Asset and Managed System in Password Safe
The asset scanned by Tenable.io must exist in the Assets and Managed Systems grids in BeyondInsight.
To verify that the asset exists in BeyondInsight:
- In the BeyondInsight console, select Assets.
- From the Smart Group filter dropdown on the Assets page, select All Assets. Verify that the asset to be scanned is displayed in the list of available assets.
To verify that the asset exists in as a managed system:
- In the BeyondInsight console, select Managed Systems.
- From the Smart Group filter dropdown on the Managed Systems page, select All Managed Systems. Verify that the asset to be scanned is displayed in the list of available managed systems.
Verify the Managed Account Used by Tenable.io Scan in Password Safe
The managed asset scanned by Tenable.io must be linked to an existing managed account in Password Safe. This managed account:
- Can be either a local or domain account
- Must be shared, not dedicated
- Must be a local admin on the asset being scanned
- Must be enabled for use with API
To confirm the account is enabled for use with API:
- In the BeyondInsight console, go to Managed Accounts.
- In the Filter by dropdown, select Account. Enter the account name in the Account field.
- Click the vertical ellipsis to the right of the new group, and then select Edit Account.
- Under Account Settings, make sure the API Enabled toggle button is enabled.
To confirm the account is linked to the system to be scanned:
- In the BeyondInsight console, go to Managed Accounts.
- From the Filter by dropdown, select Account. Enter the account name in the Account field.
- Click the vertical ellipsis to the right of the new group, and then select Go to Advanced Details. Under Account Details, select Linked Systems.
- Select Linked under the Show dropdown. Verify that the linked system is listed.
Configure Tenable Integration
Within Tenable.io, the BeyondTrust Password Safe integration can be configured using either Windows or SSH.
Windows Integration
To integrate Tenable.io with BeyondTrust in Windows:
- Log in to Tenable.io.
- In the upper-left corner, click the Menu icon. This displays the left navigation pane.
- From the menu, click Settings.
- On the Settings page, click Credentials. This displays the credentials table, which lists managed credentials that you have permission to view.
- Click the Can Edit button next to the credentials title to open the credential form.
- In the Host section, click Windows. Selected credential options are displayed.
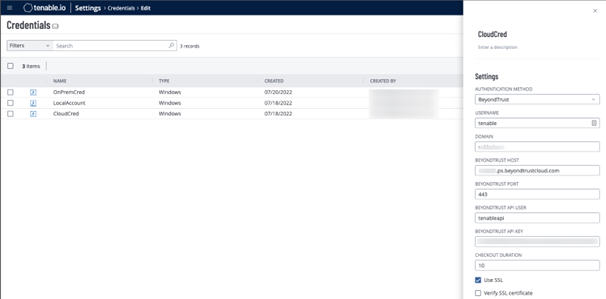
- Select BeyondTrust from the Authentication Method dropdown.
- Configure the BeyondTrust credentials:
| Option | Description | Required |
|---|---|---|
| Username | The username to log in to the hosts you want to scan. | Yes |
| Domain | The domain of the username, if required by BeyondTrust. |
No |
| BeyondTrustHost | The BeyondTrust IP address or DNS address. | Yes |
| BeyondTrust Port | The port on which BeyondTrust listens. | Yes |
| BeyondTrust API User | The API user provided by BeyondTrust. | Yes |
| BeyondTrust API Key | The API key provided by BeyondTrust | Yes |
| Checkout Duration |
The length of time, in minutes, that you want to keep credentials checked out in BeyondTrust. Configure the checkout duration to exceed the typical duration of your Tenable.io scans. If a password from a previous scan is still checked out when a new scan begins, the new scan fails. Configure the password change interval in BeyondTrust so that password changes do not disrupt your Tenable.io scans. If BeyondTrust changes a password during a scan, the scan fails. |
Yes |
| Use SSL | When enabled, Tenable.io uses SSL through IIS for secure communications. You must configure SSL through IIS in BeyondTrust before enabling this option. | No |
| Verify SSL Certificate | When enabled, Tenable.io validates the SSL certificate. You must configure SSL through IIS in BeyondTrust before enabling this option. | No |
- To create a scan that uses these credentials:
- Click the Menu icon in the upper-left corner.
- From the menu, under Vulnerability Management, select Scans.
- In the upper-right corner, click Create Scan. Select the appropriate scan template and update settings as required.
- Select Credentials from the left menu, and then click Add Credentials. Select the BeyondTrust Password Safe credentials created in the previous step.
- Click Save.
Verify Windows Integration
To verify that the Windows integration is working:
- Click the Menu icon in the upper-left corner.
- From the menu, under Vulnerability Management, select Scans.
- Under Folders, select My Scans.
- Select the ellipsis next to the scan you want to test. Click Launch to initiate an on-demand scan, and then click the completed scan to view scan details. The message Microsoft Windows SMB Log In Possible: 10394 displays when authentication is successful.
SSH Integration
Tenable.io provides an option for BeyondTrust SSH integration. Complete the following steps to configure Tenable.io with BeyondTrust in SSH.
Requirements:
- Tenable.io account
- BeyondTrust account
- Required User Role - Standard, Scan Manager, or Administrator
To configure Tenable.io for BeyondTrust SSH:
- Log in to Tenable.io.
- Click the Menu icon in the upper-left corner.
- From the menu, select Settings.
- Under Scanning, click Credentials. The credentials table lists managed credentials that you have permission to view.
- Click the Can Edit button next to the credentials title to open the credential form.
- In the Host section, click SSH. Selected credential options are displayed.
- Select BeyondTrust from the Authentication Method dropdown.
- Configure the BeyondTrust credentials:
| Option | Description | Required |
|---|---|---|
| Username | The username to log in to the hosts you want to scan. | Yes |
| BeyondTrustHost | The BeyondTrust IP address or DNS address. | Yes |
| BeyondTrust Port | The port on which BeyondTrust listens. | Yes |
| BeyondTrust API User | The API user provided by BeyondTrust. | Yes |
| BeyondTrust API Key | The API key provided by BeyondTrust | Yes |
| Checkout Duration |
The length of time, in minutes, that you want to keep credentials checked out in BeyondTrust. Configure the checkout duration to exceed the typical duration of your Tenable.io scans. If a password from a previous scan is still checked out when a new scan begins, the new scan fails. Configure the password change interval in BeyondTrust so that password changes do not disrupt your Tenable.io scans. If BeyondTrust changes a password during a scan, the scan fails. |
Yes |
| Use SSL | When enabled, Tenable.io uses SSL through IIS for secure communications. You must configure SSL through IIS in BeyondTrust before enabling this option. | No |
| Verify SSL Certificate | When enabled, Tenable.io validates the SSL certificate. You must configure SSL through IIS in BeyondTrust before enabling this option. | No |
| Use Private Key | When enabled, Tenable.io uses private key-based authentication for SSH connections instead of password authentication. If it fails, the password is requested. | No |
| Use Privilege Escalation | When enabled, BeyondTrustuses the configured privilege escalation command. If it returns a value, it will use it for the scan. | No |
| Custom Password Prompt | The password prompt used by the target host. Only use this setting when an interactive SSH session fails due to Tenable.io receiving an unrecognized password prompt on the target host's interactive SSH shell. | No |
Verify SSH Integration
To verify that the SSH integration is working:
- Click the Menu icon in the upper-left corner.
- From the menu, under Vulnerability Management, select Scans.
- Under Folders, select My Scans.
- Click the ellipsis next to the scan you want to test. Click Launch to initiate an on-demand scan, and then click the completed scan to view scan details. The message OS Identification and Installed Software Enumeration over SSH: 97993 displays when authentication is successful.
Additional Information
Elevation
Elevation is used in BeyondInsight to handle privilege escalation for SSH accounts when performing scans. This option is used because some rules do not allow server login using root. Elevation can be enforced in BeyondInsight at system level or account level.
For more information, please see Add a Managed System Manually.
Customized Report
You can build a customized report in BeyondInsight to import hosts from a CSV to scan in Tenable.io. The customized report defines the information needed for Tenable.io uploads.
To build the report:
- In the BeyondInsight console, go to Analytics & Reporting.
- Under All Reports, select Assets, and then select the report you want to view.
- Select parameters to configure the report, and then click View Report.
This report can be run on any previous discovery scan, exported as a CSV, and uploaded as a scan target in Tenable.io.
