Password Safe ServiceNow External Credential Provider Installation and Configuration Guide
This guide provides the instructions for installing the ServiceNow External Credential Storage plugin and configuring Password Safe as an external credential provider for ServiceNow Discovery. This integration allows the storage of Windows, SSH, Azure, and many other types of credentials in Password Safe for use by ServiceNow Discovery.
BeyondTrust Password Safe automates privileged password and privileged session management, providing secure access control, auditing, alerting, and recording for any privileged account. This can include local or domain shared administrator accounts to a user’s personal admin account, as well as service, operating system, network device, database (A2DB) and application (A2A) accounts, SSH keys, cloud, and social media accounts. By improving the accountability and control over privileged access, IT organizations can reduce security risks and achieve compliance objectives. With Password Safe, customers can:
- Secure and control privileged passwords to close critical security gaps and reduce risk.
- Monitor, audit, and report on activity to achieve compliance requirements.
- Automate password request and approval processes to simplify administration and improve security.
Key Features
- Store ServiceNow discovery credentials externally in Password Safe.
- Store any type of ServiceNow external discovery credential with the exception of SNMPv3.
- Using Password Safe, you have access to auditing, alerting, and other functionality around credential access.
Integration Requirements
The requirements for the BeyondTrust Password Safe and ServiceNow External Credential Storage integration are detailed below. These requirements must be in place prior to starting the integration setup process, unless the associated features of the integration are not required.
- ServiceNow instance with the following:
- A currently supported ServiceNow release.
- Administrative access to the ServiceNow portal.
- The following plugins:
- MID Server
- BeyondTrust PS Cloud instance or U-Series Appliance with the following:
- BeyondInsight 22.2 or later release installed.
- Administrative access in the BeyondInsight console.
- If using the U-Series Appliance and ServiceNow MID Server, your network firewall rules must allow TCP port 443 traffic between the MID server and the appliance for access to the Password Safe REST APIs.
For more information, please see MID Servers.
Configure Password Safe
To use the integration, the following items must be configured in Password Safe:
- Local or Active Directory (AD) account to be used for the RunAs user.
- API Registration.
- BeyondInsight user group to assign the API registration to. This group must contain the RunAs user account.
- Access policy that allows the API group and user to request the managed account password.
- Managed accounts to be used as an external credential in ServiceNow. These accounts must be API enabled.
- Ensure managed systems exist in Password Safe that have the exact name as they appear in the ServiceNow Configuration Management database. The naming convention for the system in ServiceNow must match how it appears for Requestors in Password Safe; for example, the short name or FQDN.
Create RunAs User
A regular user account is needed to assign the API registration to and is used as part of the configuration on the ServiceNow side, paired with the API key. A local BeyondInsight account or an AD account can be used. A password must be set, but it is not used for this configuration.
- In BeyondInsight, go to Configuration > Role Based Access > User Management.
- Click the Users tab.
- Click Create New User and select Create a New User.
- Provide user details, such as identification and credentials.
- Ensure Two-Factor Authentication is set to None.
- Click Create User.
The RunAs user must not have the Information Security Administrator (ISA) Password Safe role assigned to any systems.
Create an API Registration
An API Registration is required in Password Safe, and is used by ServiceNow directly (or via MID Server) to access the Password Safe API when requests are queued by the applications for calls.
To register a new API in the BeyondInsight console:
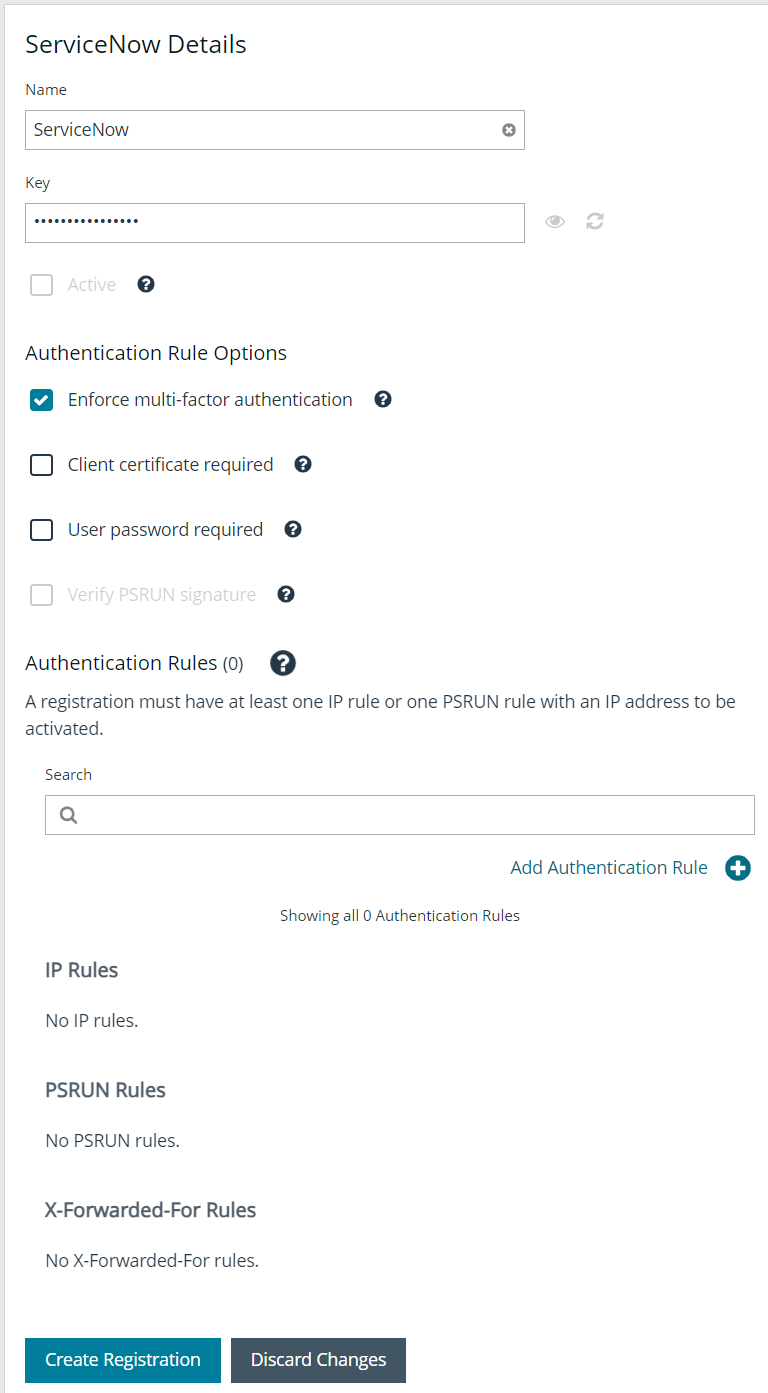
- Go to Configuration > General > API Registrations.
- From the API Registrations pane, click Create API Registration.
- Select API Key Policy.
- Provide a name for the API registration.
- Click Add Authentication Rule to add a rule for the address of your ServiceNow instance or MID server, as follows:
- From the Type dropdown list, select Single API Address.
- Select the IP Rule option.
- Provide the IP address.
- Click Create Rule.
- Click Create Registration.
- Make note of the API key. It is needed for the integration configuration in ServiceNow.
Create and Configure a Local Group
The API registration and RunAs user must be assigned to a group in BeyondInsight. To create and configure a local group, follow the below steps:
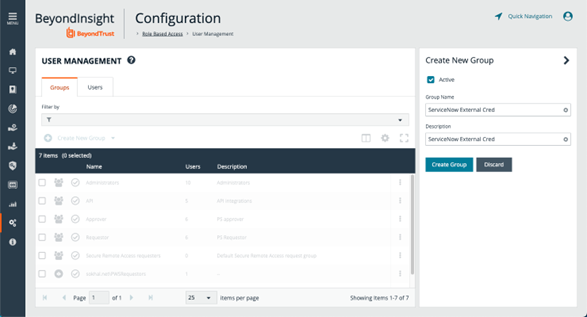
- In BeyondInsight, go to Configuration > Role Based Access > User Management.
- From the Groups tab, click Create New Group and select Create a New Group.
- Provide group name and description, and then click Create Group.
- From the Group Details pane, click Features.
- From the Features pane, locate features by selecting All Features from the Show drop-down list.
- Locate Credential Management and click the vertical ellipsis for this feature, and then select Assign Permissions Read Only.

- From the Group Details pane, click Smart Groups.
- From the Smart Groups Permissions pane, locate and select the All Managed Accounts and All Managed Groups.
- Click Assign Permissions above the grid, and then select Assign Permissions Read Only
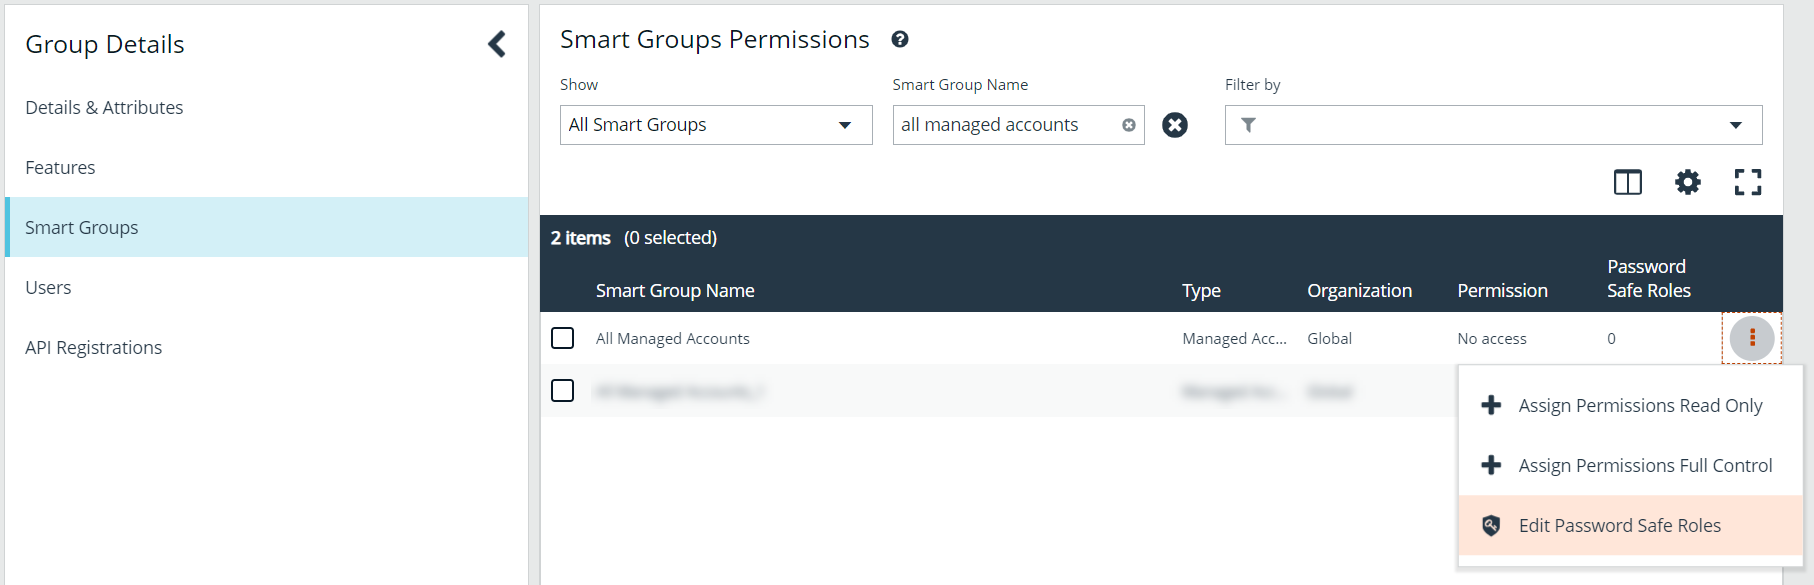
- All managed accounts must have the Requestor Password Safe role assigned. Click the vertical ellipsis for the All Managed Accounts Smart Group, and then select Edit Password Safe Roles.
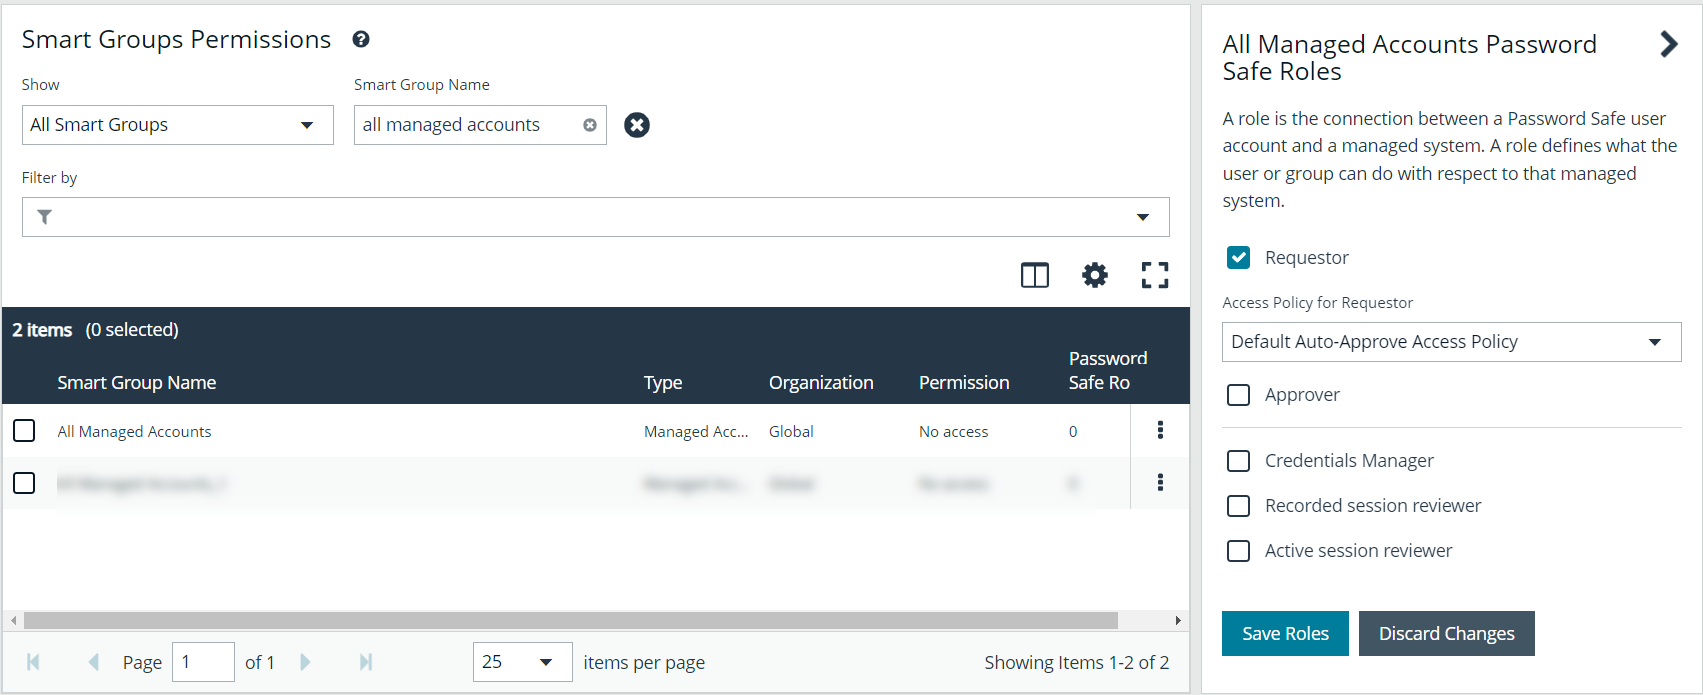
- Check the Requestor box, and then select a policy from the Access Policy for Requestor drop-down list that allows for auto-approval of requests.
- Click Save Roles.

- From the Group Details pane, click Users.
- From the Users pane, locate and select the RunAs user you had created in previous steps.
- Click Assign User above the grid.

- From the Group Details pane, click API Registrations.
- Check the box to select the API registration you had created in above steps for this integration.
Enable API on Managed Accounts
Managed accounts that are used in ServiceNow as an external credential must be API Enabled. To enable API on managed accounts, follow the below steps:
- From the left menu in BeyondInsight, click Managed Accounts.
- Click the vertical ellipsis for the managed account, and then select Edit Account.

- Scroll down to Account Settings and expand it.
- Toggle API Enabled to enable it, and then click Update Account. Repeat this step for any managed account that you want to use with the integration for access to the associated managed systems.
Prepare and Set Up Application in ServiceNow
Install Password Safe External Credential Storage for Discovery from the ServiceNow App Store
For a production ServiceNow instance, download the application from the ServiceNow Application Store.
For more information, please see Install an Application from the ServiceNow Store.
Configure the Application in ServiceNow
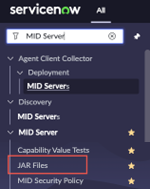
- In the ServiceNow portal, search for MID Server, and then select JAR Files under the MID Server menu.

- In the MID server JAR files section, click Password Safe External Credential Storage.

- Click the Download link next to the JAR file attachment. Save the file to a location on your machine.

- Rename the downloaded JAR file extension to a .zip extension. Open it with any zip tool.

- Open the SnowMidTierPBPSConnector.config file with Notepad.

- Edit the configuration by adding:
- The Password Safe instance hostname
- The Password Safe API Key
- The RunAs user
- Comment out the last line that redirects you to lookup the config file settings from a locally stored path
The Password Safe instance hostname should be the hostname only, without protocol or other URL components (for example: mycompany.ps.beyondtrustcloud.com)
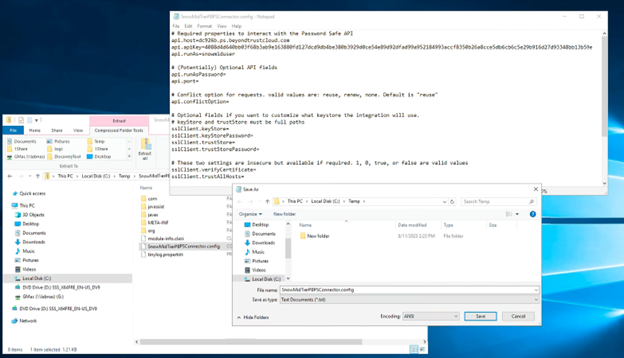
- Save the file in the same folder where the JAR file was saved in.

- Drag and drop the updated config file back into the renamed JAR zip file. Select Copy and Replace to overwrite the old config file in the zip file.
- Open the zip file to ensure that the nowMidTierPBPSConnector.config file has the latest date stamp.
- Right-click the config file and select Rename. Change the file extension back to .jar.

- Return to the ServiceNow portal. On the MID Server JAR file page, click Manage Attachments.
- Check the box next to the current jar file, and click Remove.
- There should be no .jar files listed as an attachment. Click Choose File, select the updated .jar file from the previous steps, and upload it.

- There should be no .jar file listed as an attachment. Click Choose File, select the updated .jar file from the previous steps, and upload it.

- Finally, restart the MID server that is used for this integration.

- To check if the MID server has downloaded the updated JAR file, log in to your MID server and check the following directory:
%INSTALLDIR%\ServiceNow MID Server <MIDSERVERNAME>\agent\extlib.
The date modified time on the JAR file should be recent. You can also open the JAR file and double check that it contains the changes you made to the SnowMidTierPBPSConnector.config file.
Configure the Configuration Management Database
The configuration management database (CMDB) in ServiceNow must be populated with records for assets that have the exact same name as the managed systems in Password Safe.
PS Cloud and BeyondInsight allow you to export asset data to your ServiceNow instance using connectors.
For more information, please see Configure ServiceNow Export Connector.
Test the Integration
Add and Test Discovery Credential
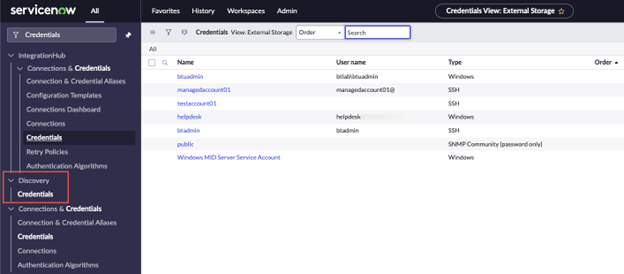
- In ServiceNow, go to All > Discovery > Credentials and click New in the top right of the page.
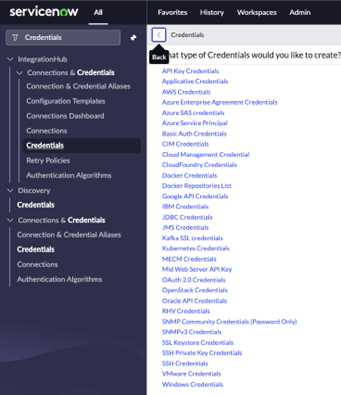
- Select the type of credential you want to test based on the OS type you are using it with. For example, select Windows Credentials for a Windows host.

- Enter a name. For example, Password Safe Credentials or All Windows Servers. Enter something that applies to the credentials you are going to use.
- Check the box for External Credential Storage.
- Select None for the Credential Storage Vault.
- The Credential ID must be defined in a format that Password Safe recognizes and should look as follows: WorkGroup|Managed-System|Managed-Account.
- Workgroup is associated with the Managed System, usually BeyondTrust Workgroup.
- The managed system is the system associated with the target managed account.
- The managed account is the account for which you are trying to retrieve the password.
- Example: BeyondTrust WorkGroup|labapp1|nina.bergin-adm
- Click Submit.
In some cases, after you click submit and close and reopen the newly created credential, it reverts the Credential Storage Vault to a different setting. Check to make sure it is set to None, and change it back if it is not and then click Submit again and then recheck the setting by closing and reopening the credential.

- To test the credential, click Test Credential in the bottom left of the page. Enter a target server name. Port 135 is the Windows Server default. Enter the name of the MID server where the Password Safe plugin is installed.
- Click OK to begin the credential test. You will either get a Credential Validated message or an error message.
- If there was an error, login to your MID server and go to the MID server installation directory %INSTALLDIR%\ServiceNow MID Server <MIDSERVERNAME>\agent\logs. The SnowMiderPBPSConnector.log file provides additional information on the error. If the issue cannot be resolved from the information in the log, please contact to BeyondTrust Support for additional help.