Configure CA Service Desk with Password Safe Ticket System
Integrating CA Service Desk Manager with Password Safe ticket system does not require a BeyondInsight connector. There are two ways to configure CA Service Desk with Password Safe:
- Use a functional account that has permissions to access CA Service Desk Manager.
- Use a PKI certificate.
Use a Functional Account for Access
Create the Functional Account
- From the left sidebar in BeyondInsight, click Configuration.
The Configuration page displays. - Under Privileged Access Management, click Functional Accounts.
The Functional Accounts page displays. - Click + Create New Functional Account.
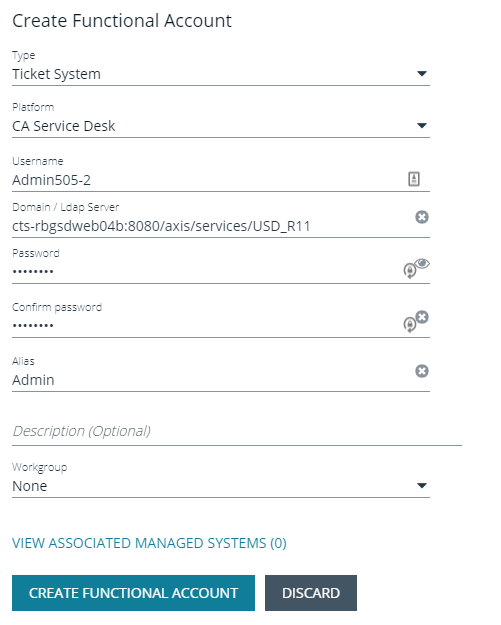
The Create New Functional Account form displays in the right panel.
- Under Type, select Ticket System.
- Select CA Service Desk from the Platform list.
- Enter a Username.
- Enter the full URL to the CA Service Desk Manager API in the Domain field.
- Enter the CA Service Desk Manager credentials. The user requires the Passwordsafe_ticket_system role. The unique name to find this role is x_bets_bi_integrat.passwordsafe_ticket_system.
- Enter an Alias and a short Description, if desired.
- Select a Workgroup.
- Click Create Functional Account when done.
Create the Access Policies
Create two access policies for the following scenarios:
- Users that need ticket validation (approval required)
- Emergency access (auto approve)
Use the following steps:
- In the BeyondInsight Console, go to Configuration > Privileged Access Management Policies > Access Policies.
- In the Access Policies pane, click Create New Access Policy.
- Name the policy and save it.
- Click + again to create the second policy and save it.
- In the Access Policy pane, select the policy that requires approval.
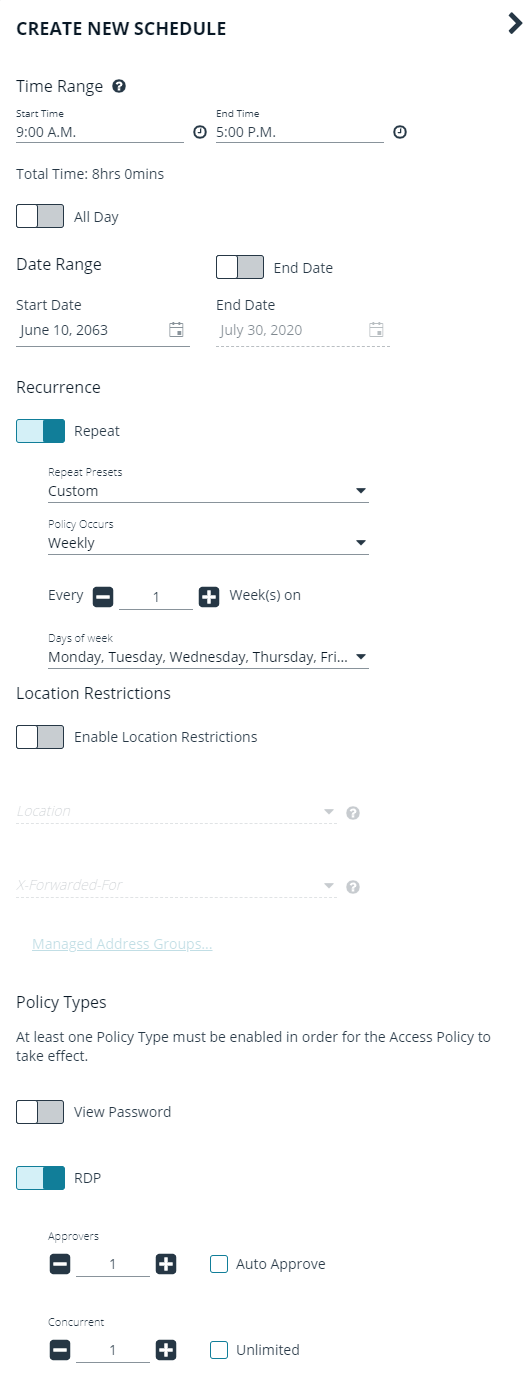
- In the Schedule tab, click Create New Schedule.
- Configure the access schedule settings: Time, Recurrence, Range, and Location.
- For each Type, under Approvers, select at least one from each list and then click Create Schedule.
- In the Access Policy pane, select the policy that you created for emergency access and then click Create New Schedule.
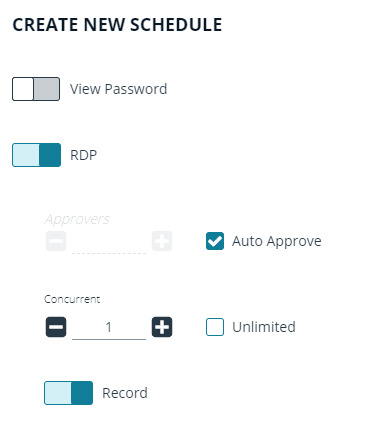
- Configure the access schedule settings: Time, Recurrence, Range, and Location.
- For each Type, under Approvers, click the down arrow in each box until Auto Approve appears checked, and then click Save.
Create the Ticket System
- From the left sidebar in BeyondInsight, click Configuration.
The Configuration page displays. - Under Privileged Access Management, click Ticket Systems.
The Ticket Systems page displays. - Click Create New Ticket System +.
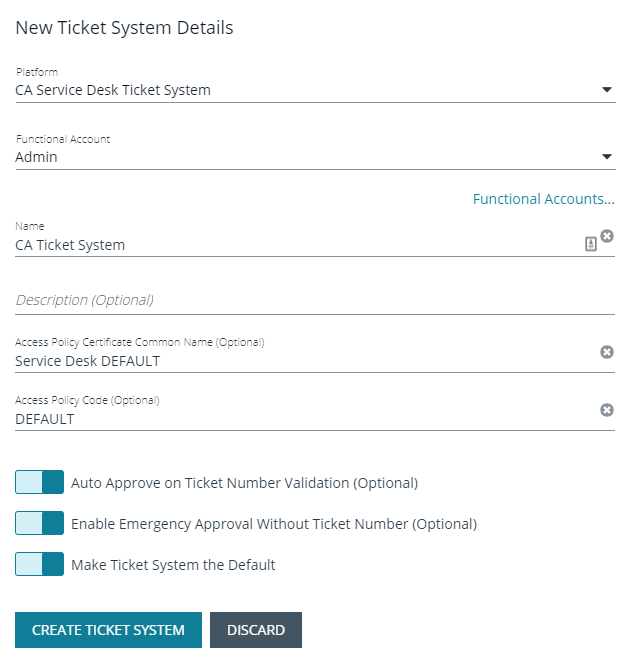
The New Ticket System Details form displays in the right panel.

- Select CA Service Desk Ticket System from the Platform list.
- Select the functional account, and then enter a name for the system. Access Policy Certificate Common Name and Access Policy Code are not required.
- Click the toggles to enable the features you want. The options are:
- Auto Approve on Ticket Number Validation
- Enable Emergency Approval Without Ticket Number
- Make this ticket system the default
- Click Create Ticket System when done.
You need only to check the first box. The second and third boxes are optional.
The Access Policy Certificate Common Name and Access Policy Code fields are not used.
For any tickets being verified using this ticket system, you must ensure within the CA Service Desk Manager that the Requester is populated in the Assignee field. The User ID here must match the Password Safe User ID.
Configure Global Settings

- In the BeyondInsight Console, go to Configuration > Privileged Access Management > Global Settings.
- Ensure the following options are enabled in the Requests section:
- Require a ticket System and Ticket Number for requests
- Reason is required for new requests
- Select other settings as needed.
- Click Update Request Settings.
Use a PKI Certificate Access Policy
An alternative way to set up access to CA Service Desk Manager is to use a PKI certificate.
Import the PKI Certificate
- Enable PKI login in CA Service Desk Manager. Instructions are in \Java\PKI_loginServiceManaged_JAVA_steps.doc, located on the CA SDM server.
- Copy and install the certificate generated above to the Password Safe server.
- Open the Microsoft Management Console (mmc.exe).
- Add the Certificates snap-in.
- Select computer account and local computer.
- Expand the Personal folder, and then right-click the Certificates folder.
- Select All Tasks > Import.
- Click Next and browse to the certificate location.
- Set file types to All Files (*.*).
- Select the certificate and open it.
- On the Private key protection page, enter the certificate password and then check the Mark this key as exportable box. This allows you to back up or transport your keys at a later time.
- On the Certificate Store page, select Personal.
- Click Finish.
- Assign IIS_IUSRS permissions to use keys.
- Right-click the certificate, and then select All Tasks > Manage Private Keys.
- Add local computer IIS_IUSRS.
- Assign Full Control.
Create the Functional Account
- From the left sidebar in BeyondInsight, click Configuration.
The Configuration page displays. - Under Privileged Access Management, click Functional Accounts.
The Functional Accounts page displays. - Click + Create New Functional Account.
The Create New Functional Account form displays in the right panel.
- Under Type, select Ticket System.
- From the Platform list, select CA Service Desk.
- In the Domain box, enter the URL to the CA Service Desk web service.
- Enter a username and password. The information is not used in this implementation, so it can be anything.
- Enter an Alias and a short Description, if desired.
- Select a Workgroup.
- Click Create New Functional Account when done.
Create the Access Policies
Two access policies are required, as documented above for functional account access. Please see Create the Access Policies .
Create the Ticket System
- From the left sidebar in BeyondInsight, click Configuration.
The Configuration page displays. - Under Privileged Access Management, click Ticket Systems.
The Ticket Systems page displays. - Click Create New Ticket System +.
The New Ticket System Details form displays in the right panel.
- Select CA Service Desk Ticket System from the Platform list.
- Select the Functional Account, and then enter a name for the system.
- Enter ServiceDesk DEFAULT in the Access Policy Certificate Common Name field.
- Enter DEFAULT in the Access Policy code field.
- Click the toggles to enable the features you want. The options are:
- Auto Approve on Ticket Number Validation
- Enable Emergency Approval Without Ticket Number
- Make Ticket System the Default
You need only to check the first box. The second and third boxes are optional.
- Click Create Ticket System when done.