Add applications to Password Safe
Applications can be managed by Password Safe. Requesters can request access to an application and launch a session through the Password Safe web portal. This provides a secure and user-friendly way to manage application access, enhancing overall productivity and security for both requesters and administrators.
Application sessions can be recorded.
Prerequisites
- The application or script must be hosted in a published Remote Desktop Services (RDS) container on the RDS server, that the functional account and managed account can access.
- The host must be accessible on port 3389.
- The system where the application resides must already be added to Password Safe before you can add the application.
To add an application to Password Safe management, you must do the following:
- Set up the application details in Password Safe configuration.
- Associate the application with a managed account.
- Create an access policy that permits application access. Recording and keystroke logging can be turned on here.
- Create a user group that includes the Smart Group containing the managed accounts.
- Assign the Requester role to the Smart Group. This includes selecting the access policy.
Add an application
Follow the steps below to add an application.
Confirm the application or script to be configured in Password Safe is configured and hosted in a published RDS container on the RDS server prior to configuring it in Password Safe.
Please refer to this Microsoft article for more information: Create a Remote Desktop Services collection for desktops and apps to run.
If you require assistance with this process, please contact your system or network administrators, or Microsoft Support if necessary.
- Select Configuration > Privileged Access Management > Applications.
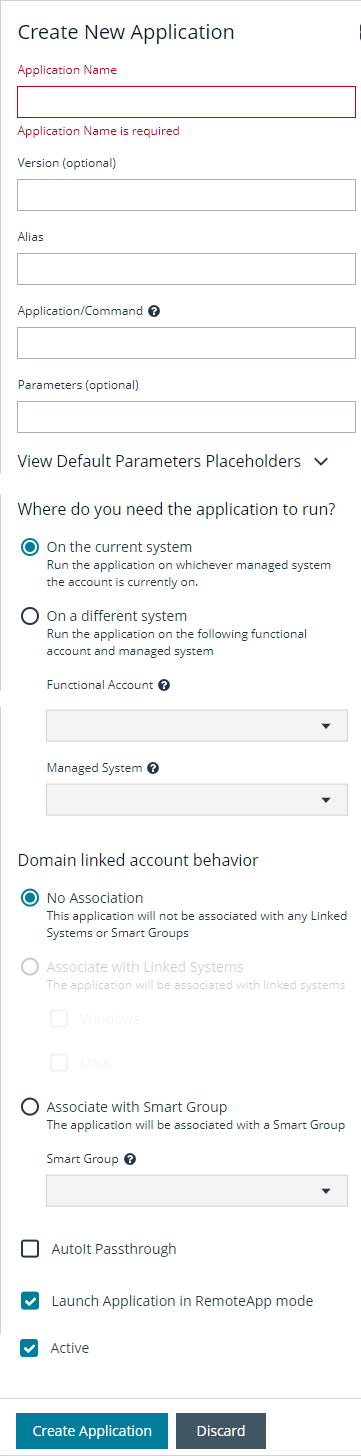
- Click Create New Application.
- Enter a Name (required) and Version (optional) for the application. We recommend using the name of the application for transparency.
- Enter an Alias (required). By default, an alias combines the name and version, but can also be edited to display any desired alias.
- Enter the path to the application in the Application/Command (required) field. For example, C:\Program Files\Windows NT\Accessories\wordpad.exe.
Use the PS_Automate utility to automate the launch and authentication to a web page or to a standard Windows GUI application, by seamlessly passing vaulted credentials to a remote application. Enter the variable %PsAutomate% in the Application/Command field to ensure the PS_Automate utility is used regardless of the location of the application.
- Enter the arguments to pass to the application in the Parameters (optional) field.
Default placeholders are as follows:
- managed account name = %u
- managed account password = %p
- managed asset name = %h
- managed asset IP = %i
- database port = %t
- database instance or asset name = %d
- jump host dns = %n
- database dns = %s
- access URL = %w
Usage syntax for the PS_Automate utility is as follows:
- Web application: ps_automate.exe [ini=path to inifile][TargetURL=url] [BrowserName=name of browser]
- Accepted values for BrowserName are: "chrome", "firefox", "msedge"
- Windows application: ps_automate.exe [ini=path to inifile]
- Select an option under Where do you need the application to run?:
- On the current system is the default and runs the application on the managed system that the account is currently on.
- On a different system runs the application based on the selections in the Functional Account and Managed System dropdown lists, i.e. an RDS server or RDS farm.
- Select a Functional Account to connect to the Password Safe managed system hosting the remote application.
- Select a Managed System. The managed system must have the application (such as wordpad.exe) configured. When starting an application session, an RDP session connects to this application server and starts the application.
- Select an option under Domain linked account behavior:
- No Association: The application is not associated with any Linked Systems or Smart Groups. This applies only when the application is assigned to a directory-type managed account, i.e. Active Directory, LDAP, etc.
- Associate with Linked Systems: The application is associated with linked systems. Select one or both of the following system types:
- Windows
- If you associate the application with a linked Windows system, standard users see all Windows-based systems applied to the Domain Linked Account when they log in to Password Safe. This excludes Unix systems.
- Unix
- If you associate the application with a linked Unix system, standard users see all Unix-based systems applied to the Domain Linked Account. This excludes Windows systems.
- If both options are selected, all systems associated to the Domain Linked Account are shown.
- Windows
- Associate with Smart Group: The application is associated with a managed system Smart Group. Select a Smart Group from the dropdown list. The application is only associated with linked systems that belong to the selected Smart Group and are linked to the account.
- Enable AutoIt Passthrough to automatically pass the credentials for the application through an RDP virtual channel. Using AutoIt Passthrough provides a secure way to access applications through a remote session. The user requesting the session is not required to enter the application credentials.
- Enable Launch Application in RemoteApp mode to initiate a remote app session rather than a full desktop session. This limits use to the specified app and the user is presented with an application window. This setting is defined per application.
- Select Active to make the application available for remote sessions.
- Click Create Application.
To edit an application:
- Navigate to the application and then click the vertical ellipsis to the right of the application.
- Select Edit Application.
- Make the necessary changes and then click Save Changes.
To view advanced application details from the Edit Application pane, click View Advanced Details.
For more information, please see the following:
- On using the PS_Automate Utility, Use the PS_Automate utility
- For the prerequisites for AutoIt Passthrough, Use AutoIt Passthrough
View application details
Once an application has been created, you can view advanced application details by following these steps:
- Select Configuration > Privileged Access Management > Applications.
- Click the vertical ellipsis to the right of the application.
- Select Go To Advanced Details. Under Advanced Details, you can select:
- Details & Attributes - This displays a read-only grid containing application information.
- Managed Accounts - This displays a read-only grid listing managed accounts that are linked to the application.
You can edit application details or delete the application using the Edit and Delete icons, located in the upper-right of the Advanced Details page.
Use Encryption Module for RemoteApp
The Encrypted Module for RemoteApp is an application which is automatically enabled to hide sensitive information from the terminal service logs.
To use this encryption, the managed system must be configured with a functional account which is also an administrator on the server the user is connecting to.
Associate the application with a managed account
Now that the application is configured, the application must be associated with a managed account.
- In the console, click Managed Accounts.
- On the Managed Accounts page, click the vertical ellipsis for the managed account, and then select Edit Account.
- In the Edit Managed Account pane, scroll down to Applications and click + to expand the Applications section.
- From the drop-down list, select the applications, and then click Update Account.
For more information about editing the managed account settings to select an application, please see Add a managed system manually.
Set up the access policy
You can create an access policy or use an existing policy. The access policy is part of the Requester role setup, described in the next section.
Application access policies apply to all applications.
- Select Configuration > Privileged Access Management Policies > Access Policies.
- Create a new access policy and schedule or edit an existing access policy and schedule. Within the schedule settings, enable Application, under Policy Types, and save the access policy.
For more information on creating and editing access policies and schedules, please see Configure Password Safe access policies.
Set up role-based access
Users who need to access an application must be managed accounts that are members of a group.
Access to applications is also available to admins and ISA users, without the need to configure an access policy.
The Requester role and application access are assigned as part of creating the user group.
Use the PS_Automate utility
Overview
The Password Safe PS_Automate utility helps to avoid the need to manually enter credentials when launching Windows GUI applications from Password Safe, saving time and increasing security.
The PS_Automate utility allows you to seamlessly pass vaulted credentials from Password Safe to a remote application using the pass through option (using token pass instead of credentials). This includes the ability to launch and authenticate to a web page or to a standard Windows GUI application.
To ensure a seamless experience, the utility supports Incognito mode for popular web browsers, such as Chrome, Firefox, and Microsoft Edge, with Edge being the default. By using an INI file, you can easily specify the input and operational behavior for the utility.
The PS_Automate utility, as well as INI files for Amazon Web Services, Azure, Office 365, and Google, are made available when enhanced session auditing is enabled in Password Safe. The files are deployed by the session proxy when a session is created in Password Safe.
The system where the PS_Automate utility is deployed must have internet access, in order to automatically download the latest version of the required browser drivers on first use:
- chromedriver.exe
- msedgedriver.exe
- geckodriver.exe
The utility uses the browser drivers, and the versions of the drivers must match the versions of the browsers used.
PS_Automate is a utility for Windows only. It is not supported on macOS.
Usage
The usage syntax for the PS_Automate utility is as follows:
Web applications
ps_automate.exe [ini=path to inifile][TargetURL=url] [BrowserName=name of browser]
Windows applications
ps_automate.exe [ini=path to inifile]
For testing purposes the utility also accepts username and password on the command line: [username=username] [password=password]. However, this is not recommended for production use, as command line parameters can be written to Windows logs, such as the event log.
ps_automate.exe ini="BIWebApp.ini" TargetURL="https://localhost/WebConsole/index.html#!/dashboard" BrowserName="chrome"
ps_automate.exe ini= "C:\automate\AWSWebApp.ini" TargetURL="https://534949981440.signin.aws.amazon.com/console/" BrowserName="firefox"
ps_automate.exe ini="MSWebApp.ini" TargetURL="https://login.microsoftonline.com"BrowserName="msedge"
ps_automate.exe ini="ssms_database.ini"
For more information on defining the command line arguments in the INI file used by PS_Automate, please see Define Command Line Arguments in INI File.
Use AutoIt Passthrough
The following prerequisites must be in place before you can use the AutoIt Passthrough feature:
- The application must be launched through an AutoIt script.
- The wrapper AutoIt script must call the Password Safe Passthrough library through pspassthru.dll (provided as part of the Password Safe Resource Kit).
For more information about turning on the feature, please see Add an application.
AutoIt script details
The AutoIt example script uses the following functions:
- pspassthru.dll
- ps_get_credentials
- DLLCall: An AutoIt function. The first argument takes in the location of the DLL file to call.
Func get_credentials($token)
   Local $aResult = DLLCall("pspassthru.dll", "str:cdecl", "pbps_get_
      credentials", "str", $token, "bool", 0)
   Local $credentials = StringSplit($aResult[0], " ")
   return $credentials
Endfunc
ps_get_credentials function
char* ps_get_credentials(char* token, bool respond_with_json)
Parameters
char* token: A one-time use token provided by Password Safe as the last command line argument passed to the AutoIt script.
bool respond_with_json: A flag to toggle the format of credentials. When this value is True, the credentials are in JSON format. Otherwise, they are in a white-space delimited list.
Return value
The token is sent to Password Safe to be validated.
- If the token is valid for the current session and has not been used, the return value is a string with credentials in the desired format.
- If the token is invalid or has been used, the return value is NULL.
Tokens are validated and credentials are sent over an encrypted RDP virtual channel not visible to the end user.
Add SAP as a managed system
You can add your SAP environment to Password Safe management.
Password Safe supports SAP NetWeaver.
Requirements
- Instance Number: When adding the system to Password Safe you must know the SAP instance number.
- Client ID: An ID that is unique to the SAP instance.
The instance number and client ID are provided in an email when you purchase SAP.
- SAP permissions: The Password Safe functional account requires RFC privileges.
SAP RFC privileges are needed for password changes. RFC permissions assigned to the functional account permit the password change. However, the password cannot be tested.
If an account has RFC privileges, that account can change their password and others. It can also test its own password.
- The username and password in Password Safe must be the same as in SAP.
Set up the functional account
The functional account requires the Client ID. All other settings are the typical functional account settings.
For more information on creating functional accounts, please see Create a functional account.
Add SAP
You must add SAP manually. You cannot add SAP using a Smart Rule.
- In the console, click Assets.
- Select the asset where the SAP instance resides, and then select Add to Password Safe.
- Select SAP from the Platform list.
- Enter the instance number.
- All other settings are the typical managed system settings.
For more information on adding Managed Systems, please see Add a managed system manually.