SailPoint IdentityIQ deployment guide
Overview
The SailPoint IdentityIQ Deployment Guide outlines how to use a SailPoint IdentityIQ Privileged Access Management (PAM) application template. This quick start strategy leverages the PAM module for visibility and provides a provisioning policy form that replaces the default provisioning capabilities that come with the PAM module. The provisioning capabilities found within the PAM module are based on user entitlements, while Password Safe is exclusively based on Group Entitlements via Role Based Access Control (RBAC).
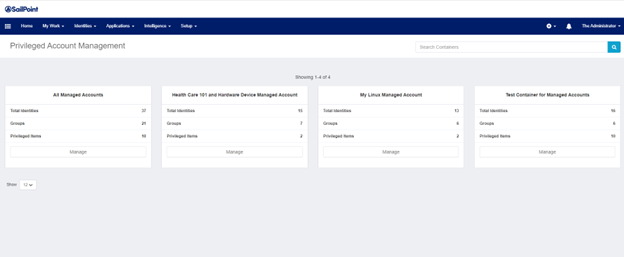
Container creation in Password Safe results in creating an account Smart Group , which includes conditions, actions, and resource consumption. Container creation is not applicable as a use case within the PAM module.
For Password Safe, privileged data items (discovered managed accounts) are displayed under containers (managed account Smart Groups). This use case does not apply to Password Safe, and is based on a different PAM Application design.
The application template, found in the Password Safe Resource Kit, helps complement the PAM module and allows provisioning without the need for complex customization.
When it comes to provisioning, a few strategies are available depending on the specific use case, or combination of account and group. In the table below, Local means created directly into Password Safe. The table below illustrates entitlement type used for provisioning vs account-group combinations.
| Group | ||||
|---|---|---|---|---|
| Account | Local | AD | Entra ID | LDAP |
| Local | PS | |||
| AD | PS - Import | AD - Sync | ||
| Entra ID | PS - Import | Entra ID - Sync | ||
| LDAP | PS - Import | LDAP - Sync | ||
PS – Import = Password Safe entitlements are provisioned via the Provisioning Policy – Form, within the application definition for Password Safe, by configuring attributes including nativeIdentifier (unique identifier associated to an individual account) and source, as described below in this document.
Sync = Password Safe group synchronization, via previously imported groups
- by synchronization interval
- by manual synchronization
- at log in, where group memberships are re-evaluated or synchronized
From an access perspective, group sync causes no delay versus provisioning and deprovisioning.
Create the SailPoint IdentityIQ service account in Password Safe
Creating a SailPoint IdentityIQ service account in BeyondInsight requires the following:
- Create a user group
- Enable features and Smart Groups for the user group
- Create a user account and add it to the user group
- Log in to BeyondInsight as the new service account user to generate OAuth credentials.
The below sections detail the steps to take to accomplish the above.
Create a new group for the service account
To create a local group in BeyondInsight, follow the below steps:
- Navigate to Configuration > Role Based Access > User Management.
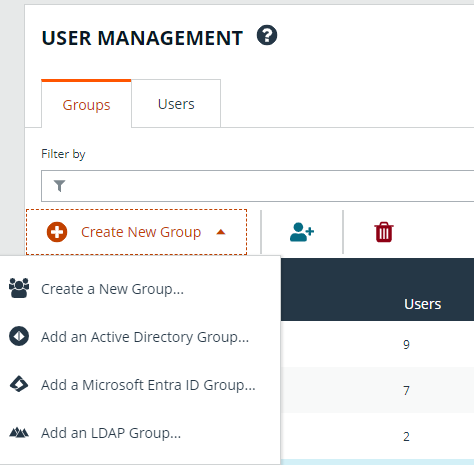
- From the Groups tab, click + Create New Group.
- Select Create a New Group.
- Enter a Group Name and Description for the group.
- Click Create Group.
- Follow the steps in the below sections to enable features and Smart Group for your newly created group.
In addition to creating groups locally, you can import Active Directory, Entra ID, and LDAP groups into BeyondInsight.
Enable features for the group
To enable features for a group in BeyondInsight, assign permissions to the features as follows:
- Go to Configuration > Role Based Access > User Management.
- From the Groups tab, find the group and click on the corresponding ellipsis to right of the group.
- Select View Group Details from the list.
- Click Features located under Group Details.
- Select All Features from the Show dropdown above the grid to display a list of features in the grid.

- Select the Management Console Access feature and click Assign Permissions > Assign Permissions Read Only above the grid. This permission is required so the service account can log in to BeyondInsight and obtain the service accounts’ unique OAuth credentials.
- Select the following features and click Assign Permissions > Assign Permissions Full Control above the grid.
- Options - Connectors: This feature is required to allow the creation of OAuth credentials by the member account. In production, this permission could be removed after connection is established, but is needed again to cycle client_secret and refresh_token.
- Password Safe Account Management: This feature is required to read or write managed accounts through the public API.
- Password Safe Role Management: This feature is required to allow visibility into account Smart Groups, which are assigned via user groups in BeyondInsight.
- Smart Rule Management - Managed Account: This feature is required to manage Smart Rules for managed accounts.
- User Accounts Management: This feature is required for the service account to manage user groups and user accounts.
Enable Smart Groups for the group
To enable Smart Groups for a group in BeyondInsight, assign permissions to the Smart Groups as follows:
- Go to Configuration > Role Based Access > User Management.
- From the Groups tab, find the group and click on the corresponding ellipsis to right of the group.
- Select View Group Details from the list.
- Click Smart Groups located under Group Details.
- Select All Smart Groups from the Show dropdown above the grid to display a list of Smart Groups in the grid.
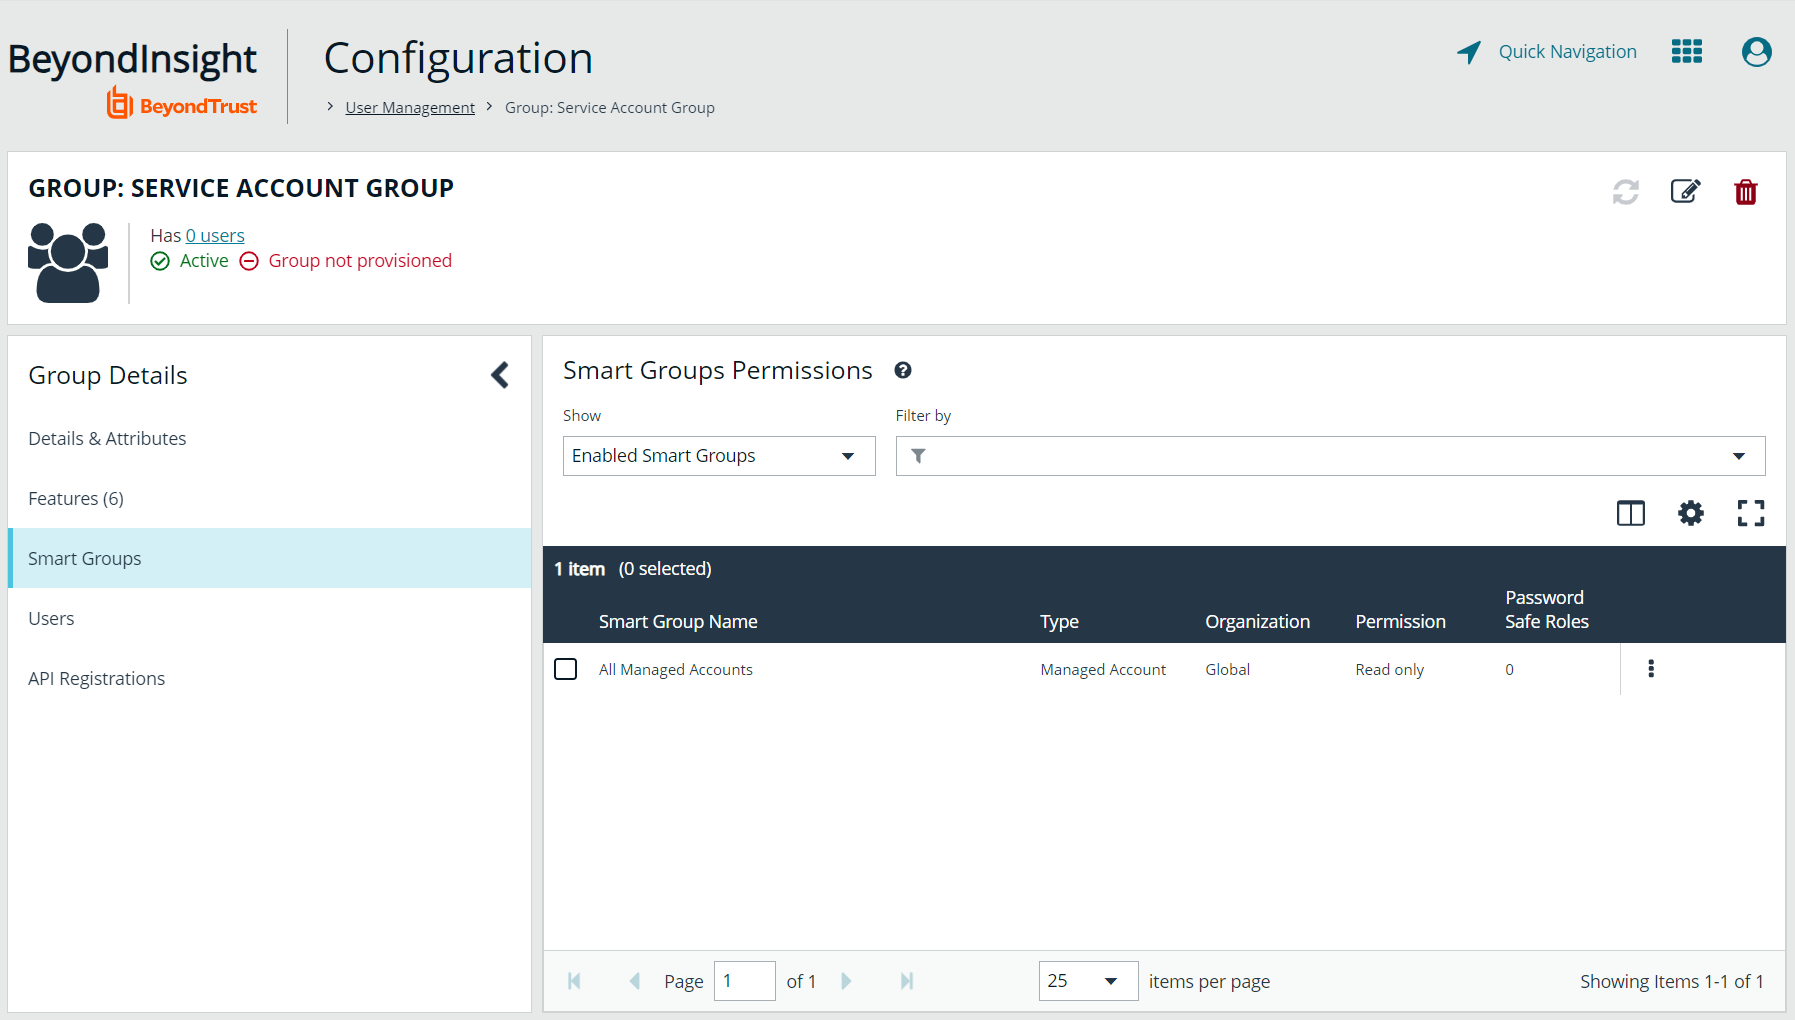
- Select the All Managed Accounts Smart Group and click Assign Permissions > Assign Permissions Read Only above the grid.
Managed Account Smart Groups with a category of Managed Accounts are visible via the SCIM API. Managed Account Smart Groups with a category of Platforms are not visible. However, you can recreate the same Smart Group with a category of Managed Accounts.
Create a new user and assign to group
Once the group is created and assigned the appropriate features and Smart Groups permissions, you can create a new account in BeyondInsight for the service account and add it to the group.
Permissions are assigned only to the group, not to the account.
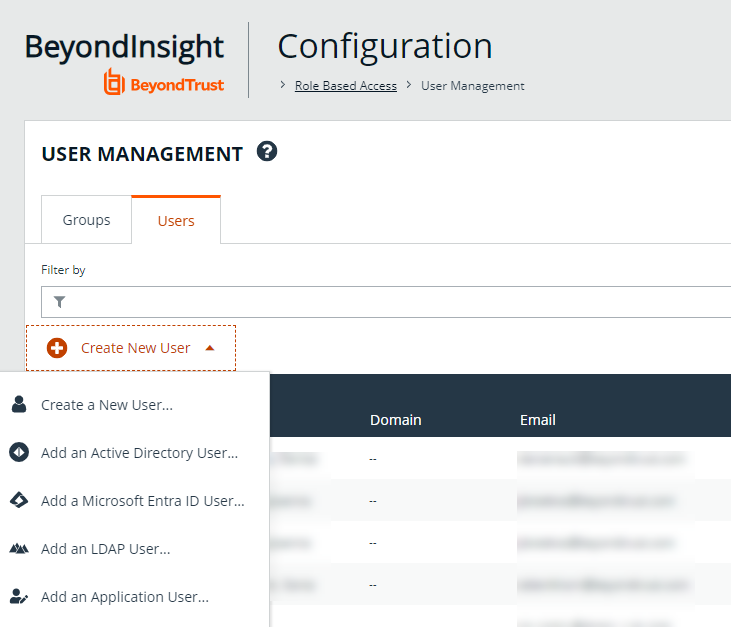
- Go to Configuration > Role Based Access > User Management.
- From the Users tab, click Create New User.
- Select Create a New User.
- Provide Identification, Credentials, Contact Information, User Status, and Authentication Options as needed.
- Click Create User.
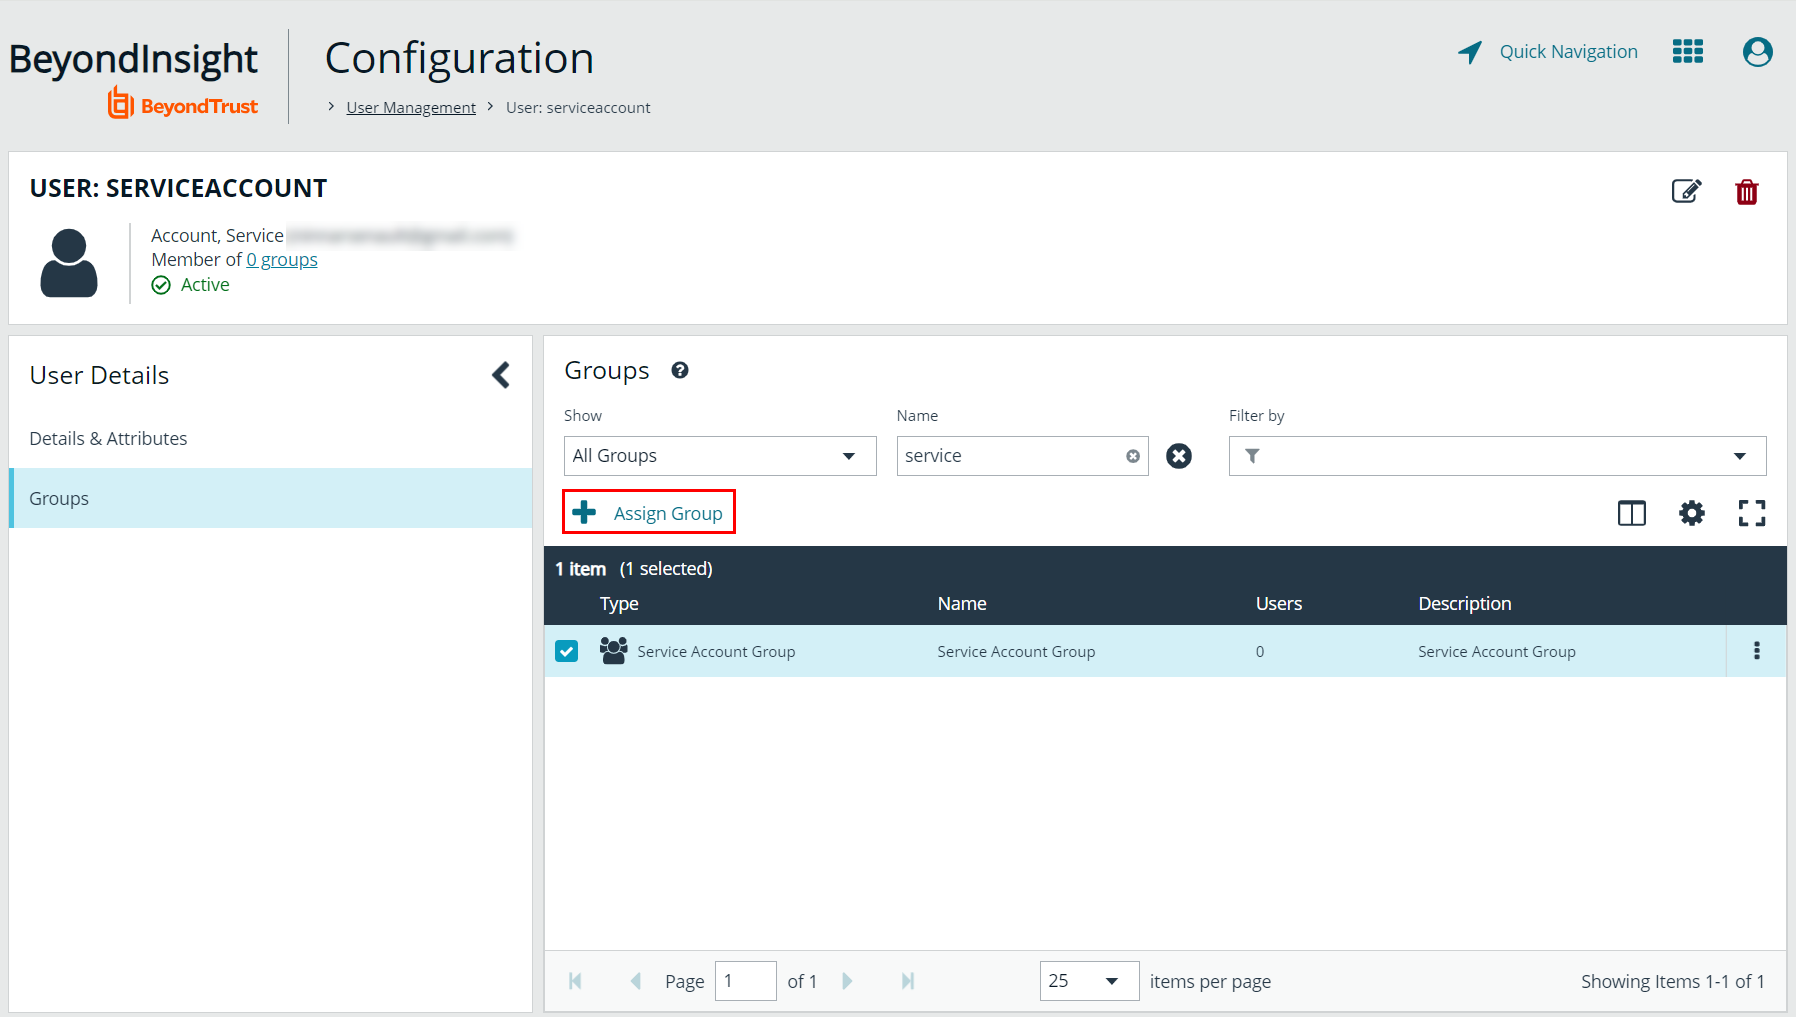
- You are taken to the details page for the user account where Groups is automatically selected. Select All Groups from the Show dropdown above the Groups grid to list all available user groups.
- Locate the group you created above for the service account, select it, and then click Assign Group above the grid.
In addition to creating user accounts locally, you can import AD, Entra ID, and LDAP accounts and add them to either local or imported groups.
Generate OAuth credentials
Once the user account is created and assigned to a group, you must log in as the new user to generate OAuth credentials.
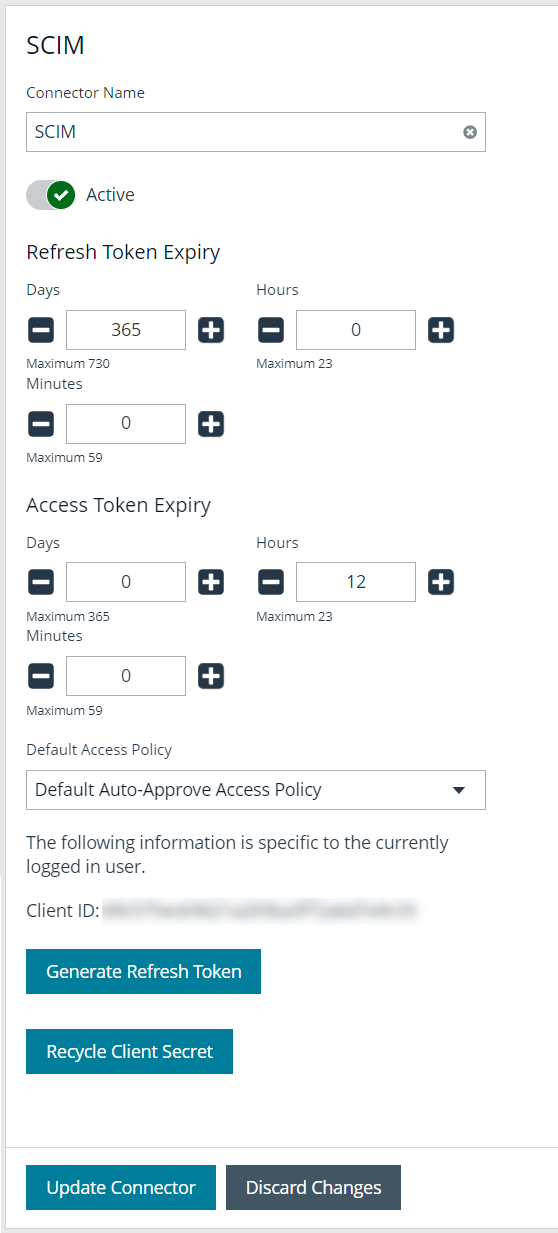
- Go to Configuration > General > Connectors.
- Under Connectors, select the SCIM connector. Once selected, the SCIM connector information displays.
Do not select the SailPoint connector. This was available in previous versions of BeyondInsight, but it is an older integration and is not based on SCIM.
- Each logged-in account in BeyondInsight has a unique client ID. The Client ID is located within the SCIM connector information. Highlight the ID, right-click, and save locally as client_id to a text file.
- Click Recycle Client Secret.
- Click Recycle on the Recycle Secret Access Key pop-up. This generates a unique access key.
- Highlight the Client Secret access key, right-click, and save as client_secret to a text file.
- Click Generate Refresh Token if you want to use this method of authentication. Use the account login password when prompted.
The refresh token is used in the production environment. Client credentials (client ID and client secret) are used in a lab or test environment. Every Password Safe user with full control permissions to the Options – Connectors feature can obtain a Client ID and Client Secret via the connector.
Only one SCIM connector can be created by Password Safe per instance.
Create the SailPoint IdentityIQ SCIM application for Password Safe

Access the Password Safe Resource Kit
The Password Safe Resource Kit is available with product downloads via the Customer Portal. A preconfigured application for Password Safe is available in the Resource Kit.

Before you import SCIM-Password Safe-IdentityIQ.xml, save a copy of the file and edit it using the text editor of your choice to change the application name. You can create one or more applications, each with a unique name.
Search for BT PBPS SCIM and replace the value with Password Safe or any desired value for the name.

Import the XML file
To be able to import the SCIM-PasswordSafe-IdentityIQ.xml file, users must have administrator permissions.
To import the XML file:
- Log in to SailPoint IdentityIQ.
- Click the gear icon at the top of the screen and select Global Settings.
- On the Global Settings page, click Import from File.
- On the Import from File page under Import Objects, click Choose File and navigate to the edited XML file.
- Click Import.
Application definition
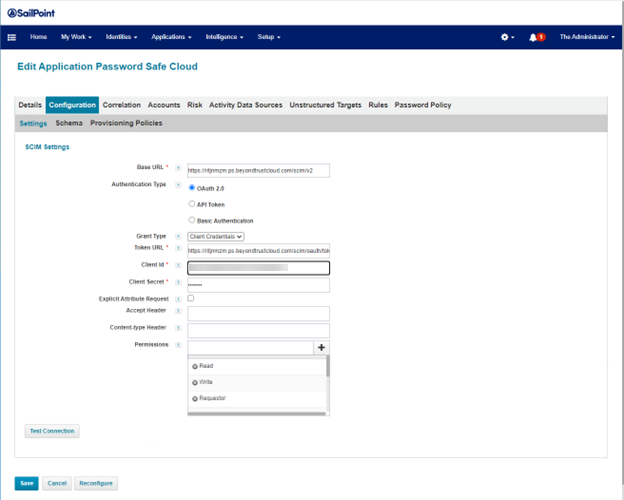
- Under the Application menu item, select Application Definition. You are able to see and edit the new application.
- Double-click the new application.
- Click the Configuration tab. Then click Settings.
- Under Grant Type, select Client Credentials.
- Enter the Base and Token URLs.
- Provide the Client ID and Client Secret, which you saved locally while in the Generate oAuth Credentials section of this guide.
- Click Test Connection. If the test is successful, a Connection Successful message is displayed. If the test is not successful, an error message is displayed.
Client credentials are recommended for testing. A refresh token is used in production where security requirements are higher.
- Click the Correlation tab.
- Configure the Account Correlation, for example, by using an email address and username.

- Click the Unstructured Targets tab.
- Click the Add New Unstructured Data Source button.
- On the pop-up dialog, click the Create Target Source button.
- On the next screen, select Privileged Account Management Collector from the Target Source Types dropdown list.
- Enter URLs and credentials.
- Select PAM Access Mapping Correlation Rule from the Correlation Rule dropdown list.
- Click Save on the Unstructured Target Configuration screen.
- Click Save on the Edit Application screen.
Aggregate accounts, groups, and entitlements from Password Safe
Before a user can start using SailPoint IdentityIQ, it must aggregate, or discover, Password Safe accounts, permissions, and groups.

- Under the Setup menu item, click the Tasks tab.
- Under the New Task dropdown list select Account Aggregation.
- Include a task name and update all remaining fields as required.
- Click Save.
- Repeat steps one through four, this time for Account Group Aggregation.
- Repeat steps one through four, this time for Target Aggregation.
- Once all three tasks have been created, right-click on the Account task and select Execute in Background. Repeat this step for Group, and then Target.
View target permissions and entitlements
To view how permissions and accounts are represented in IdentityIQ after aggregation:
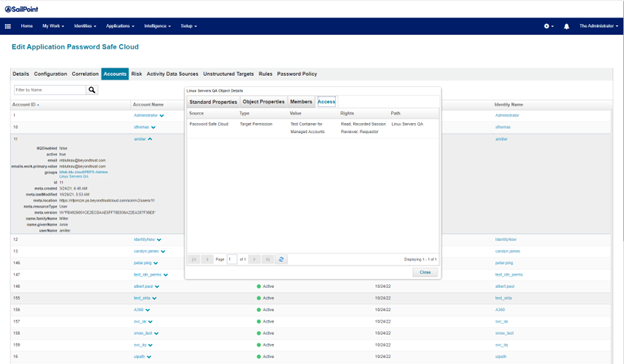
- Return to the applications list by clicking the Application menu item, and then select Application Definition.
- Double-click the application.
- Click the Accounts tab.
- Expand an account.
- Click one of the groups listed, and then click the Access tab to view Target Permissions.
- To view identity entitlements, click the Identities menu at the top of the page, and then select Identity Warehouse.
- Double-click user name, and then click the Entitlements tab.
Configure the PAM Module to point to Password Safe
The below steps are only required for IdentityIQ version 8.1 and prior releases. For version 8.2 and later releases, the PAM Module supports multiple concurrent PAM or Target Sources.
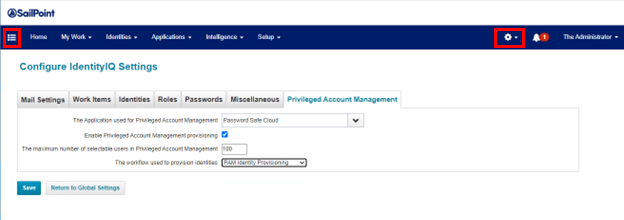
- Click the gear icon in the upper right corner of SailPoint IdentityIQ and select Global Settings.
- On the Global Settings page, click IdentityIQ Configuration.
- Click the Privileged Account Management tab.
- Select Password Safe from the first dropdown list.
- Click Save.
- Click the list icon in the upper left corner of SailPoint IdentityIQ to access the Tasks menu and expand Manage Access.
- Select Privileged Account Management to view the PAM module for Password Safe.
The PAM module provides the Add Identities button, which is configured by default to provision entitlements to users. Password Safe allows for entitlements at the group level only, via its RBAC model. Some customers have reconfigured the PAM module to provision entitlements through Groups, but that is beyond the scope of this guide, and it is recommended that customers work with SailPoint Professional Services for such changes. However, the provisioning strategy described later in this guide provides provisioning support for both directory and non-directory or local users.
Provision directory and non-directory users
The application template for Password Safe comes with a preconfigured provisioning policy. To access the provisioning policy:

- Under the Applications menu item, select Application Definition.
- Double-click the application.
- Click the Configuration tab.
- Click Create Account Form.

The "Source" attribute is required to recognize that an account exists in a source outside of Password Safe. Without knowing the source, provisioning fails to find and modify the account.
- On the next screen, create an attribute called Source:
- Click the blue plus sign icon and select Add Field.
- Under Edit Options > Settings, type source in the Name field.
- Type Source in the Display Name field.
- Under Value Settings, select Script from the Value dropdown list.
- Under Allowed Values, select one or more values.
- Enter a Value Script. In the below example, Active Directory is the name of the application in IdentityIQ:
if (accountType != void)
{
   if ("Local".equals(accountType))
   {
      return null;
   }
}
return "Active Directory";
Source must be null for local provisioning, otherwise this will instruct Password Safe to look for the user in the source/application.
- Next, create an attribute called Active.
- Click the blue plus sign icon and select Add Field.
- Under Edit Options > Settings, type active in Name field.
- Type Active in Display Name field.
- Under Value Settings, select Value from the Value dropdown list.
- Type true in the field under Value. If the value is not set to true, the account will be inactive in Password Safe.
- Click the pencil icon to the right of the Distinguished Name to Import attribute. Add Help Text to explain that this is based on the import of a pre-existing account from Active Directory.
For an account with a source other than Password Safe, e.g.; in LDAP or AD, one Distinguished Name is presented. However, if the target user has multiple accounts in different directories, a list of accounts is provided. Each of these accounts should be provisioned.
- Click Save in the top right corner.
Password Safe cannot provision a new account to Active Directory. It can only import an existing account from Active Directory and add it to a Password Safe local group. Password Safe cannot modify accounts, groups, or group gemberships in Active Directory. Password Safe can import and synchronize groups and account members.
Test the integration
The most common scenario consists of a user with a directory account. For this scenario, use Password Safe as the application. To test this scenario:
![]()
- On the SailPoint IdentityIQ homepage, click the menu icon in the upper left corner.
- Select Manage Access > Manage User Access.

- On the Select User screen, enter the username in the Search field and click the magnifying glass icon. One or more users are returned.
- Click the check mark icon next to a user name to select that user.
- Click Next.

- On the Manage Access screen, type Password Safe in the Search field and click the magnifying glass icon. One or more groups are returned.
- Click the check mark icon next to a local group to select that group.
- Click Next.
- On the Review and Submit screen, make sure everything is correct, and then click Submit.

- You may be asked for additional information. Click Complete Form.
- On the next screen, under Account Type, click Active Directory to resolve the value (or values) via Directory Source.
- Check the Distinguished Name to Import box.
- Click OK.
View execution status of user access request

- On the SailPoint IdentityIQ homepage, click the menu icon in the upper left corner.
- Select Manage Access >Track My Requests.
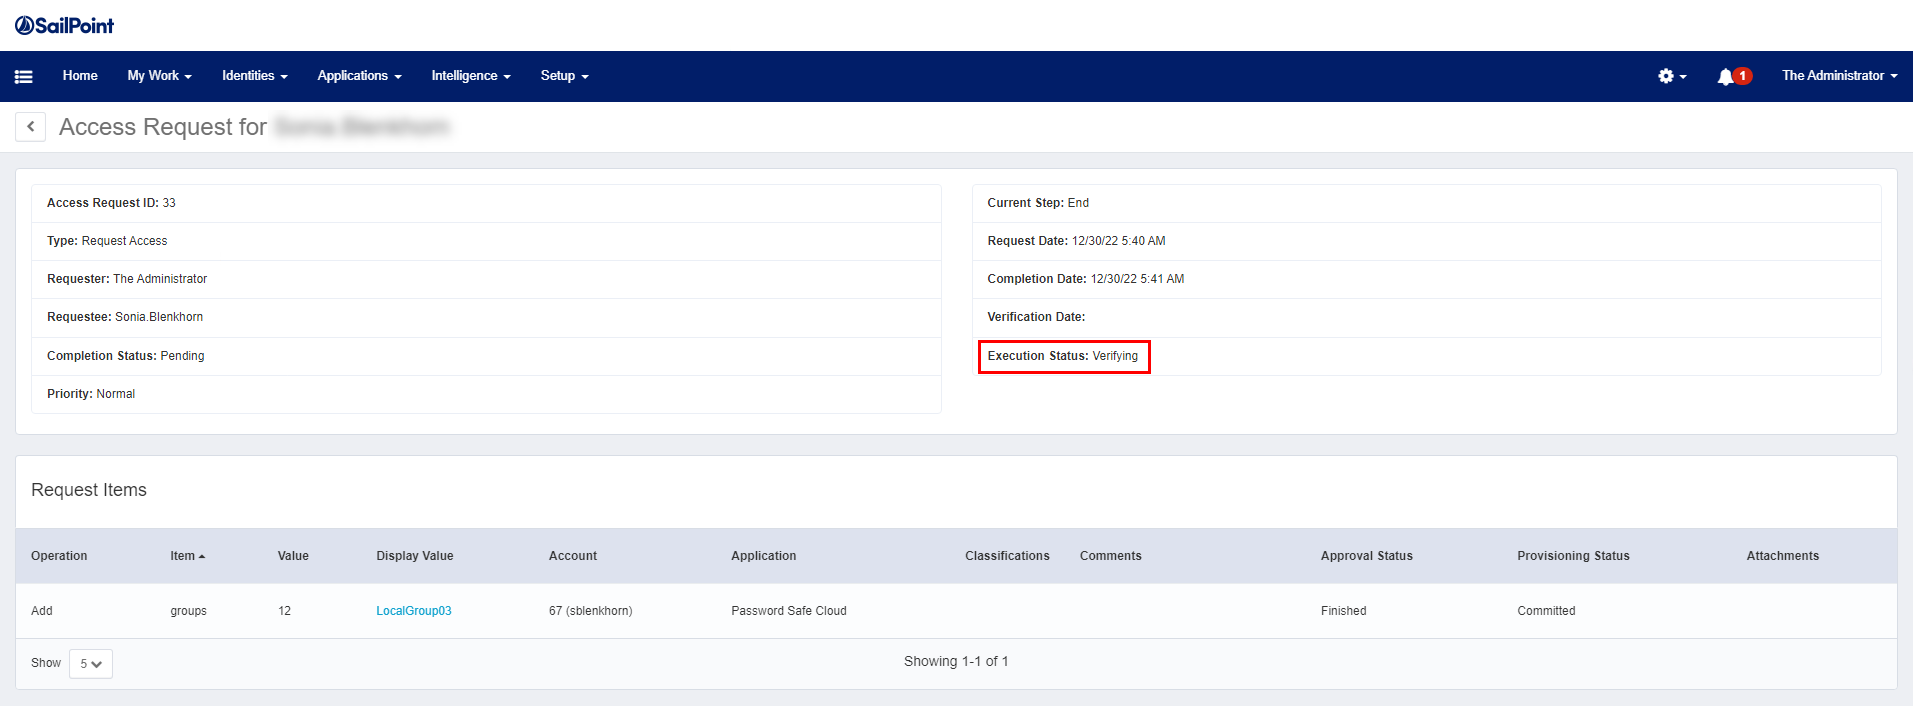
- On the Access Request page, click Details to view the execution status of the request.
- The access request is in Verifying status until aggregation is performed for Password Safe. Once aggregation is complete, the user account is imported from Active Directory into the Password Safe local group.
Provision a user without a directory account
You might need to provision populations of users without a Directory Account. For example, this is required for vendor access.
To view application accounts assigned to a user:

- On the SailPoint IdentityIQ homepage, click the Identities menu, and then select Identity Warehouse.
- Select Manage Access >Track My Requests.
- On the Identity Warehouse screen, enter the username in the Search field, and then click the magnifying glass icon. One or more users are returned.
- Double-click the correct user name.
- On the View Identity User.Name screen, click Application Accounts.
To provision a user without a directory account:
- On the SailPoint IdentityIQ homepage, click the menu icon in the upper left corner.
- Select Manage Access > Manage User Access.
- On the Select User screen, enter the username in the Search field, and then click the magnifying glass icon. One or more users are returned.
- Click the check mark icon next to a user name to select that user.
- Click Next.
- On the Manage Access screen, enter Password Safe in the Search field and click the magnifying glass icon. One or more groups are returned.
- Click the check mark icon next to a local group to select that group.
- Click Next.
- On the Review and Submit screen, make sure everything is correct, and then click Submit.

- Additional information is required. Click Complete Form.
- On the next screen, under Account Type, select Local.
- Provide a username and password.
- Click OK.
The User Name and Password values can be assigned dynamically in the Provisioning Policy Create Form.
The new local user account is now available in Password Safe. To view this account:
- On the BeyondInsight homepage, select Configuration > Role Based Access > User Management > Groups.
- Click the ellipsis to the right of the group that the new local user account was assigned to. Select View Group details.
- Under Group Details, select Users. The new local user account is visible under Assigned Users.