Use SailPoint IdentityIQ Credential Cycling
Implementation Tutorial
Credential cycling is a feature that allows applications requiring credentials, such as username and password, to obtain that information directly from BeyondTrust Password Safe.
With credential cycling, credentials can be removed from application configurations and obtained at run time using an Application Programming Interface (API) call to Password Safe. Password Safe is then configured to rotate the credentials directly with the application target, helping to reduce the risk associated with stale credentials while eliminating the need for manual updates of credentials in a solution like SailPoint IdentityIQ.
Credentials used by SailPoint IdentityIQ are privileged credentials, since they allow access to private data. They also allow for provisioning and deprovisioning of permissions in critical systems and applications, such as Active Directory (AD).
This tutorial outlines the steps required to configure credential cycling for a Java database connectivity (JDBC) application in SailPoint IdentityIQ.
Create a Service Account for IdentityIQ Credential Cycling
Create an API Registration
- Log in to the BeyondInsight console.
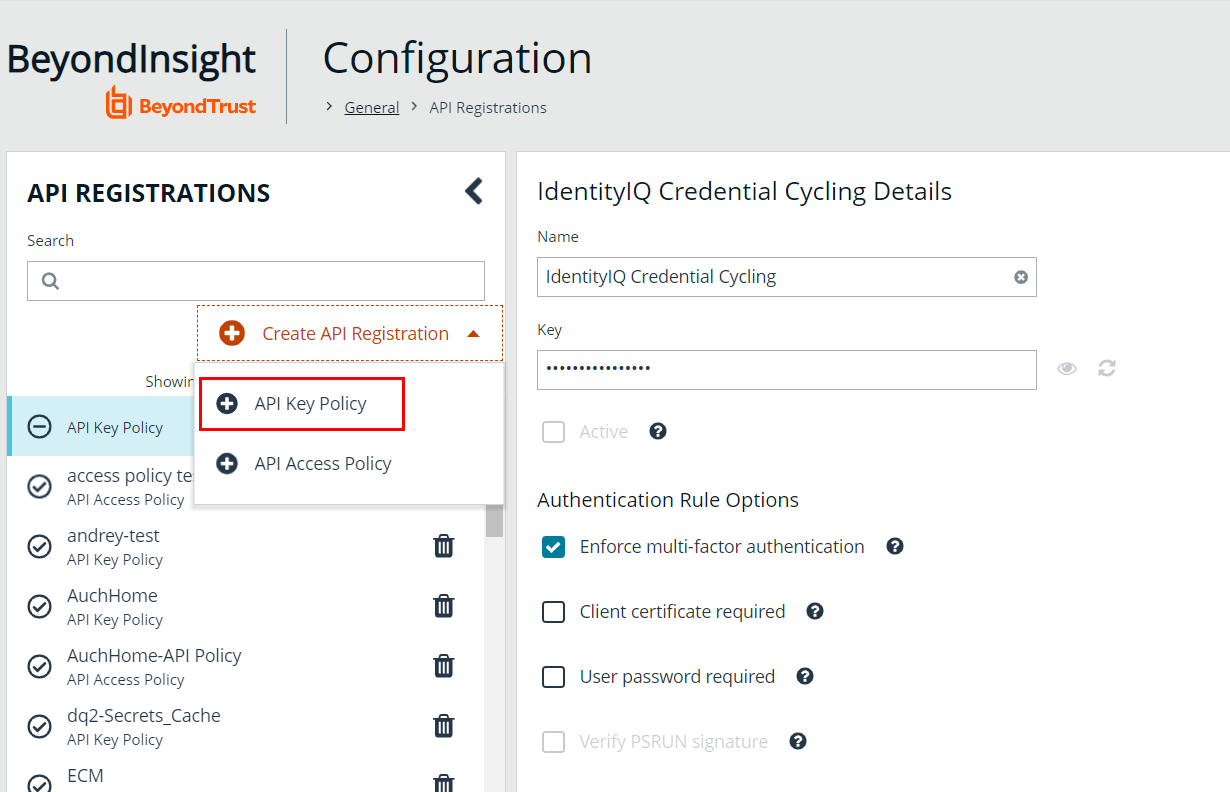
- Go to Configuration > General > API Registrations.
- Under API Registrations, click Create API Registration, and then select API Key Policy.
- Name the new API registration IdentityIQ Credential Cycling.

- Click Add Authentication Rule.
- Add the IdentityIQ server IP address (located in IP Rule) to the IP Address field to allow the connection.
- Click Create Rule.
- Click Create API Registration.
For security options beyond API Key and IP Rule or Filter, it is possible to take advantage of the Password Cache. For more information, please see thePassword Cache User Guide.
Create a Local Group
To create a local group in BeyondInsight, follow the below steps:
- Navigate to Configuration > Role Based Access > User Management.
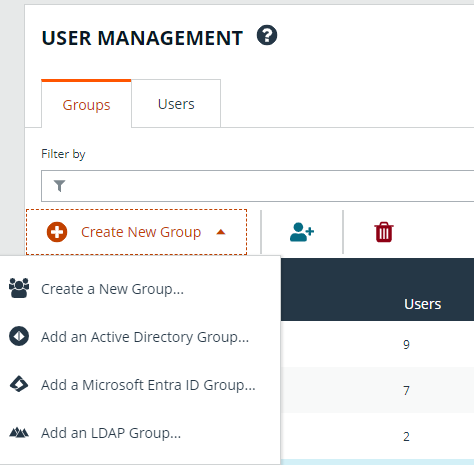
- From the Groups tab, click + Create New Group.

- Select Create a New Group.
- On the next screen, provide a group name of IdentityIQ Credential Cycling and description.
- Click Create Group.
In addition to creating groups locally, you can import Active Directory, Entra ID, and LDAP groups into BeyondInsight.
Create an Account Access Policy
An access policy must be available for credential cycling. This is required to be able to grant the requestor the Password Safe role for the Smart Rule.
- In BeyondInsight, go to Configuration > Privileged Access Management Policies > Access Policies.

- Click Create New Access Policy.
- Type IdentityIQ Credential Cycling in the Access Policy Name field and click Create Access Policy.
- Click the Schedule tab, and then click Create Schedule.
- Scroll down to Policy Types and enable View Password.
- Check the Auto Approve box.
- Scroll down to the bottom of the scheduling form and click Create Schedule.
- Click Make Available on the prompt that displays.
- Click Update Access Policy.
Assign an Account Smart Group
An account Smart Group must be assigned to the new local group that contains the application accounts required by IdentityIQ. To do this:

- In BeyondInsight, go to Configuration > Role Based Access > User Management > Groups.
- In the Filter by field, select Name from the dropdown list.
- Type IdentityIQ Credential Cycling in the Name field.
- Click the vertical ellipsis for the group and select View Group Details.
- Under Group Details, select Smart Groups.
- Locate the All Managed Accounts Smart Group in the Smart Groups Permissions grid and click the vertical ellipsis for it.
- Select Assign Permissions Read Only.
- Click the vertical ellipsis for the All Managed Accounts Smart Group again, and then select Edit Password Safe Roles.
- Check the box next to Requestor.
- Select IdentityIQ Credential Cycling from the Access Policy for Requestor dropdown.
- Click Save Roles.
Add a User Account
A user account must be added to the group. IdentityIQ uses this account as the service account for credential cycling.
- In BeyondInsight, go to Configuration > Role Based Access > User Management > Groups.
- In the Filter by field, select Name from the dropdown list.
- Type IdentityIQ Credential Cycling in the Name field.
- Click the vertical ellipsis for the group and select View Group Details.
- Under Group Details, select Users.
- Above the Users grid, select Users not Assigned from the Show dropdown list.
- Locate the user and select it.
- Click Assign User above the grid. If you select Assigned Users from the Show dropdown list, the user is now listed.
Enable Credential Cycling API Registration for the Group

- In BeyondInsight, go to Configuration > Role Based Access > User Management > Groups.
- In the Filter by field, select Name from the dropdown list.
- Type IdentityIQ Credential Cycling in the Name field.
- Click the vertical ellipsis for the group and select View Group Details.
- Under Group Details, select API Registrations.
- Check the box next to the IdentityIQ Credential Cycling API registration created earlier in this tutorial to enable it.
Identify Managed System and Managed Account
A managed system and a managed account must be identified in order for IdentityIQ to determine the password for that account. SailPoint Connector requires the correct username/password credentials to connect to the account.
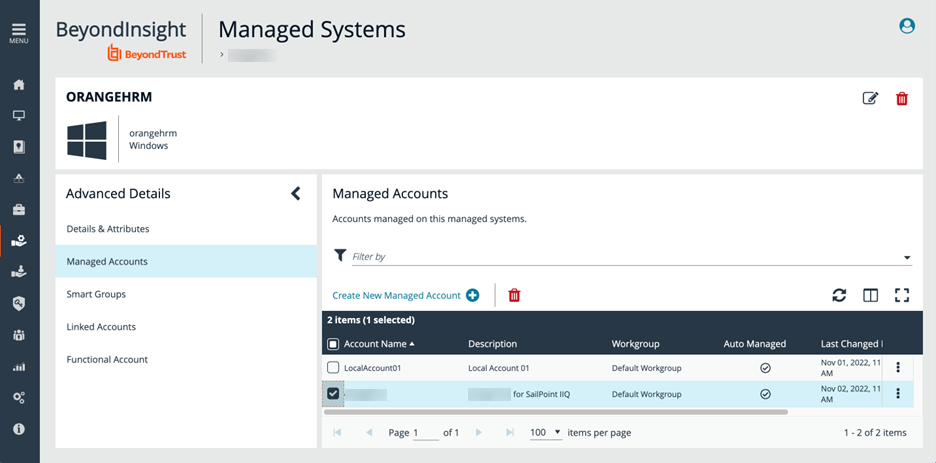
- In BeyondInsight, go to Managed Systems.
- Check the box next to a managed system to select it, and then click the corresponding ellipsis to the right of the system. Select Go to Advanced Details.
- Under Advanced Details, select Managed Accounts.
- Check the box next to a managed account to select it.

- The managed account must have an API enabled. Click the corresponding ellipsis to the right of the group.
- Under Account Settings, click the toggle button next to API Enabled.
Update Managed Account Password to JSON format
To allow IdentityIQ to retrieve credentials, the password for the managed account in Password Safe must use the JSON format.

- In BeyondInsight, go to Managed Systems.
- Check the box next to a managed system to select it, and then click the corresponding ellipsis to the right of the system. Select Go to Advanced Details.
- Under Advanced Details, select Managed Accounts.
- Check the box next to a managed account to select it, and then click the corresponding ellipsis to the right of the account. Select Edit Account.
- Under Credentials, type the user (account name) and password for that account in the Password field using the following format:
{"bt_user":"MyUserName","bt_password":"MyPasswordValue"}
- Click Update Account.
Use IdentityIQ to Complete Credential Cycling Process
Customize the credentialConfigurationTemplate.xml File
In order to continue with the credential cycling process, the credentialConfigurationTemplate.xml file must be customized. It is recommended that you create a copy locally.
- On your local drive, navigate to Program Files > Apache Software Foundation > Tomcat 9.0 > webapps > identityiq > WEB-INF > config.
- Select the credentialConfigurationTemplate.xml file.
- Right-click on the file and save a copy to edit it.
- Open the copied file in a text editor of your choice. Change the following:
- url, runas, and apikey to match your environment.
- Replace managedAccountName and managedSystemName with the correct values.
- Specify the name of the application that uses credential cycling.
- Identify application attributes.
Populate User and Password with Credential Cycling
In IdentityIQ, you must populate the connection user and connection password in the application using credential cycling.
To view connection user and connection password:
- Log in to SailPoint IdentityIQ.
- Under Applications, select Application Definition.
- Click the desired application.
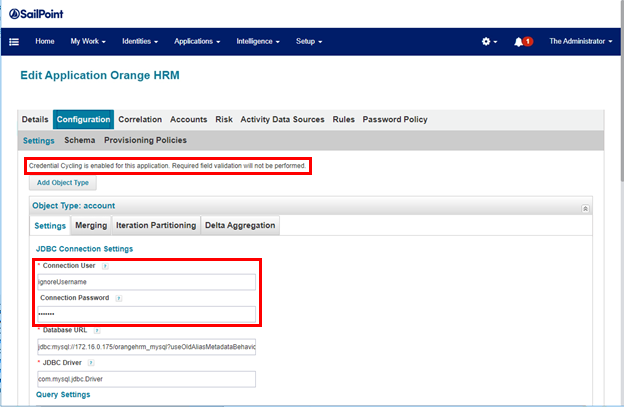
- Click Configuration > Settings to view Connection User and Connection Password.
If the application is enabled for credential cycling, and note is displayed on the screen.
Application attributes differ from the label used on the Application Configuration page. In order to identify the application attributes, use the /debug interface.

- Go to https://identityiq_server:8443/identityiq/debug.
- Select Application.
- Click the desired application to open the Object Editor.
- Locate key=”password” and key=”user” and identify the values. These 2 values are required for application attributes.
- Manually update the following values in the template file for the desired application:
- <CredentialAssociation applicationName="Application Name"
attributeName="user"
credentialAttributeName="bt_user">
- <CredentialAssociation applicationName="Application Name"
attributeName="password"
credentialAttributeName="bt_password"/>
- <CredentialAssociation applicationName="Application Name"
- Click Save.

- Import the template file to IdentityIQ. This applies the template to the application:
- Click the gear icon on the upper right side of the screen.
- Select Global Settings.
- Select Import From File.
- Click Choose File and navigate to the template file.
- Click Import.
At this point, you should be able to test the application successfully, preview the application via schema, and aggregate. Once an application is configured for credential cycling, credentials in Settings are ignored. To test the application:

- Log in to SailPoint IdentityIQ.
- Under Applications, select Application Definition.
- Click the desired application.
- Click Configuration > Settings.
- At the bottom of the page, click Test Connection. If successful, a Test Successful message is displayed.