Set Up SAML with a generic security provider in BeyondInsight
The following steps show how to set up BeyondInsight with a generic security provider.
Configure SAML in the BeyondInsight console
To configure SAML in the BeyondInsight console, take follow the steps:
- Navigate to Configuration > Authentication Management > SAML Configuration.
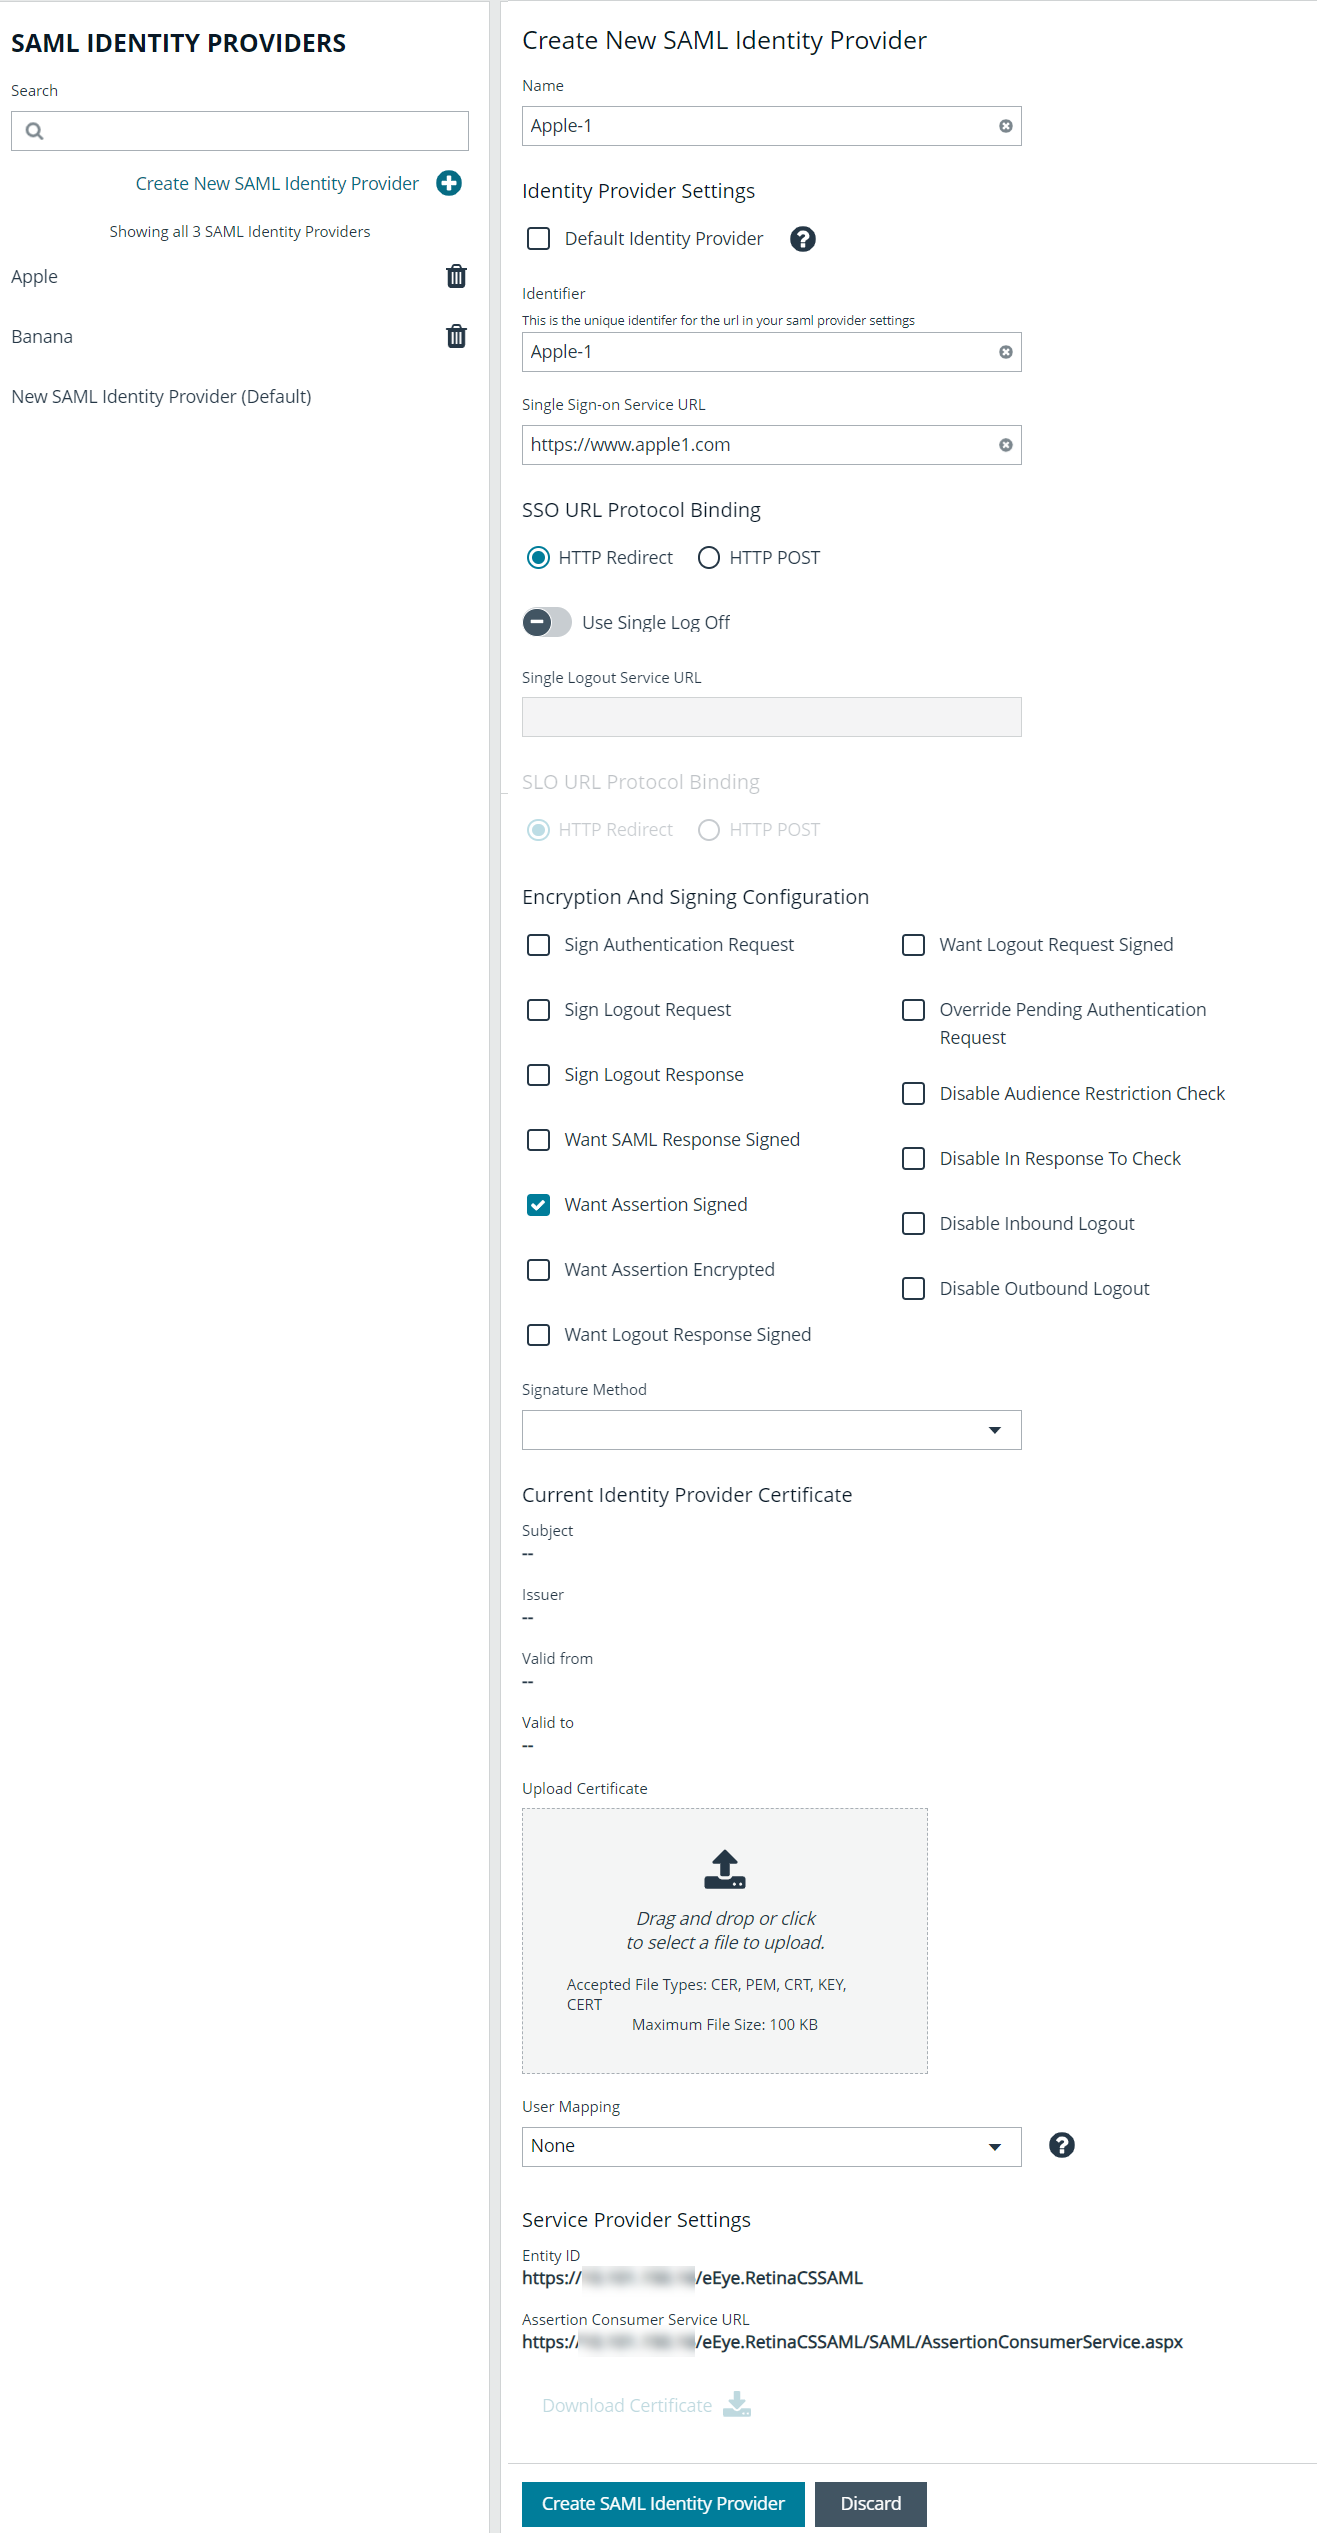
- From the SAML Identity Providers pane, click Create New SAML Identity Provider.
- Provide a name for the new SAML identity provider (IdP).
- Complete the Identity Provider Settings as follows:
- Check the Default Identity Provider option if you have more than one IdP for the same service provider (SP), and would like this IdP to be used as default for SP initiated logins. This is useful in the case where a user accesses the SAML site access URL without providing an IdP. Also, when a user clicks the Use SAML Authentication link from the BeyondInsight login page, they are redirected to the default IdP's site for authentication.
- Identifier: Enter the name of the identity provider entry, normally supplied by the provider.
- Single Sign-on Service URL: Provide the SSO URL, from the provider.
- SSO URL Protocol Binding: Select either HTTP Redirect or HTTP Post as the type.
- Single Logout Service URL: Enter the SLO URL, from the provider.
- SLO URL Protocol Binding: Select either HTTP Redirect or HTTP Post as the type.
- Encryption and Signing Configuration: Check applicable boxes to enable options, as required by your service provider.
- Signature Method: Select the method, as is required by your IdP, from the dropdown.
- Current Identity Provider Certificate: Upload the identity provider certificate.
- User Mapping: Select the type of user account from the dropdown. This indicates how user claims from the SAML provider are mapped in the BeyondInsight User database.
- None: This is the legacy type of mapping, which is not based on type of user.
- Local: Select this option for local user account claims. BeyondInsight maps the user and group name.
- Microsoft Entra ID: Select this option for Entra ID user account claims. When selected, BeyondInsight maps the ObjectID attribute to the AppUser and UserGroup attributes for the user.
- Active Directory: Select this option for Active Directory user account claims. If the claims are configured to pass the SID of the user and group, BeyondInsight maps the SID for the user and group, which is preferred over mapping domain name and group name attributes.
- Click Save SAML Identity Provider.
- The following Service Provider Settings are auto-generated by BeyondInsight:
- Entity ID: This is the fully qualified domain name, followed by the file name: https://<serverURL>/eEye.RetinaCSSAML/. This is used for audience restriction.
- Assertion Consumer Service URL: The HTTPS endpoint on the service provider where the identity provider redirects to with its authentication response. .
- Click Save SAML Configuration.
Once the SAML configuration is saved, a public service provider certificate is available to download. It can be uploaded to the IdP, if required.
Configure identity provider (IdP)
Below are some of the values an IdP may need:
- Audience Restriction: https://<FQDN>/eEye.RetinaCSSAML/
- SSO Service URL: https://<FQDN>/eEye.RetinaCSSAML/SAML/AssertionConsumerService.aspx
- SLO Service URL: https://<FQDN>/eEye.RetinaCSSAML/SAML/SLOService.aspx
- Service Provider Certificate: Generated when SAML configuration is saved.
Your IdP must provide the following attributes in the assertion:
- None:
- Group: This must match the group created in BeyondInsight or imported from Active Directory / LDAP. If an Active Directory group is used, it must match the BI format of Domain\GroupName.
- Name: UPN, domain\username, username or EmailAddress formats are acceptable.
- EmailAddress
- Surname
- GivenName
- Local:
- Group: This is the BeyondInsight groups the user must belong to and must be sent as the GroupName for each group.
- Name: This is sent as the BeyondInsight username.
- EmailAddress
- Surname
- GivenName
- Active Directory:
- SecurityIdentifier: The user's SID.
- Group: This is the BeyondInsight groups the user must belong to and must sent as the SID for each group.
- Name: This is sent as UPN.
- EmailAddress
- Surname
- GivenName
- Microsoft Entra ID:
- ObjectID: The user's ObjectID. Azure includes this with the assertion by default.
- Group: This is the BeyondInsight groups the user must belong to and must be sent as the ObjectID for each group.
- Name: This is sent as UPN.
- EmailAddress
- Surname
- GivenName
EmailAddress, Surname, and GivenName are optional. All other attributes are required. Assertion requirements change based on the SAML mapping you choose when configuring SAML.
Multiple identity providers
If you have added multiple IdPs to your SAML configuration, users can log in to BeyondInsight / Password Safe using the following two methods:
- IdP initiated login: the user logs in to the IdP first and launches BeyondInsight / Password Safe from there.
- SP initated login: the user accesses the SP initiated URL to log in. During SP initiated logins the user is able to specify which IdP they want to log in with; otherwise BeyondInsight / Password Safe uses the default IdP.
- Default SAML SIte Access URL: https://<BeyondInsightURL>/eEye.RetinaCSSAML/login.aspx
- Specific SAML Site Access URL: https://<BeyondInsightURL>/eEye.RetinaCSSAML/login.aspx?partnerIdP=<IdP EntityID>
For more information on configuring a Microsoft Entra ID SAML Provider, please see Configure Microsoft Entra ID SAML with BeyondInsight SAML.
Configure SAML using the saml.config file
In the case where you have multiple service providers, you can configure SAML manually as outlined below.
Copy certificates from IdP
- Copy the idp.cer file you received from the IdP to the following folder on the UVM: C:\Program Files (x86)\eEye Digital Security\Retina CS\WebSiteSAML\Certificates.
Generate or obtain a private service provider certificate (sp.pfx file)
Generate your own Self Signed Certificate as follows:
- Use PowerShell to generate a new certificate:
New-SelfSignedCertificate -Subject "BI SAML SP" -CertStoreLocation cert:\LocalMachine\My - Provider "Microsoft Enhanced RSA and AES Cryptographic Provider" -HashAlgorithm SHA256 - KeyLength 2048 -NotAfter 1/1/2050
This command requires PowerShell 5.0 or later (Windows 10 or Server 2016).
- Make note of the Thumbprint for later use, for example: 7120E0BD353429D18F9829096AB3BC9A80AF33B8.
- Export the public key for your certificate:
Export-Certificate -Cert cert:\LocalMachine\My\7120E0BD353429D18F9829096AB3BC9A80AF33B8 - FilePath c:\certs\sp.der
- Convert the certificate to base 64:
Certutil.exe -encode c:\certs\sp.der c:\certs\sp.cer
Use a certificate obtained from a Certificate Authority as follows:
Your Certificate must have the following capabilities:
- Enhanced Key Usage: Client Authentication, Server Authentication
- Key Usage: Digital Signature, Key Encipherment
Add the certificate to the Local Machine, Personal Store and add any Intermediate or Root certs to the proper stores if needed.
If you want to use the service provider cert from the Certificate Store you must grant permissions to IIS to READ the Private Key:
- Open MMC.
- Add the Certificate SnapIn for Local Machine.
- Explore to Personal/Certificates.
- Right -click on your Certificate that was setup for the service provider.
- Select All Tasks > Manage Private Keys.
- Add the IIS user: IIS_IUSRS.
Modify saml.config file
The file is located here: C:\Program Files (x86)\eEye Digital Security\Retina CS\WebSiteSAML.
Update the Service Provider section as follows:
- Name: Should be fully qualified domain followed by eEye.ReintaCSSAML. This is used for the Audience Restriction.
- Description: Add a description.
- AssertionComsumerServiceUrl: This shouldn't need to be modified.
- If you save the certificate for the SP to the certificate folder use these options:
- LocalCertificateFile: Path to the certificate
- LocalCertificatePassword: Password for the PFX file
- If you want to use the certificate from the cert store remove LocalCertificateFile and LocalCertificatePassword and add:
- LocalCertificateThumbprint: Thumbprint of the certificate
You can remove all but your one IdP entry.
The following IdP fields must be updated to your environment settings:
- Name: The name of the Provider entry, normally provided by the Provider
- SingleSignOnServiceUrl: URL for SSO from IdP
- SingleLogoutServiceUrl: URL for SLO from IdP
- PartnerCertificateFile: Location to the public cert for the IdP
The other settings are set to what your Provider requires.
Below are some common configurations for some of the common IdPs:
Example saml.config (this is configured for OKTA using a self signed service provider certificate)
<?xml version="1.0" encoding="utf-8"?>
<SAMLConfiguration xmlns="urn:componentspace:SAML:2.0:configuration">
 <ServiceProvider
  Name=https://pws.mydomain.com/eEye.RetinaCSSAML/
  Description="Example Service Provider"
  AssertionConsumerServiceUrl="~/SAML/AssertionConsumerService.aspx">
  <LocalCertificates>
   <Certificate
    Thumbprint="05552BAF3B8BC9675C94EDB885D4B821F3DC15DE" />
  </LocalCertificates>
 </ServiceProvider>
 <PartnerIdentityProviders>
  <PartnerIdentityProvider
   Name=http://www.okta.com/exk1dg5hqz3LbpBIj5d7
   Description="ADFS"
   SignAuthnRequest="false"
   SignLogoutRequest="false"
   WantSAMLResponseSigned="false"
   WantAssertionSigned="false"
   WantAssertionEncrypted="false"
   WantLogoutResponseSigned="false"
   SingleSignOnServiceBinding="urn:oasis:names:tc:SAML:2.0:bindings:HTTP-POST"
   SingleSignOnServiceUrl=https://dev-25872691.okta.com/app/dev-25872691_bi212_1/exk1dg5hqz3LbpBIj5d7/sso/saml
   SingleLogoutServiceBinding="urn:oasis:names:tc:SAML:2.0:bindings:HTTP-POST"
   SingleLogoutServiceUrl=https://dev-25872691.okta.com/app/dev-25872691_bi212_1/exk1dg5hqz3LbpBIj5d7/slo/saml>
   <PartnerCertificates>
    <Certificate
    FileName="Certificates\okta.cer" />
   </PartnerCertificates>
  </PartnerIdentityProvider>
 </PartnerIdentityProviders>
</SAMLConfiguration>
Update host name and SAML access URL
The below steps are applicable for on-premises installations only. Access URLs can also be set from the configuration area in the BeyondInsight console for both PS Cloud and on-premises installations by navigating to Configuration > Authentication Management > Single sign on site access urls.
- Open the BeyondInsight Configuration Tool.
- Scroll Down to SAML Access URL.
- Update it to the fully qualified domain, followed by the file name:
https://<FQDN>/eEye.RetinaCSSAML/ - Scroll down to the Host Name field under the Web Site Information section.
- Update it to the fully qualified domain, for example, bidev.shines.test.cloud.
- Click Apply.
The host name is the fully qualified domain name used to access BI/PS. If this is a load-balanced instance, the host name is the same on all servers.
Configure Microsoft Entra ID SAML with BeyondInsight SAML
You can integrate Microsoft Entra ID SAML with BeyondInsight SAML so that when BeyondInsight receives claims from Entra ID, it can enumerate groups for the user directly from Entra ID using the Group ID value in the claim. This allows an Entra ID user to log in to BeyondInsight using SAML authentication when the user account does not yet exist in the BeyondInsight User database. BeyondInsight adds the user to its database automatically upon successful Entra ID group enumeration and authentication into BeyondInsight.
To configure the integration between Entra ID SAML and BeyondInsight SAML, log in to your Entra ID tenant and follow the instructions below to add a new enterprise application to host the SAML configuration for BeyondInsight:

- In Azure, navigate to Enterprise Applications, and then click + New Application.
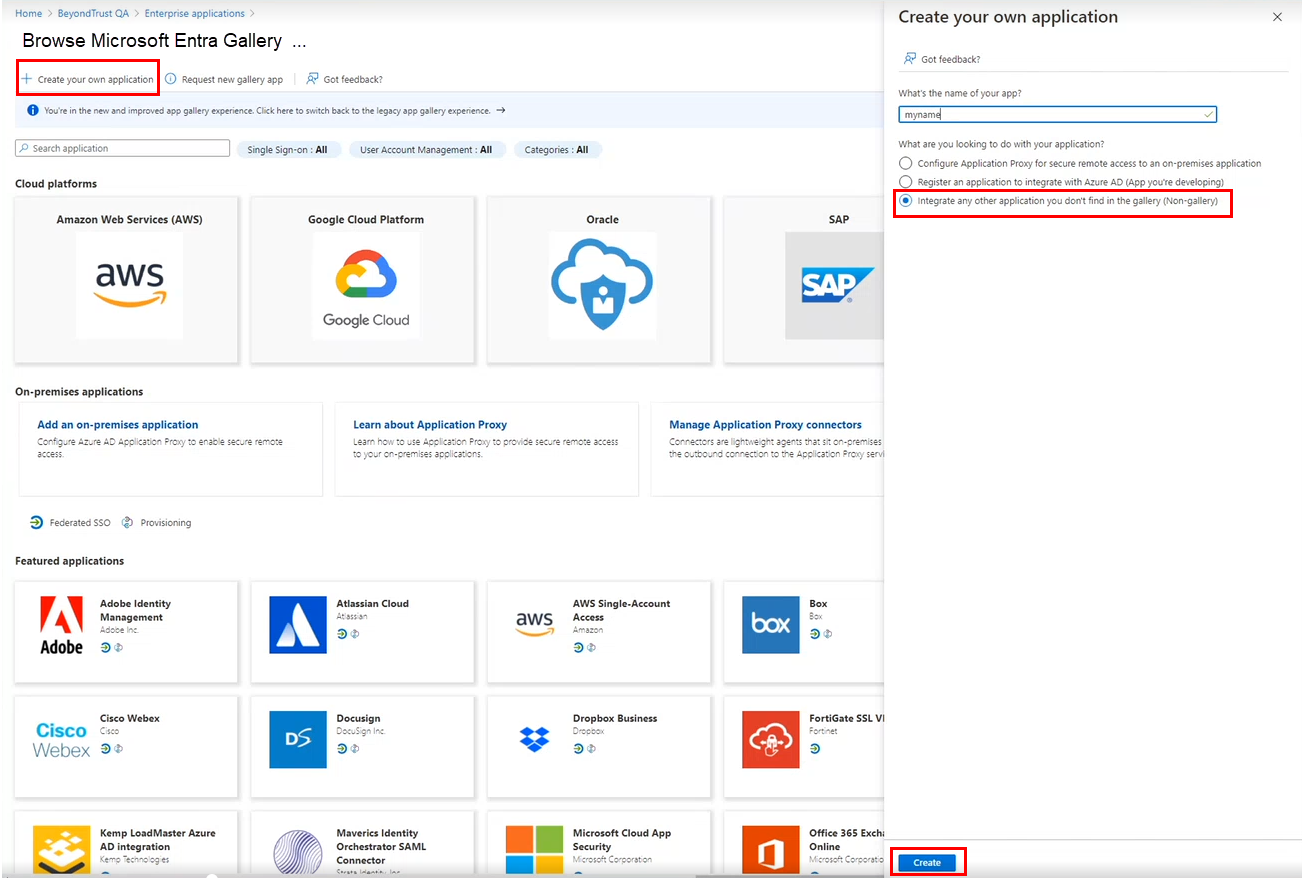
- Click + Create your own application.
- Provide a name.
- Select the Integrate any other application you don’t find in the gallery (Non-gallery) option.
- Click Create.
- In the BeyondInsight console, create a new SAML identity provider. To complete the SAML IdP config in BeyondInsight, use the following information from the enterprise application you just created:
- In Azure, go to the SAML-based Sign-on configuration page for the application.
- In the Set up <application name> section, copy the Login URL and the Entra ID Identifier and save them.
- Paste them into the Identifier, Single Sign-on Service URL, and Single Logout Service URL fields in the BeyondInsight SAML IdP configuration.
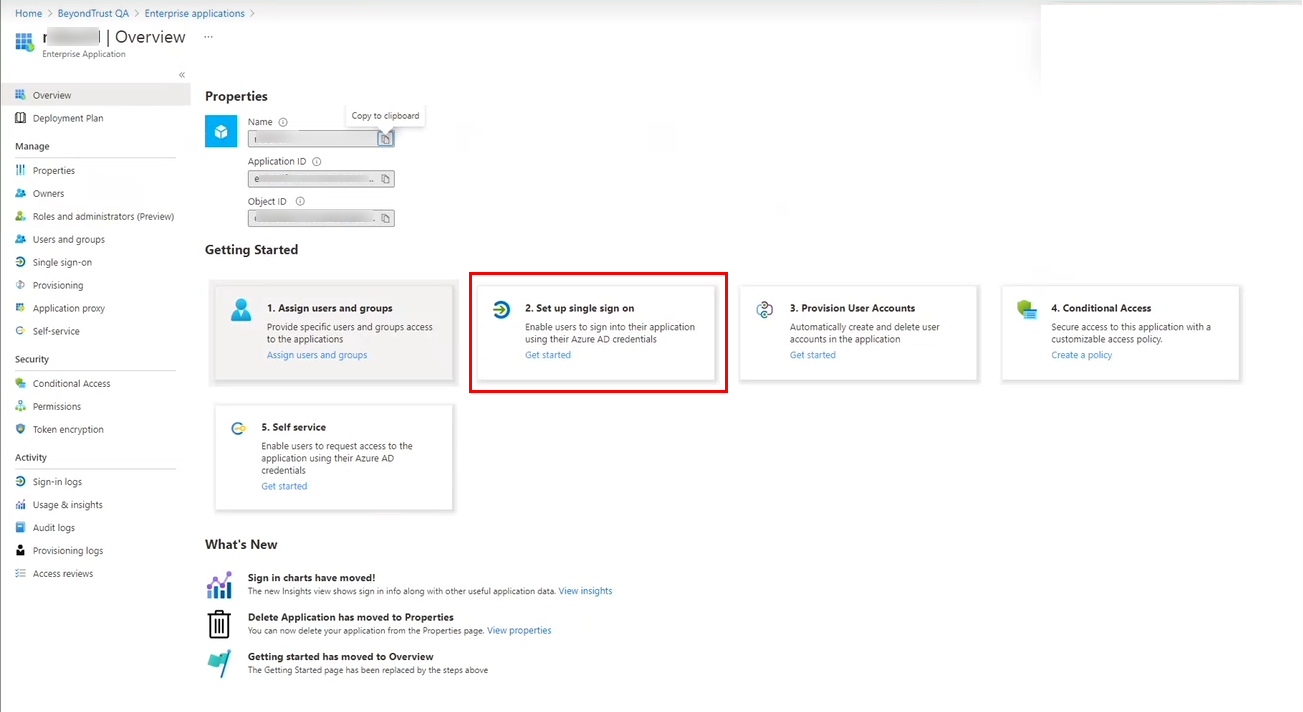
- In Azure, open the Properties for the newly created enterprise application.
- From the Getting Started section, click Set up single sign-on.
- In the Basic SAML Configuration section, provide the Identifier (Entity ID) and Reply URL (Assertion Consumer Service URL) obtained from the SAML IdP you just created in BeyondInsight.
- In the User Attributes & Claims section, click Edit to add the group claim.
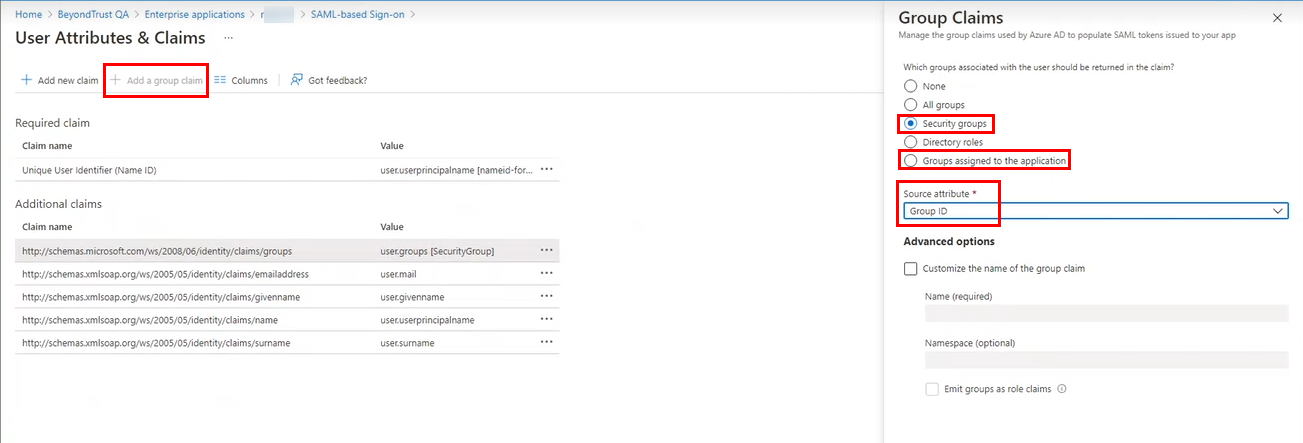
- Click + Add a group claim.
- In the Group Claims section:
- Select which groups associated with the user to return in the claim: either Groups assigned to the application or Security Groups.
- Select Group ID from the Source attribute.
If user accounts are configured in Okta, ensure GivenName, Surname, and Email attributes are set for user accounts in Okta. When these attributes are not set, the user's name and email do not display in the user's profile for the logged in user in BeyondInsight. If these attributes are set after the user has logged into BeyondInsight, the user must log out of BeyondInsight and log back in, to see their name and email in their user profile.
For more information on configuring a SAML IdP in BeyondInsight, please see Configure SAML in the BeyondInsight console.
Disable forms login
In environments where SAML, smart card, or claims-aware is configured, we recommend enabling the Disable Forms Login authentication option to disallow users from using the standard login form in BeyondInsight.
To disable forms login for existing users, enable this option directly on a user account as follows:
- Click the vertical ellipsis for the user account, and then click Edit User Details.
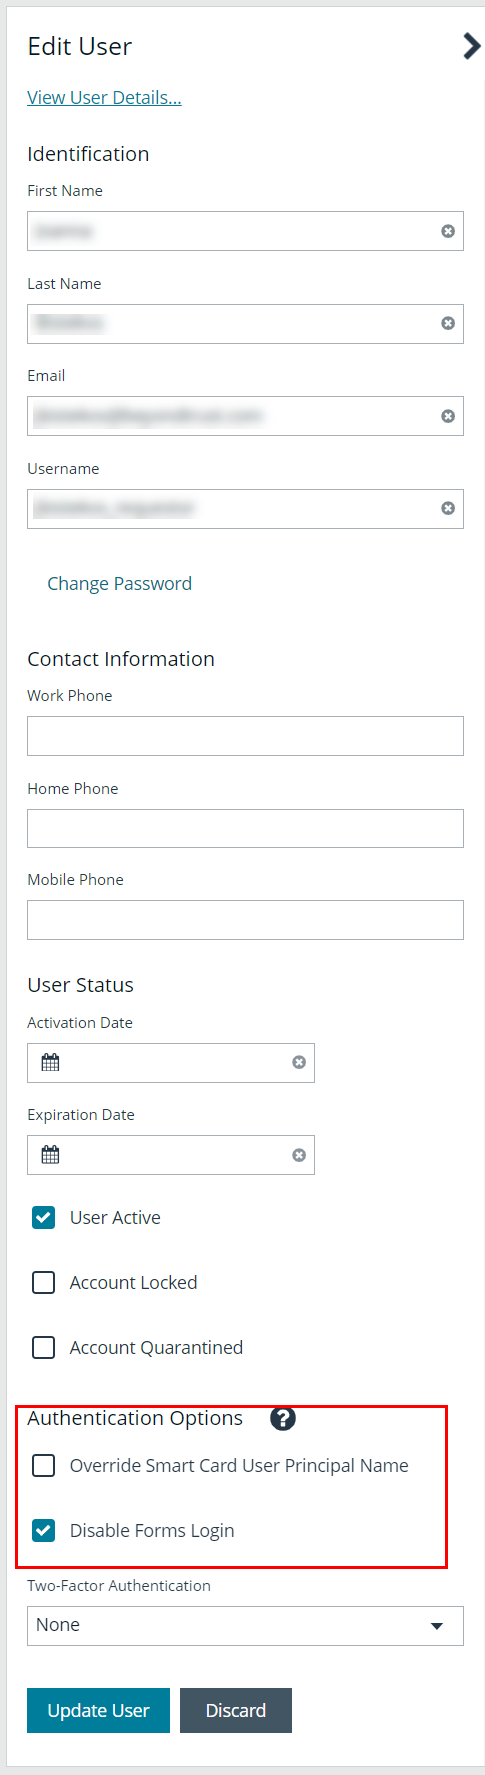
- Under Authentication Options, check Disable Forms Login to enable the option.
Please contact BeyondTrust Support for assistance if you need to bulk-apply this setting to existing accounts.
To disable forms login globally for newly created directory accounts:
- Navigate to Configuration > Authentication Management > Authentication Options.
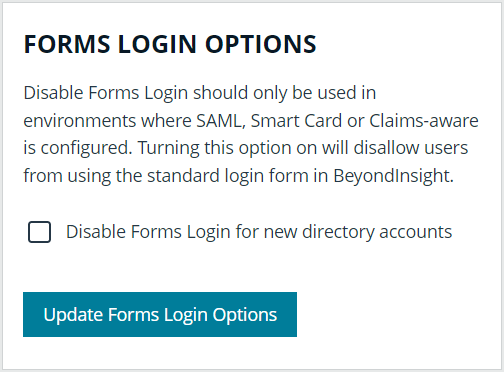
- Under Forms Login Options, check the Disable Forms Login for new directory accounts option to enable it.