Manage U-Series Appliance security settings
Download and upload a crypto key
- From the left menu, under Security and Compliance, click Data Encryption Key.
- To download a crypto key:
- Under Download Crypto Key Options, create an encryption password and confirm it.
- Click Export and Download Crypto Key. The crypto key zip file is created and downloaded to your system.
- To upload a crypto key:
- Under Upload Crypto Key Options, enter the encryption password.
- Drag and drop the crypto key zip file into the drop area or click the button to browse to the zip file.
- Click Generate Uploaded Crypto Key.
Check FIPS compliance
Federated Information Processing Standard (FIPS) is a US and Canadian government standard that defines a minimum set of security requirements for cryptographic systems. Enabling FIPS Mode in your local computer policy enforces Windows to use FIPS compliant algorithms for encryption, hashing, and signing.
To enable FIPS Mode, take the following steps:
- From the left menu, under Security and Compliance, click Local Computer Policy.
- Expand the FIPS Compliance section.
- Click the toggle to enable FIPS Mode.
- Click Update FIPS Settings.
- You must reboot the U-Series Appliance for this setting to take effect.
Manage the U-Series Appliance API key
The U-Series Appliance API manages the communication between U-Series Appliances when high availability is used in your environment. The API key enables U-Series Appliances to communicate with each other.
The API key is automatically generated and is available to copy from the Appliance API Keys page.
For security reasons, we recommend that you regenerate the key regularly. Remote appliances using the previous registration code to communicate with this appliance are denied access until the new registration code is copied to that appliance and registered again.
To view this appliance's key details:
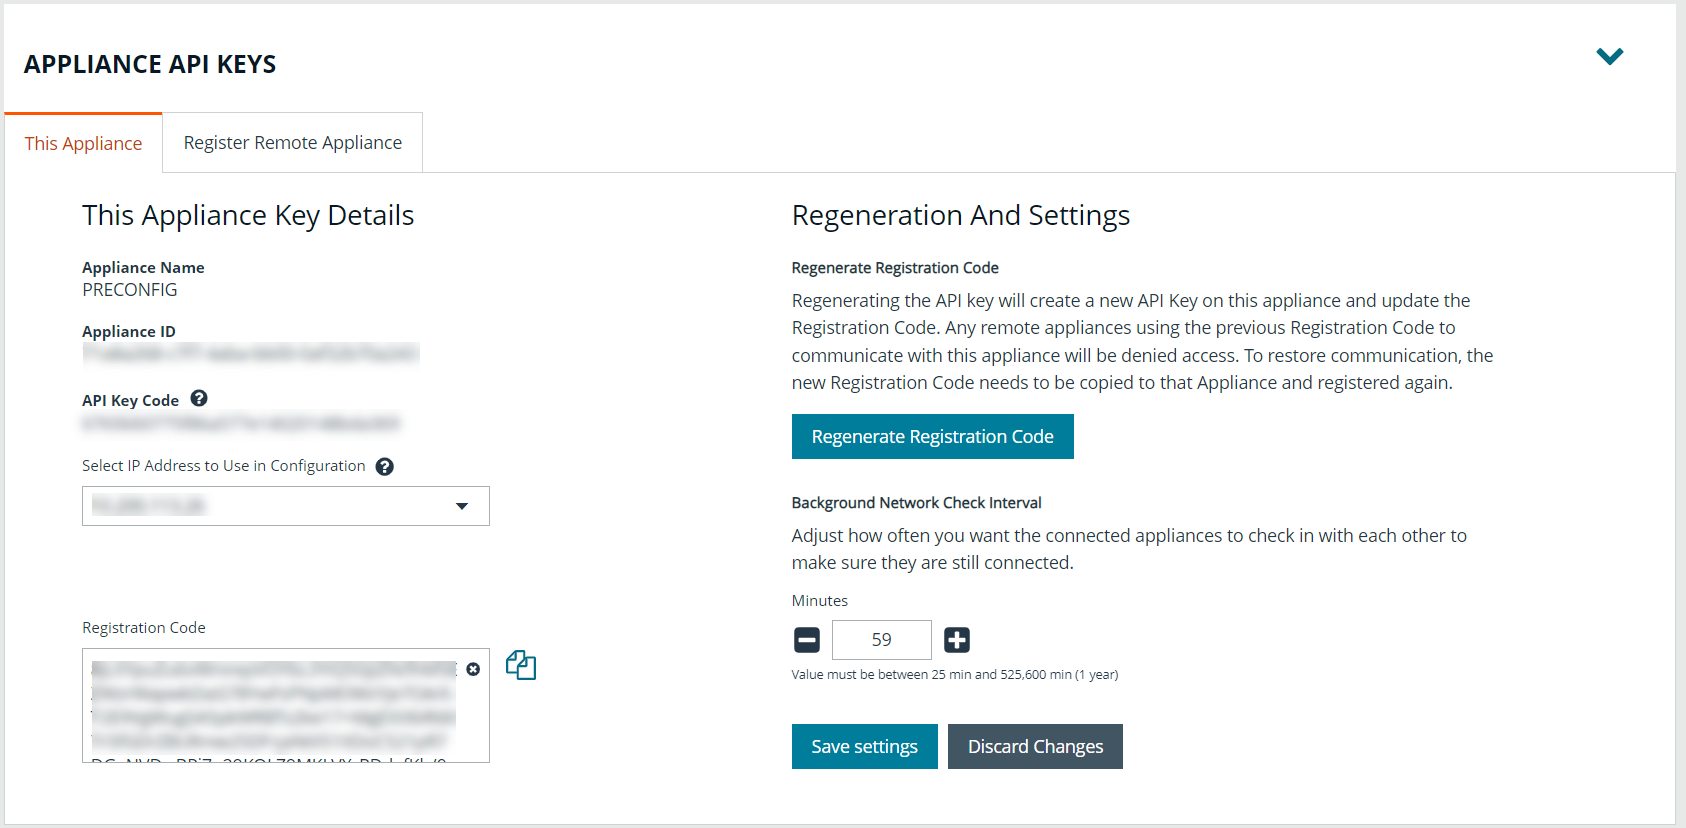
- From the left menu, under Integrations, click Appliance API Keys.
- From This Appliance tab, you can view the API key details for this appliance in the This Appliance Key Details section.
- To view the registration code:
- Select the IP address the remote appliance uses to communicate with this appliance from the Select IP Address to Use in Configuration list.
- The registration code displays in the Registration Code box. Click the Copy button next to the box to copy the code.
- To create a new API key:
- Under Regeneration And Settings, click Regenerate Registration Code.
- Follow step 3 to view and copy the new registration code.
Register a remote appliance
Communication between appliances requires both appliances to be registered with each other.
To register a remote appliance:
- Open the U-Series Appliance console on the remote appliance first.
- From the left menu, under Integrations, click Appliance API Keys.
- Click the Register Remote Appliance tab.
- Add the registration code from the appliance that you want to link to this appliance into the Registration Code from Remote Appliance box.
- Optionally, enter a short Description for the appliance being registered.
- Click Register Remote Appliance.
- Click the This Appliance tab.
- Select an IP from the Select IP Address to Use in Configuration dropdown.
- Click the Copy button to the right of the Registration Code box.
- Go back to the first appliance's console, and go to the Appliance API Keys page again.
- Click the Register Remote Appliance tab.
- Paste the registration code from the remote appliance.
- Optionally, enter a short Description for the appliance being registered.
- Click Register Remote Appliance.
The registered remote appliance now appears in the Registered Remote Appliance grid at the bottom of the page. To refresh that list at any time, click the Refresh button at the top right of the table.
To view more of the table, to the right of the Appliance API Keys section, click the down arrow to collapse that section.
Set the background network check interval
In the Registered Remote Appliance grid, you might see the word Communicating under the Outgoing Status and Incoming Status headings. You can adjust how often the connected appliances check with each other to make sure they are still connected, as follows:
- On the This Appliance tab, under the Regeneration And Settings section, enter the number of minutes for the Background Network Check Interval.
- Click Save Settings.
Turn SSL authentication off or on
- From the left menu, under Security and Compliance, click Client Connections.
- Under Event Service Security, click the toggle to enable or disable the SSL (Secure Socket Layer) and Client Certificate Authentication Required option.
We do not recommend disabling SSL certificate authentication. SSL authentication should be disabled only in certain rare circumstances, such as during testing.
Generate and export certificates
- From the left menu, under Security and Compliance, click Certificate Management.
- To regenerate the SSL certificate to match the U-Series Appliance network name, under Generate SSL Certificate, click Generate Certificate.
This certificate will not be trusted by the client browser.
- To export the client certificate, under Export Certificate, enter and confirm the password for the certificate, and then click Export and Download Certificate.
Set a security protocol
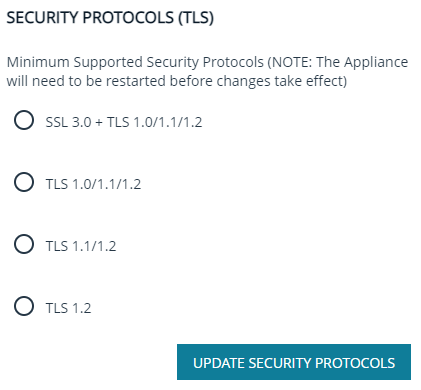
- From the left menu, under Security and Compliance, click Security Protocols.
- Under Security Protocols, select the security protocol that applies to your environment.
- Click Update Security Protocols.
Turn on HSTS
You can apply extra security to the U-Series Appliance website by using HTTP strict transport security (HSTS) technology.
- From the left menu, under Security and Compliance, click Client Connections.
- Under HSTS (), toggle the option to enable it.