Configure Backup and Restore on the U-Series Appliance
Save the U-Series Appliance configuration in case of disaster recovery or if you must revert settings to a previous configuration. You can back up the U-Series Appliance immediately or schedule a backup to occur at regular intervals.
A backup contains full packages of all data for all features set up on the U-Series Appliance.
You can add multiple remote or local backup locations to use for your backups, or you can use the default local backup location already created for you in the appliance. When configuring the backup location, you can set the maximum number of backups that can be saved at that location, 0 being unlimited. The default local backup location is set to 5. When the retention number is reached, the oldest backups are deleted and removed from the database permanently.
There is no time limit for how long backups are retained. Backups are only deleted when the retention limit is reached or when they are manually deleted.
Add a Backup Location
By default, there is one backup location already created and available for saving backups to a local path, named LocalBackups. You can add new backup locations, which are either local or remote network shares, as follows:
- From the left menu, under Business and Continuity, click Backup and Restore.
- Select the Backup Locations tab.
- Click Create New Location +.
- Enter a name and the local or remote path.
- If the remote share requires credentials, check the box for that option, and enter the credentials.
- If the remote share is an NFS share, check the box for that option.
We do not recommend storing backup files on an unsecured network share.
- Enter a value in the Retention box. Retention is the number of backups saved. When the limit is reached, then older backups are deleted and removed from the database permanently.
- Click Save Location. This process attempts to write and delete a file. If that fails, you cannot create the backup location. Upon failure, we recommend that you verify access permissions.
Schedule a Backup
- From the left menu, under Business Continuity, click Backup and Restore.
- Select the Schedule a Backup tab.
- Click the + button next to Create Backup.
- Select Schedule Backup.
- Enter a backup password and confirm it.
- Select an existing backup location from the dropdown or leave the default LocalBackups location selected.
- Alternatively, click the New Backup Location option to add a new location. New backup locations are automatically added to the list on the Backup Locations tab.
We do not recommend storing backup files on an unsecured network share.
- Select a Schedule Type from the dropdown and set the date, time, and frequency for the schedule.
- Select the features to include in the backup or select All Enabled Features to include them all.
Features that are not enabled are not included in the backup.
- Click Save Schedule.
- The scheduled backup is now listed in the grid on the Schedule a Backup tab, where you can click the vertical ellipsis for it, and select to edit it, deactivate it, or delete it.
Create a Manual Backup to Run Now
- From the left menu, under Business Continuity, click Backup and Restore.
- Select the Schedule a Backup tab.
- Click the + button next to Create Backup.
- Select + Create Backup Now.
- Enter a backup password and confirm it.
- Select an existing backup location from the dropdown or leave the default LocalBackups location selected.
- Alternatively, click the New Backup Location option to add a new location. New backup locations are automatically added to the list on the Backup Locations tab.
We do not recommend storing backup files on an unsecured network share.
- Leave the Schedule Type as Immediate.
- Select the features to include in the backup or select All Enabled Features to include them all.
Features that are not enabled are not included in the backup.
- Click Create Backup.
View the Details of a Backup
- From the left menu, under Business Continuity, click Backup and Restore.
- Select the Backups and Restores tab.
- Locate the backup from the list of available backups and click the vertical ellipsis for the backup. Select View Details.
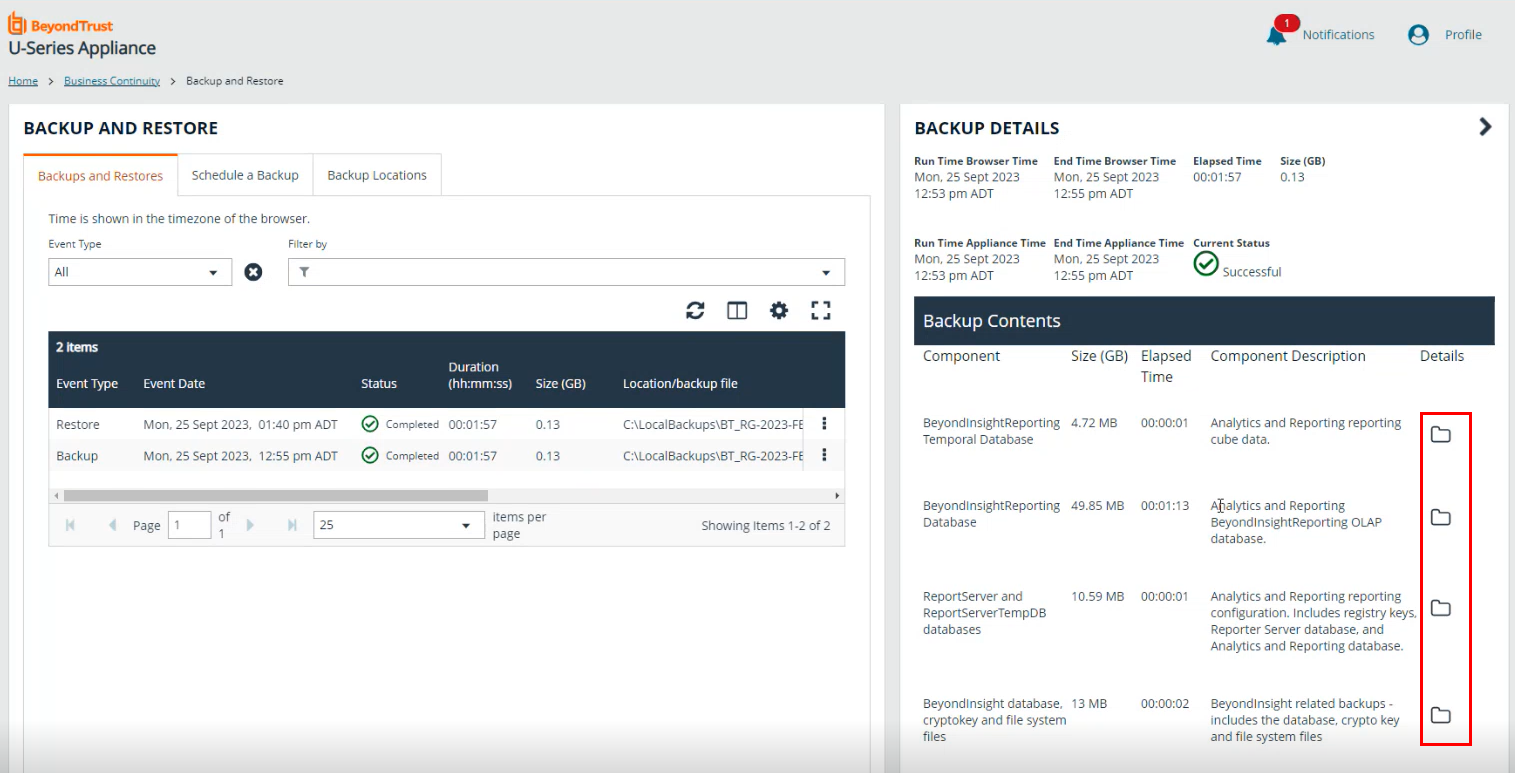
- The Backup Details panel displays, listing all of the contents in the backup.
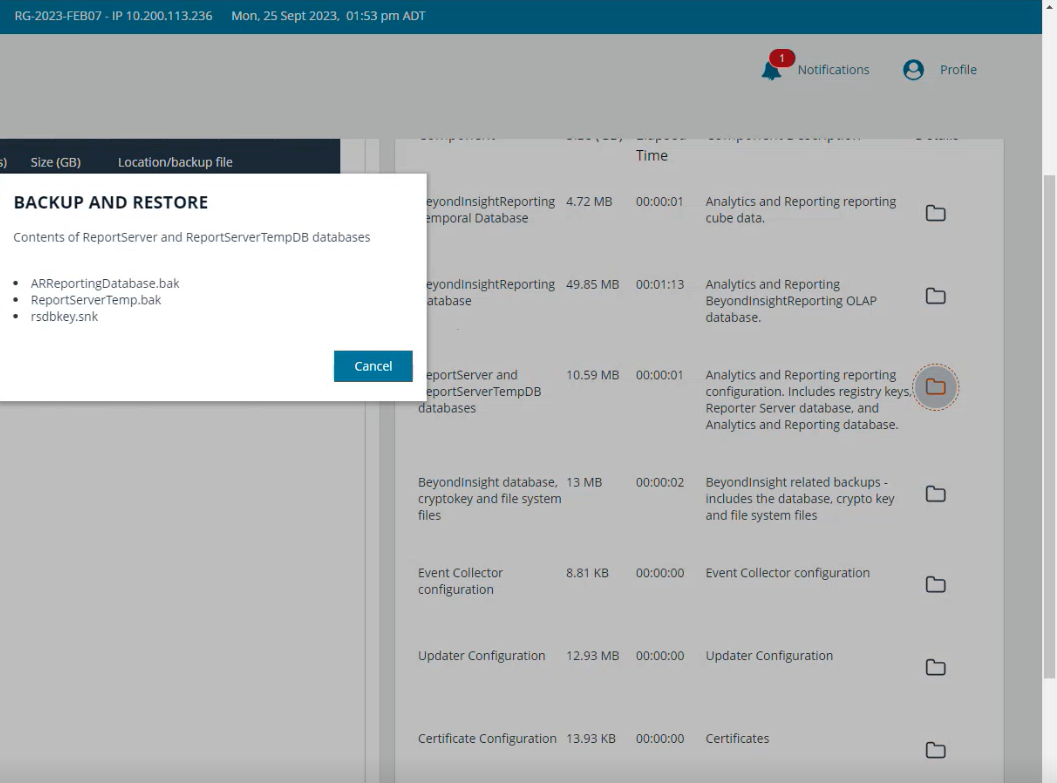
- Click the folder icon in the Details column for an item in the list, to display a list of the specific contents for that item.
Contents of a Backup File
What is contained in a backup file:
BeyondInsightAnalytics & Reporting
- ReportServer Database
- BeyondInsight Reporting Database
- ReportServerTempDB Database
- Cube database
- Encryption key
BeyondInsight
- BeyondInsight Database
- BeyondInsight Registry information
- Database Connection String
- Encryption Key
- System files
Event Collector
- Product registry settings
Enterprise Update Server (EUS)
- EUS Database
- EUS webconfig
U-Series Appliance
- Certificates (Client & Server)
- Roles settings
- U-Series Appliance Monitored data
- U-Series Appliance Notification data
- Performance Counters
- Log Export Database
BeyondInsight for Unix & Linux (BIUL)
- BIUL Database
- Product Configuration
- Log File
- Related product settings
BeyondTrust Auto Update:
- Proxy details
- Registration details
- Parent update server endpoint
BeyondTrust Updater
- BeyondTrust Analyzer data
- Client database
- Health check report
- Licenses
- User database
- Product related registry settings
Network Discovery Scanner
- Product Registry settings
- Certificates
- Database audits
- Application settings
Session Archiving
- Session Monitoring files
Download a Backup
Downloads greater than 4GB cannot be downloaded from a web browser. Copy downloads greater than 4GB to a network share, or use another way to download.
- From the left menu, under Business Continuity, click Backup and Restore.
- Select the Backups and Restores tab.
- Locate the backup from the list of available backups and click the vertical ellipsis for the backup. Select Download.
Delete a Backup
- From the left menu, under Business Continuity, click Backup and Restore.
- Select the Backups and Restores tab.
- Locate the backup from the list of available backups and click the vertical ellipsis for the backup. Select Delete.This removes the backup from the list and also removes it from the current folder location.
Warning: Once a backup is deleted it cannot be undone.
Restore the U-Series Appliance from a Backup
- From the left menu, under Business Continuity, click Backup and Restore.
- Select the Backups and Restores tab.
- Search through the list of available backups and click the vertical ellipsis for the backup you wish to restore. Select Restore.
- If the backup was taken on this U-Series Appliance, you are not prompted for a password.
- If the backup was taken on a different U-Series Appliance, you are prompted for a password.
- If the browser session remains open when a restore is complete, a notification displays indicating the restore process is complete.