Configure the Ivanti Plugin for Integration with BeyondTrust Remote Support
You must purchase this integration separately for both your Remote Support software and your Ivanti Service Manager solution. For more information, contact BeyondTrust's Sales team.
Now that you have configured Ivanti Service Manager and the BeyondTrust Appliance B Series, deploy and configure the Ivanti plugin.
For more information on installing and working with the BeyondTrust Middleware Engine, please see the BeyondTrust Remote Support Middleware Engine Installation and Configuration document .
- Copy the provided plugin ZIP file to the server hosting the BeyondTrust Middleware Engine.
- Extract the plugin ZIP file to the Plugins folder in the directory where the BeyondTrust Middleware Engine is installed.
- Restart the BeyondTrust Middleware Engine Windows service.
- From the server, launch the middleware administration tool. The default URL is http://127.0.0.1:53231.
- The Ivanti Plugin shows in the list of plugins. Click the clipboard icon to add a new configuration.
BeyondTrust Appliance B Series
The first portion of the plugin configuration provides the necessary settings for communication between the plugin and the B Series Appliance. The configuration sections include:
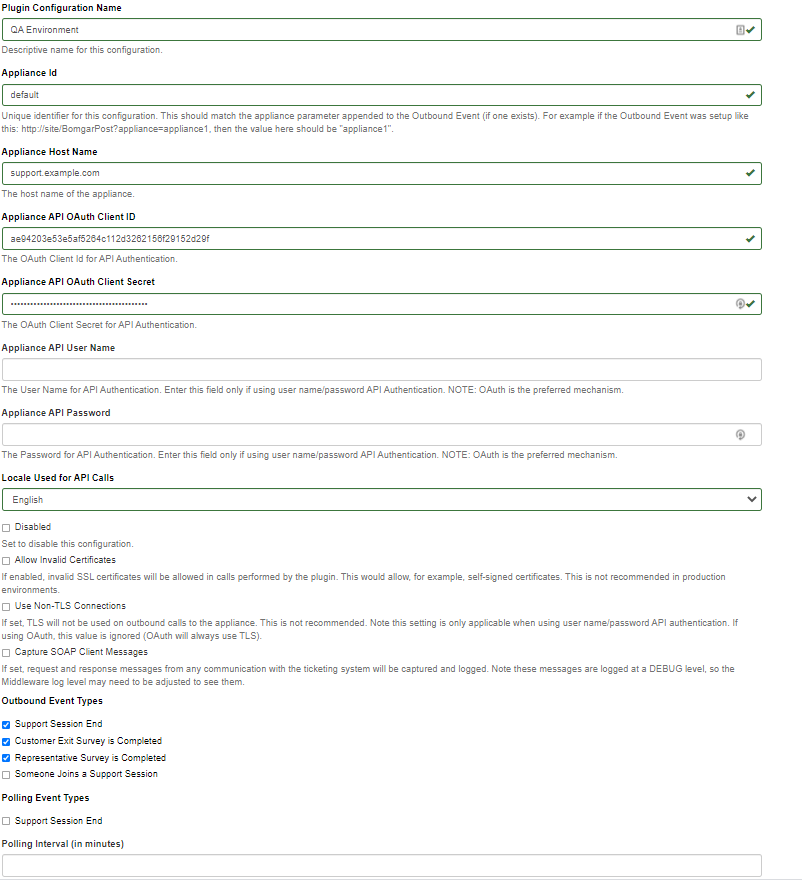
- Plugin Configuration Name: Any desired value. Because multiple configurations can be created for a single plugin, allowing different environments to be targeted, provide a descriptive name to indicate how this plugin is to be used.
- Appliance Id: This can be left as Default or can be given a custom name. This value must match the value configured on the outbound event URL in the B Series Appliance. If outbound events are not being used, this value is still required, but any value may be used.
- BeyondTrust Appliance B Series Host Name: The hostname of the B Series Appliance. Do not include https:// or other URL elements.
- BeyondTrust Integration API OAuth Client ID: The client ID of the OAuth account.
- BeyondTrust Integration API OAuth Client Secret: The client secret of the OAuth account.
- Locale Used for BeyondTrust API Calls: This value directs the B Series Appliance to return session data in the specified language.
- Disabled: Enable or disable this plugin configuration.
- Allow Invalid Certificates: Leave unchecked unless there is a specific need to allow. If enabled, invalid SSL certificates are allowed in calls performed by the plugin. This would allow, for example, self-signed certificates. We do not recommend this in production environments.
- Use Non-TLS Connections: Leave unchecked unless it is the specific goal to use non-secure connections to the B Series Appliance. If checked, TLS communication is disabled altogether. If non-TLS connections are allowed, HTTP access must be enabled on the BeyondTrust /login > Management > API Configuration page. We strongly discourage using non-secure connections.
When using OAuth authentication, TLS cannot be disabled.
- Outbound Events Types: Specify which events the plugin processes when received by the middleware engine. Keep in mind that any event types selected here must also be configured to be sent in BeyondTrust. The Middleware Engine receives any events configured to be sent in BeyondTrust but passes them off to the plugin only if the corresponding event type is selected in this section.
- Support Session End
- Customer Exit Survey is Completed
- Representative Survey is Completed
- Polling Event Types: If network constraints limit connectivity between the B Series Appliance and the middleware engine such that outbound events cannot be used, an alternative is to use polling. The middleware engine regularly polls the B Series Appliance for any sessions that have ended since the last session was processed. At this time, only the Support Session End event type is supported.
One caveat to polling behavior versus the use of outbound events is that if a session has ended but the customer exit survey has not yet been submitted within the same polling interval, the customer exit survey is not processed. This does not apply to representative surveys since the session is not considered to be complete if a representative survey is still pending.
- Polling Interval: Enter only if polling is used. This determines how often the middleware engine polls the B Series Appliance for sessions that have ended.
- Retry Attempt Limit: Enter the number of retries that can be attempted if the plugin fails to process an event.
- Retry Outbound Event Types: Specify which outbound events the plugin retries if it fails to process an event.
- Retry Polling Event Types: Specify which polling events the plugin retries if it fails to process an event.
Ivanti Service Manager Instance
The remainder of the plugin configuration provides the necessary settings for communication between the plugin and the Ivanti Software instance. The configuration settings include:
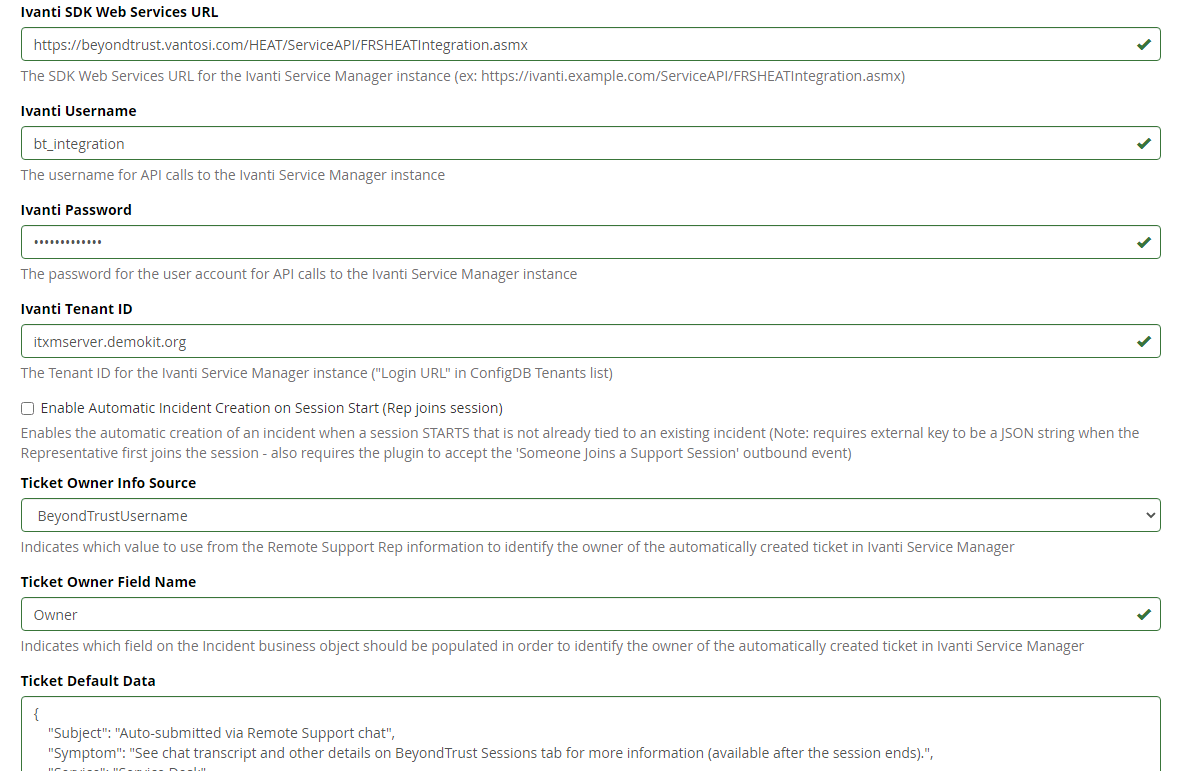
- Ivanti SDK Web Services URL: The SDK Web Services URL for the Ivanti instance. For example, https://ivanti.example.com/ServiceAPI/FRSHEATIntegration.asmx).
- Ivanti Username: The username of the API account.
- Ivanti Password: The password of the above user.
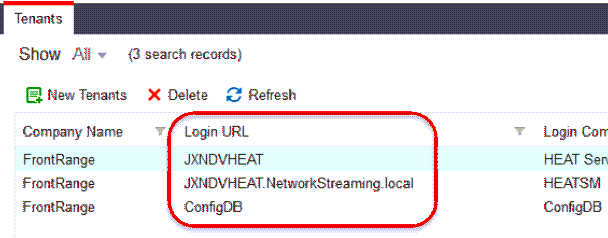
- Ivanti Tenant ID: The ID of the tenant instance targeted by the integration. If unknown, you can find this by logging into the ConfigDB web interface and viewing the Tenants list. The Tenant ID is listed as the Login URL in the list and detail views.
- Enable Automatic Incident Creation on Session Start: If checked, the plugin processes support_conference_member_added events and the external key to determine whether to create a ticket within Ivanti or not. The plugin attempts to create the ticket only if this setting is enabled, if the conference member joining the conference is a representative, and if the external key is a JSON string.
- Ticket Owner Info Source: By default, the integration uses the BeyondTrust representative's username to identify them as the owner of the newly created ticket. Optionally, it can also use the representative's public display name in various formats or ignore the representative's information altogether, instead always using the default value supplied in the JSON string configured for Ticket Default Data.
- Ticket Default Data: A JSON string containing values that can be used to prepopulate certain fields on the newly created ticket.
Once all settings have been entered, Save the configuration.
Test Settings and Generate HTML Content
Once the proper configuration has been entered and saved, use the tool's Test this Plugin Configuration function to verify the settings. In addition to verifying settings for both BeyondTrust and Ivanti, the page outputs a snippet of HTML that is used in the creation of an intermediate page used for custom links. Once the settings are successful and the markup is generated, create the custom link as described below.
Create the Custom Link Page
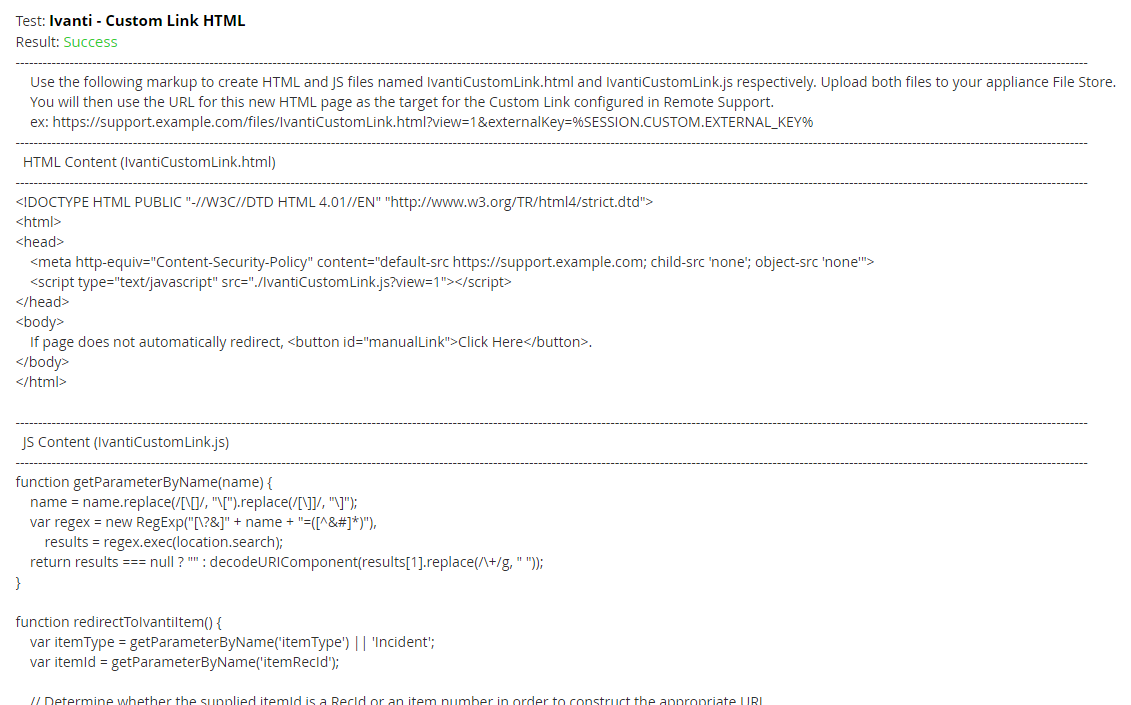
- Create an empty text file using Notepad or another text editor and copy and paste the HTML content from generated content on the plugin test page into the file.
- Save the file as IvantiCustomLink.html.
- Repeat the above steps to copy the JS content into a separate file, and save the file as IvantiCustomLink.js
- Log in to the BeyondTrust /login interface and upload both files to the file store, under Public Portals > File Store.
Report Templates
On the BeyondTrust Middleware Engine server, in the <install dir>\Plugins\<integration>\Templates folder, there are multiple files ending with *.hbs. These are Handlebars template files. These files are used by the plugin to format the session report and exit surveys that are added to the corresponding ticket each time a BeyondTrust session ends or each time a survey is submitted. The templates can be edited if desired.
If you are editing a template, we recommend copying and saving the original in case the changes need to be reverted.
For more information on Handlebars templates, please see the Handlebars website.