Configure Ivanti Service Manager for Integration with BeyondTrust Remote Support
You must purchase this integration separately for both your Remote Support software and your Ivanti Service Manager solution. For more information, contact BeyondTrust's Sales team.
Before importing the package, use a text editor to ensure all URLs to the B Series Appliance have been updated. To do so, search for support.example.com and replace any instances with the hostname of the B Series Appliance.
A development package is provided as part of the integration: BeyondTrust Standard Integration - Core - 1.x.x.MetadataPatch.
Before applying any development package, we recommend that you first back up the database in case changes need to be rolled back.
The Core development package contains all the necessary business objects, quick actions, etc., needed by the integration.
Once the contents of the Core development package have been verified:
- Make sure you have taken the steps described in the note above to find and replace the example B Series Appliance hostname in the package file.
- Log in to the Ivanti tenant as an administrator and access the admin UI.

- Under Build > Development Package > Packages, select Import Package and browse to the file.
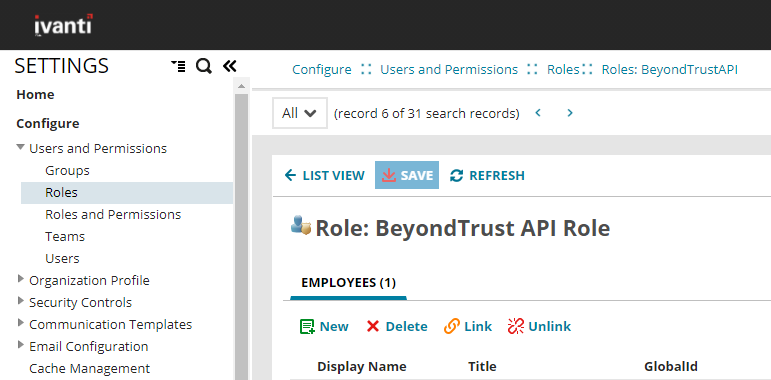
When the development package is successfully imported, a new BeyondTrust API Role should be listed under Configure > Users and Permissions > Roles.
- Select the role and add a new employee to be used for API calls.
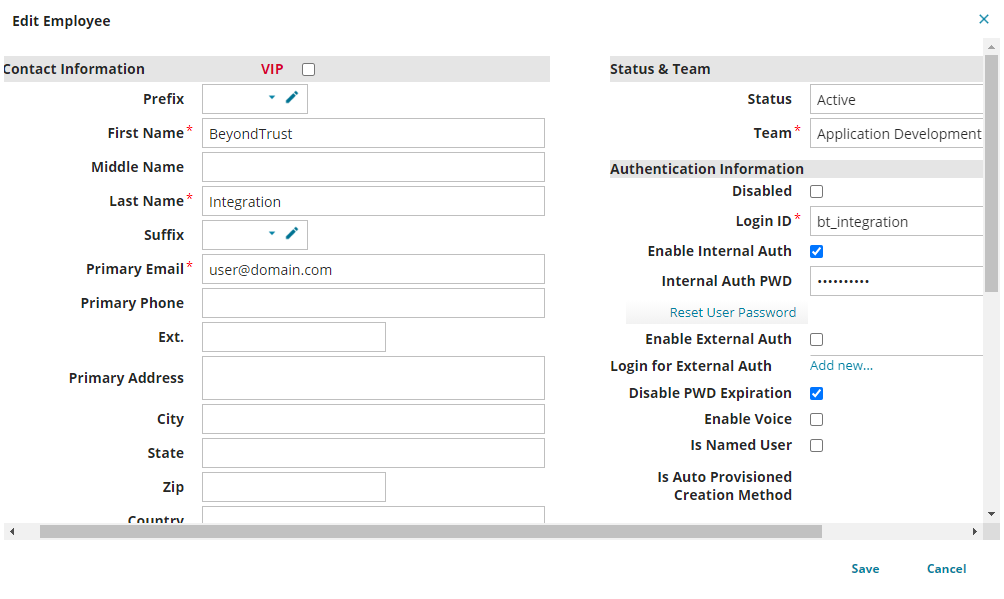
- Ensure that Internal Auth is enabled.
- Ensure that an Internal Auth Password is set.
- Ensure that Password Expiration is disabled.
Update the User Interface
- Under Build > Business Objects, select Change > Layouts, and then click the Change layout.
- In the Views in this layout grid, select formView to edit the view.
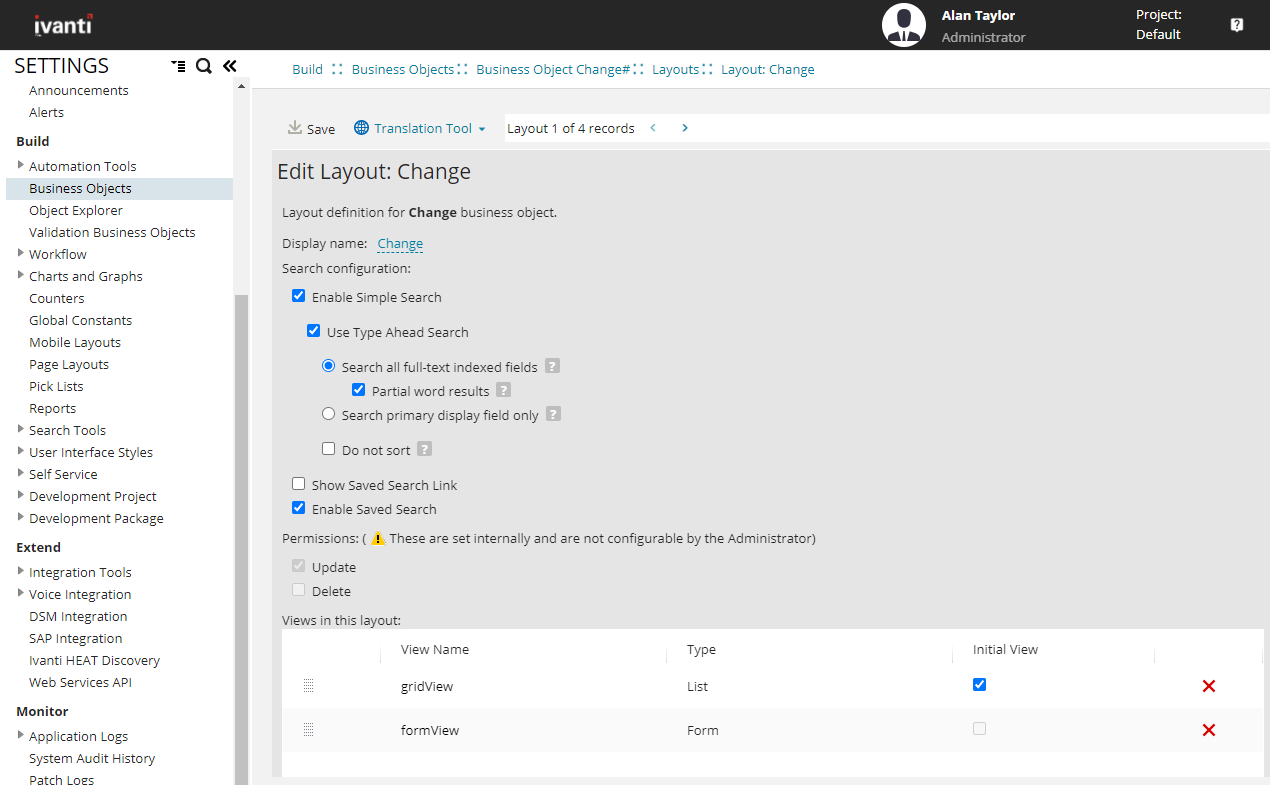
- Click the Edit link to the right of the Toolbar section.

- In the Toolbar Editor, find and select the BeyondTrust - Generate Session Key action from the list at the bottom and drag it into position as the first item in the right half of the toolbar menu.

- Configure the new toolbar button as follows:
Field Name Value Action BeyondTrust - Generate Session Key Display Image and Text Image bt_rs_icon.png Text (Custom) BeyondTrust Session Key Tooltip Click to generate a BeyondTrust session key - Click Save on the Button Editor and Save again on the Toolbar Editor.
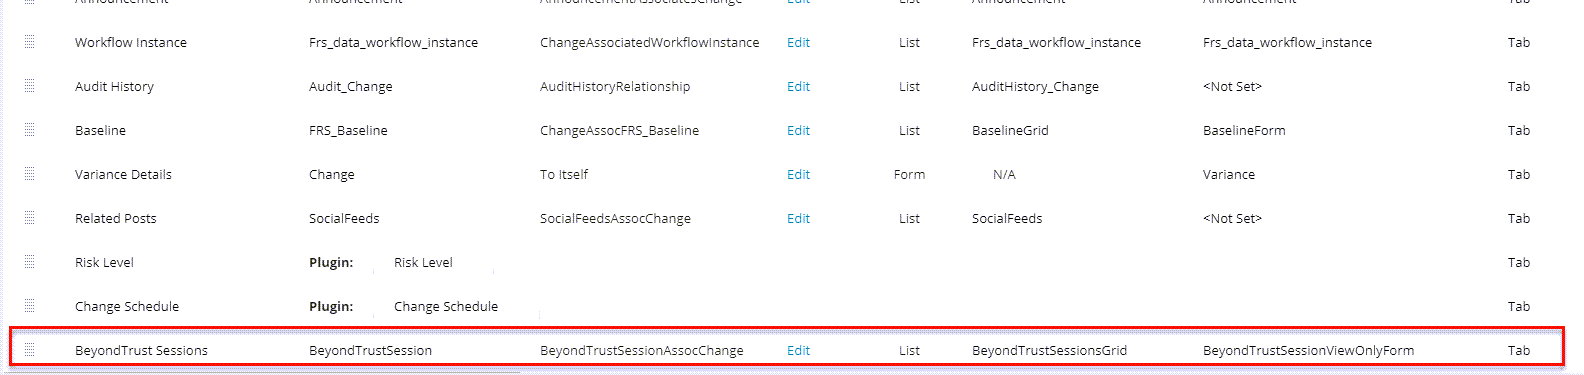
- Scroll to the bottom of the Child Panels grid and click the link to Add Child Panel.
- Configure the new panel as follows:
Field Name Value Display Name BeyondTrust Sessions Object BeyondTrustSession List BeyondTrustSessionsGrid Forms(s) BeyondTrustSessionViewOnlyForm Show Count [Checked] 
- Click the Edit link in the Toolbar column and drag all of the toolbar buttons for the panel to the trash so that no buttons show on the BeyondTrust Sessions panel.
- Click Save at the top to save all changes to the layout.
- Repeat steps 1 through 10 for the Change.SDA and Change.SDM layouts and/or any custom layouts you may be using instead of these default layouts.
- Under Build > Business Objects > Service Request, select the Service Request business object, and then repeat steps 1 through 10 for the ServiceReqLayout.New layout and/or any custom layouts you may be using instead of these default layouts.
- Under Build > Business Objects > Incident, select the Incident business object, and then repeat steps 1 through 10 for the IncidentLayout.ServiceDesk layout and/or any custom layouts you may be using instead of these default layouts.
- With the Incident business object still selected, swap from Layouts to Forms, and then select the IncidentDetails.ServiceDesk form.
- Check the box to Show layout cells, and select the cell containing the Assets control.
- Click the link above the form to Insert Row Above.
- Expand the toolbar to the left of the form to show Incident > Fields, and then drag the CILink field into the newly created row.
- Click the new control to select it, and then configure it as follows:
Field Name Value Display Field [CI]Name Editable true Label Pos No Label 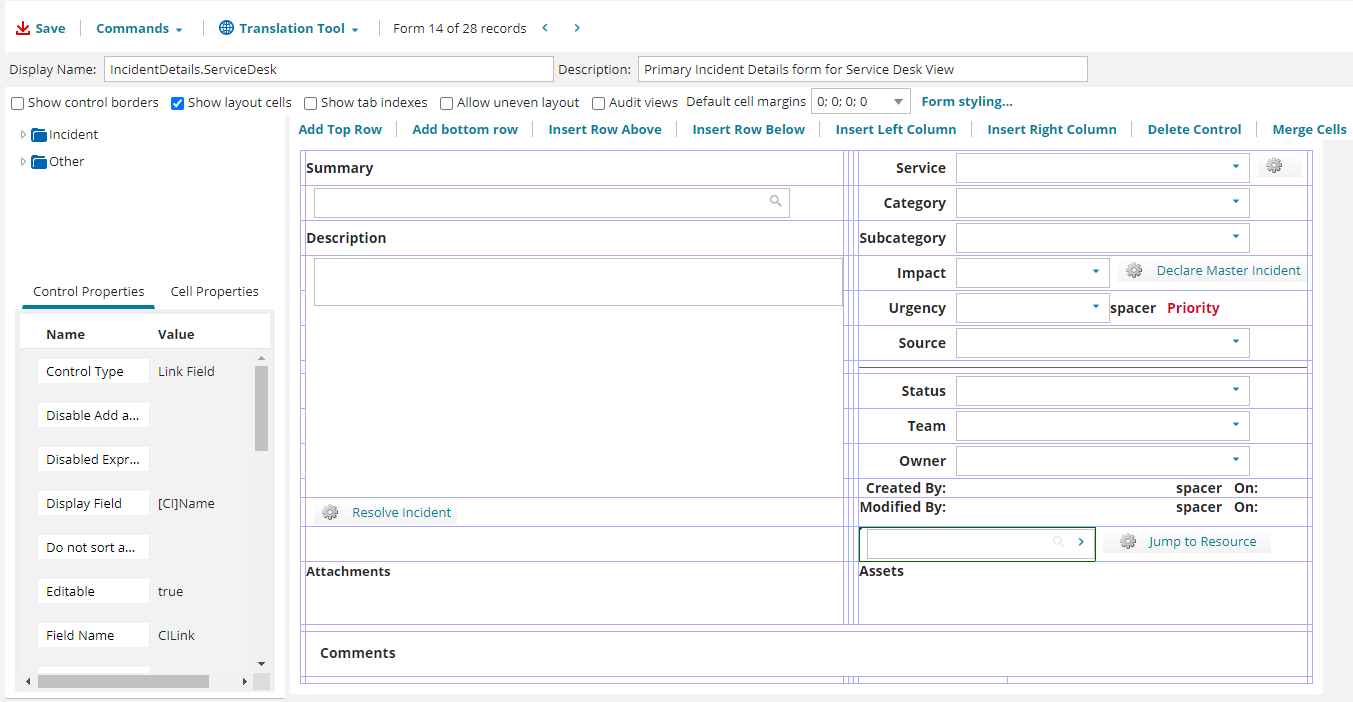
- Collapse the Incident tree in the toolbar, expand it to show Other items, and then drag a URL Button to the right of the CILink field.
- Select the new button and configure it as follows:
Field Name Value Image bt_rs_icon.png
Use the Image Manager tool in the Expression Editor to select the image.
Label Jump to Resource URL https://<BeyondTrust-hostname>/api/client_script?action=start_pinned_client_session&search_string=$([CI#.IncidentAssocCILink]Name)&type=rep&operation=generate&session.custom.external_key=$(RecId)&session.custom.item_id=$(IncidentNumber)&session.custom.item_type=Incident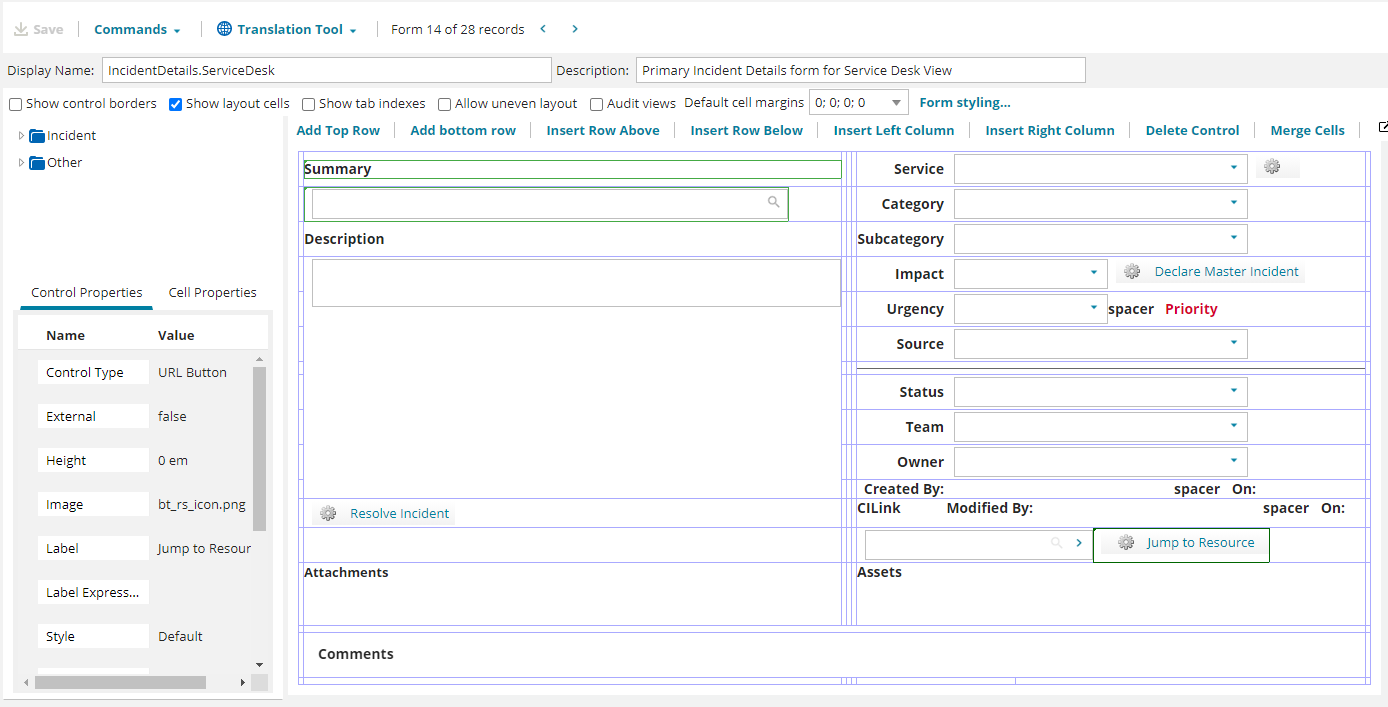
- Click Save at the top to save changes to the form.
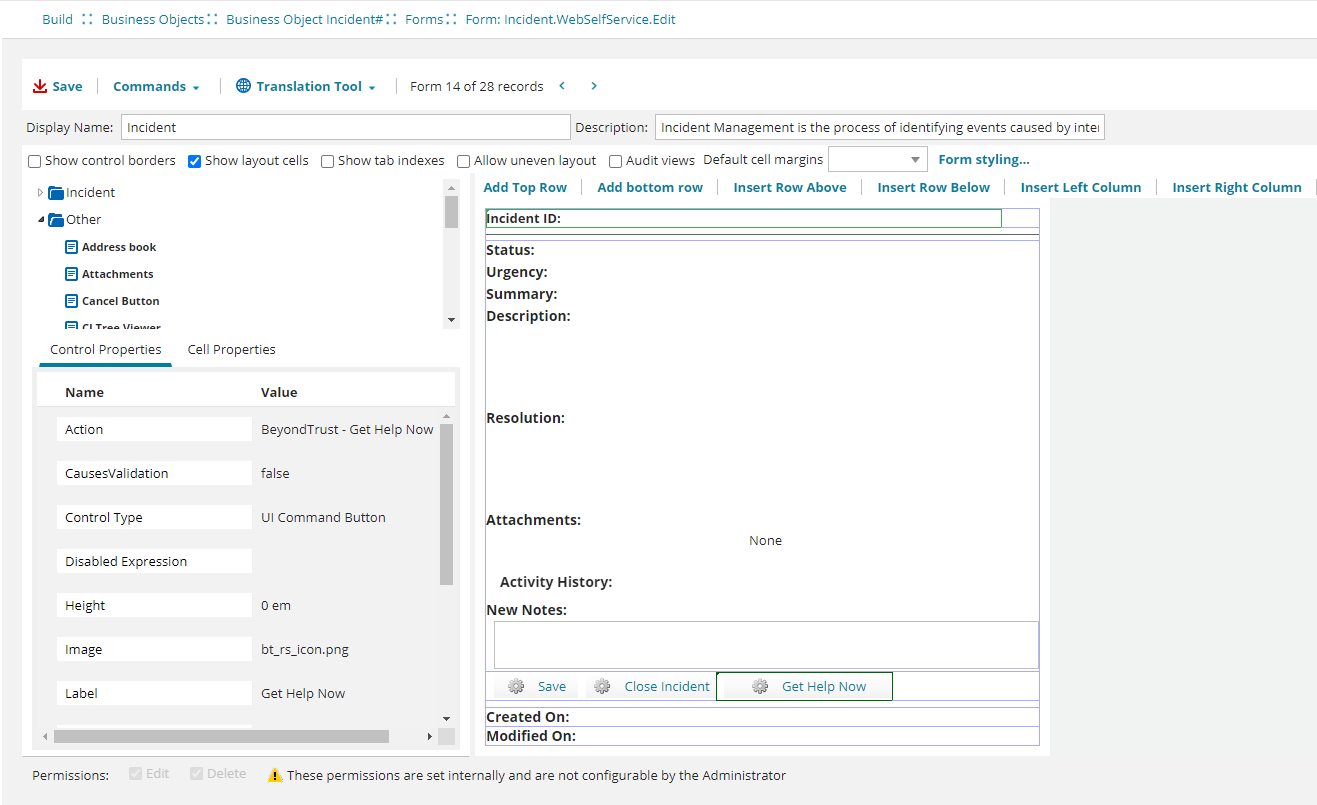
- Select the Incident.WebSelfService.Edit form.
- Expand the toolbar to show Other items, and then drag a Command Button to the right of the Close Incident button on the form.
- Select the new button and configure it as follows:
Field Name Value Action BeyondTrust - Get Help Now CausesValidation false Image bt_rs_icon.png
Use the Image Manager tool in the Expression Editor to select the image.
Label Get Help Now 
- Click Save at the top to save changes to the form.