Deploy the BeyondTrust SRA Virtual Appliance into an Amazon AWS Environment
You must have an Amazon AWS account and support plan already configured. You are also responsible for registering the DNS hostname for your site.
Administrators can deploy the BeyondTrust SRA Virtual Appliance into their Amazon Web Services (AWS) environment by following the steps below.

- Open the email you received from BeyondTrust Technical Support and select the Link your AWS account(s) link to be redirected to the BeyondTrust site.
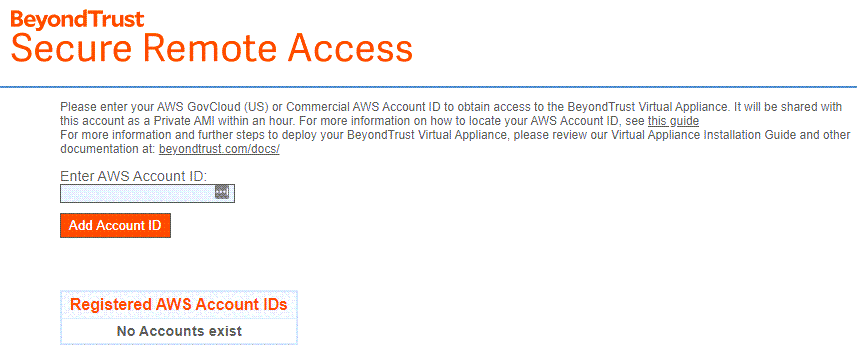
- Enter your Commercial AWS Account ID or Government AWS Account ID in the text box and click Add Account ID. Your SRA Virtual Appliance is shared with your Amazon AWS account as a Private Amazon Machine Image (AMI) within an hour. The AMI is shared to each of your AWS regions.
If you are uncertain what your AWS Account ID is, the email contains a link to an Amazon help page that details how to find it.
- In the AWS EC2 Dashboard, in the AWS services section, click the EC2 link to start the wizard.
- Browse to Images > AMI.
- Select Private Images from the dropdown.
- Select the SRA Virtual Appliance (for example, BeyondTrust SRA Appliance - 6.x.x) in the AMI list. This is the base software image, which must next be updated and configured.
- Click the Launch button.
- Choose an instance type. BeyondTrust supports all T3 and M5 instance types.
For more information about sizes, please see Review License and Sizing Conditions.
- Click Next: Configure Instance Details.
- After configuring the instance launch details, click Next: Add Storage.
- On the Add Storage page, configure the sizes and volume types of the drives you wish to include on the AMI. A second EBS volume is set to device /dev/sdb with a size of 10GB. We recommend you increase this second disk to 100GB. If you need a large volume for recordings, and this is a cost-sensitive deployment, then you can provision a third drive and configure it as Magnetic (standard). The third drive must be added as /dev/sdg. You may enable the Encrypted option if desired.
- Click Next: Add Tags.
- Click Next: Configure Security Group.
- The Launch Wizard creates a security group which you must edit, or you can create a new security group after you deploy the image, so that the site is accessible on ports 443 and 80. This can be accomplished from Network & Security > Security Groups in the EC2 Dashboard.
- Click Review and Launch. Review your instance details and click Launch.
- Skip the option to select or create a key pair, as the instance does not allow SSH access. Instead, select Proceed without a key pair, check the acknowledgment box, and click Launch Instances.
- After the site launches, browse to Instances > Instances in the EC2 Dashboard and locate the assigned Public IP address in the Description tab. This is the IP address used to configure your B Series Appliance and your DNS A record.
If you stop or terminate your Instance, you are not guaranteed to retrieve the same IP address after it reboots. To facilitate managing your DNS, we recommend purchasing an Elastic IP address.
- Navigate in a web browser to https://[Public IP address]/appliance.
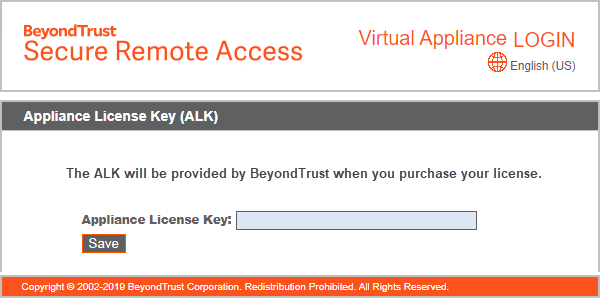
- Enter your Appliance License Key provided in the email from BeyondTrust Technical Support. Click Save.