Security > Certificates: Create and Manage TLS Certificates

Manage TLS certificates, create certificate requests, and import certificates signed by a certificate authority.
Certificate Installation
The BeyondTrust Cloud Appliance comes with a pre-installed certificate signed by a certificate authority (CA). This certificate validates the *.beyondtrustcloud.com domain. If you wish to change the fully qualified domain name (FQDN) of your B Series Appliance, you must install a CA-signed certificate which validates your new FQDN. To do this, you must create a certificate signing request (CSR) from the BeyondTrust Cloud Appliance as described below, or use Let's Encrypt to obtain a certificate. If you choose a custom hostname for your B Series Appliance, you may use the built-in Let's Encrypt functionality for your SSL certificate.
For more information on certificates, see SSL Certificates and BeyondTrust Remote Support.
Let's Encrypt
Let's Encrypt issues signed certificates that are valid for 90 days at a time, and can automatically renew themselves indefinitely. In order to request or renew a Let's Encrypt certificate, you must meet the following requirements:
- The DNS for the hostname you are requesting must resolve to the B Series Appliance.
- The B Series Appliance must be able to reach Let's Encrypt on TCP 443.
- Let's Encrypt must be able to reach the B Series Appliance on TCP 80.
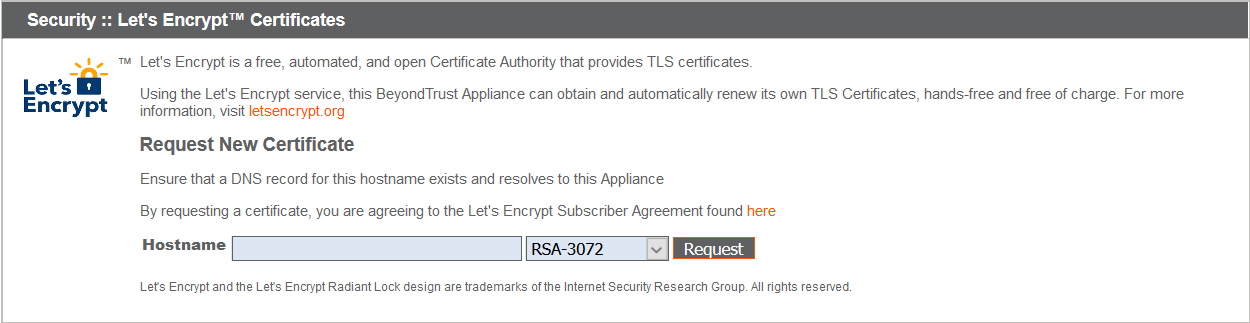
To implement a Let's Encrypt certificate, in the Security :: Let's Encrypt™ Certificates section complete the following:
- Hostname: Enter the fully qualified domain name (FQDN) of the B Series Appliance.
- Use the dropdown to choose the certificate key type.
- Click Request.
As long as the above requirements are met, you will be provided a certificate that will automatically renew every 90 days once the validity check with Let's Encrypt has completed.
The B Series Appliance starts the certificate renewal process 30 days before the certificate is due to expire and requires the same process as the original request process does. If it has been unsuccessful 25 days prior to expiry, the B Series Appliance sends daily admin email alerts (if email notifications are enabled). The status will show the certificate in an error state.
For more information, please see letsencrypt.org.
Other CA-Issued Certificates
To create a certificate request:

- Locate the Security :: Other Certificates section and click Create.
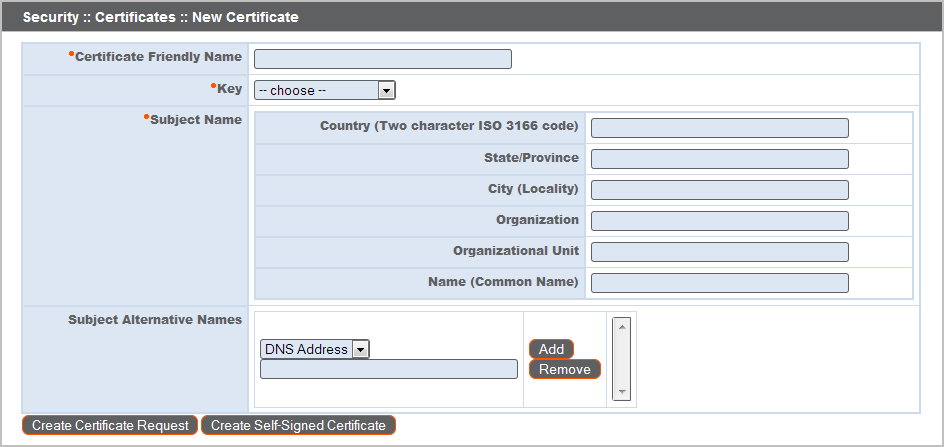
- In Certificate Friendly Name, enter a name you will use to identify this certificate.
- From the Key dropdown, choose the Existing Key of your *.beyondtrustcloud.com certificate or select a new key type.
- Enter the remaining information pertaining to your organization.
- In the Name (Common Name) field, enter a descriptive title for your BeyondTrust site.
- In the Subject Alternative Names section, enter your BeyondTrust site hostname and click Add. Add a SAN for each DNS name or IP address to be protected by this SSL certificate.
DNS addresses can be entered as fully qualified domain names, such as access.example.com, or as wildcard domain names, such as *.example.com. A wildcard domain name covers multiple subdomains, such as access.example.com, and so forth.
Click Create Certificate Request.

To use a CA-signed certificate, contact a certificate authority of your choice and purchase a new certificate from them using the CSR you created in BeyondTrust. Once the purchase is complete, the CA will send you one or more new certificate files, each of which you must install on the B Series Appliance.
To download the root certificate for your B Series Appliance certificate, check the information sent from your CA for a link to the appropriate root. If there is none, contact the CA to obtain it. If this is impractical, search their website for their root certificate store. This contains all the root certificates of the CA, and all major CAs publish their root store online.
Usually, the easiest way to find the correct root for your certificate is to open the certificate file on your local machine and inspect its "Certification Path" or "Certificate Hierarchy". The root of this hierarchy or path is typically shown at the top of the tree. Locate this root certificate on the root store of your CA's online root store. Once done, download it from the CA's root store and import it to your B Series Appliance as described above.
Certificates
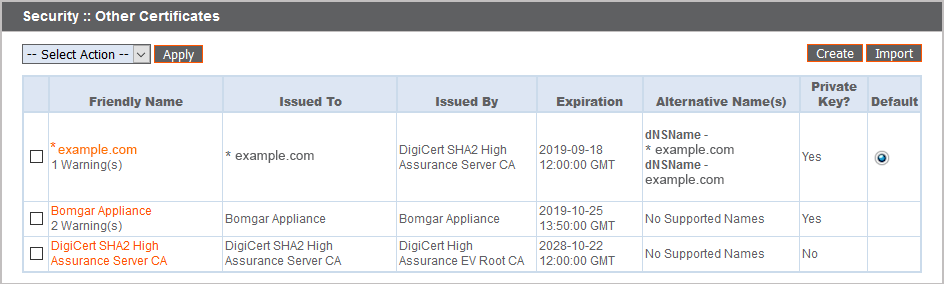
View a table of SSL certificates available on your B Series Appliance.
For connections that do not supply a Server Name Indication (SNI) or supply an incorrect SNI, select a default SSL certificate from the list to provide for these connections by clicking the button under the Default column. The default SSL certificate cannot be a self-signed certificate nor the default B Series Appliance certificate provided for initial installation.
To learn more about SNI, please see Server Name Indication.
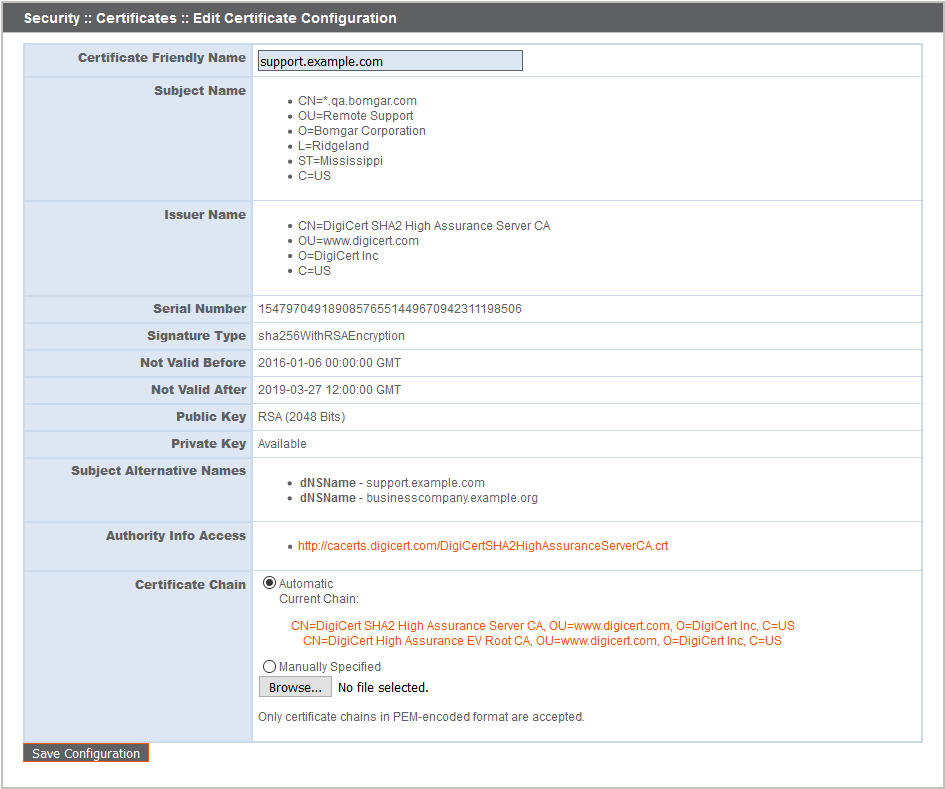
Click a certificate name to view details and manage its certificate chain.
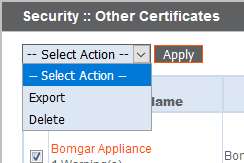
To export one or more certificates, check the box for each desired certificate, select Export from the dropdown at the top of the table, and then click Apply.

If you are exporting only one certificate, you immediately can choose to include the certificate and/or the certificate chain if available. Click Export to start the download.

If you are exporting multiple certificates, you will have the option to export each certificate individually or in a single PKCS#7 file.
When selecting to export multiple certificates as one file, click Continue to start the download.
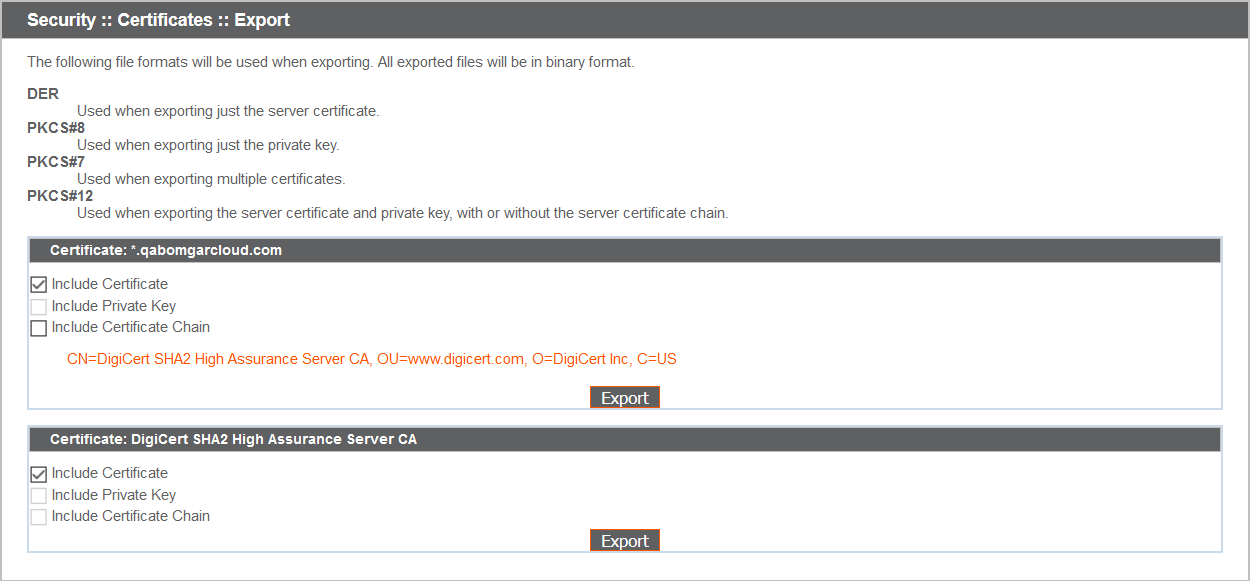
To include certificate chains in the export, select individual export and click Continue to view all selected certificates. For each listing, choose to include the certificate and/or the certificate chain if available. Click Export to start the download.
To delete one or more certificates, check the box for each desired certificate, select Delete from the dropdown at the top of the table, and then click Apply.
Under normal circumstances, a certificate should never be deleted unless it has already been successfully replaced by a working substitute.

To confirm accuracy, review the certificates you wish to delete, and then click Delete.
Certificate Requests

View a table of pending requests for third-party-signed certificates. Click a certificate request name to view details.
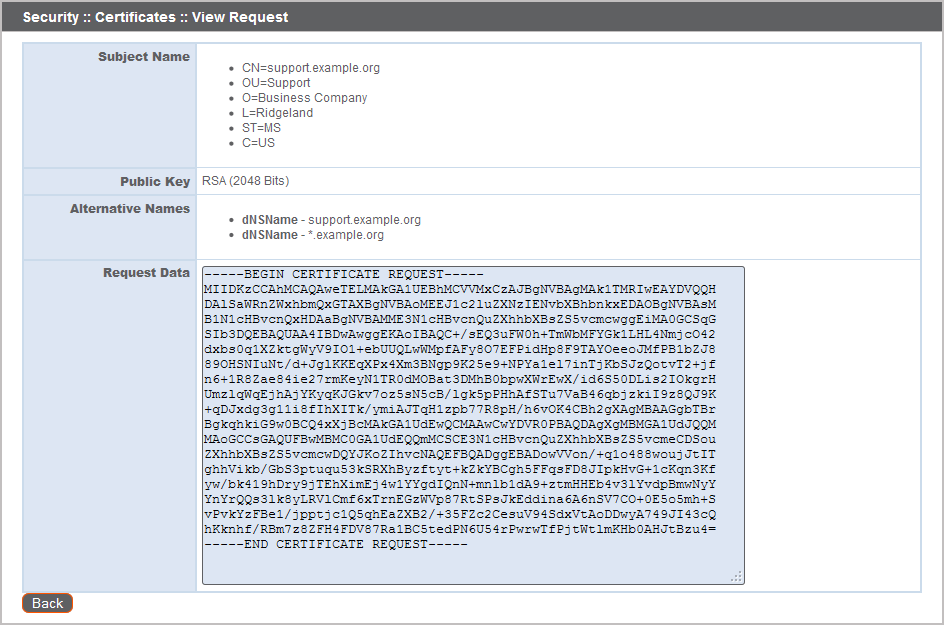
The detail view also provides the request data you will give your preferred certificate authority when requesting a signed certificate.
If you are renewing a certificate, use the same certificate Request Data that was used for the original certificate.
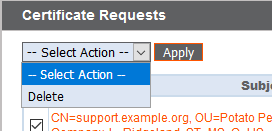
To delete one or more certificate requests, check the box for each desired request, select Delete from the dropdown at the top of the table, and then click Apply.

To confirm accuracy, review the certificate requests you wish to delete, and then click Delete.