Create and Configure the RADIUS Security Provider
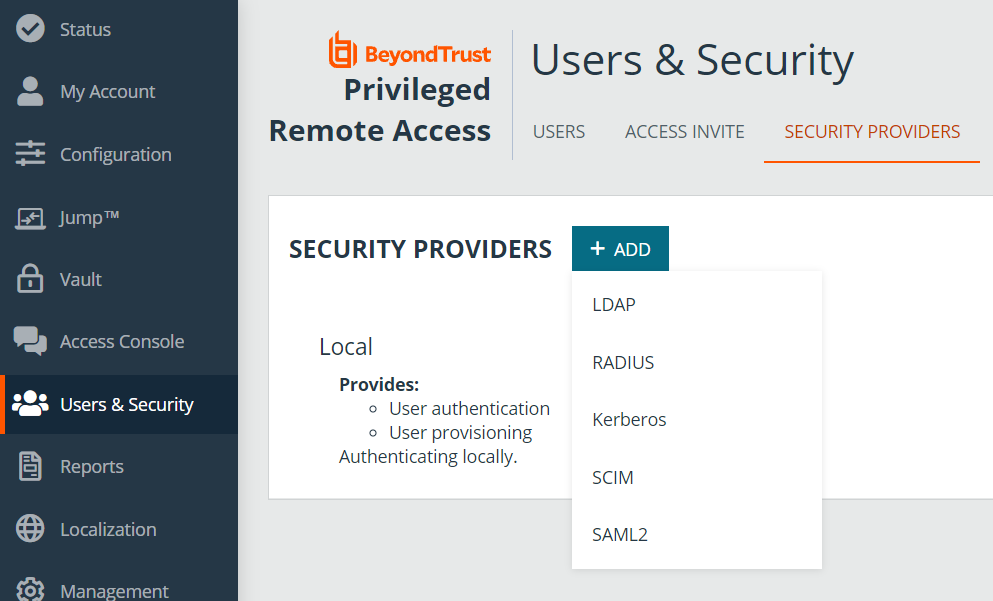
Go to /login > Users & Security > Security Providers.
Click Add. From the dropdown, select the type of server you want to configure.
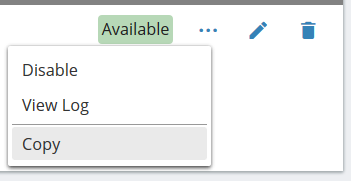
Alternatively, you can copy an existing provider configuration by clicking the ellipse on a listed provider, and then selecting Copy.
If you want to copy one node in a cluster, click the ellipse for the node and then select Duplicate Node.
Enter the settings for this security provider configuration as detailed below.
Add Security Provider
Name
Create a unique name to help identify this provider.
Enabled
If checked, your B Series Appliance can search this security provider when a user attempts to log into the access console or /login. If unchecked, this provider will not be searched.
Keep display name synchronized with remote system
Checking this option keeps a user's display name set to the name designated on the security provider rather than allowing the display name to be modified in BeyondTrust.
Authorization Settings
Only allow the following users
You can choose to allow access only to specified users on your RADIUS server. Enter each username separated by a line break. Once entered, these users will be available from the Add Policy Member dialog when editing group policies on the /login > Users & Security > Group Policies page.
If you leave this field blank, all users who authenticate against your RADIUS server will be allowed; if you allow all, you must also specify a default group policy.
Default Group Policy
Each user who authenticates against an external server must be a member of at least one group policy in order to authenticate to your B Series Appliance, logging into either the /login interface or the access console. You can select a default group policy to apply to all users allowed to authenticate against the configured server.
If a default policy is defined, any allowed user who authenticates against this server might have access at the level of this default policy. Therefore, we recommend you set the default to a policy with minimum privileges to prevent users from gaining permissions you do not wish them to have.
If a user is in a default group policy and is then specifically added to another group policy, the settings for the specific policy always take precedence over the settings for the default, even if the specific policy is a lower priority than the default, and even if the default policy's settings are set to disallow override.
LDAP Group Lookup
If you want users on this security provider to be associated with their groups on a separate LDAP server, choose one or more LDAP group servers to use for group lookup.
If a default policy is defined, then any allowed user who authenticates against this server will potentially have access at the level of this default policy. Therefore, it is recommended that you set the default to a policy with minimum privileges to prevent users from gaining permissions that you do not wish them to have.
If a user is in a default group policy and is then specifically added to another group policy, the settings for the specific policy will always take precedence over the settings for the default, even if the specific policy is a lower priority than the default, and even if the default policy's settings are set to disallow override.
Connection Settings
Hostname
Enter the hostname of the server that houses your external directory store.
Port
Specify the authentication port for your RADIUS server. This is typically port 1812.
Timeout (seconds)
Set the length of time to wait for a response from the server. Note that if the response is Response-Accept or Response-Challenge, then RADIUS will wait the entire time specified here before authenticating the account. Therefore, it is encouraged to keep this value as low as reasonably possible given your network settings. An ideal value is 3-5 seconds, with the maximum value at three minutes.
Connection Method
If you are using an external directory store in the same LAN as your B Series Appliance, the two systems may be able to communicate directly, in which case you can leave the option Proxy from appliance through the Connection Agent unchecked and move on.
Shared Secret
Provide a new shared secret so your B Series Appliance and your RADIUS server can communicate.
Save Changes
Click Save to save this security provider configuration.