Use Remote Jump for Unattended Access to Computers on a Separate Network
Remote Jump enables a privileged user to connect to an unattended remote computer on a network outside of their own network. Remote Jump depends on a Jumpoint.
A Jumpoint acts as a conduit for unattended access to Windows and Linux computers on a known remote network. A single Jumpoint installed on a computer within a local area network is used to access multiple systems, eliminating the need to pre-install software on every computer you may need to access.
Jumpoint is available for Windows and Linux systems. Jump Clients are needed for remote access to Mac computers. To Jump to a Windows computer without a Jump Client, that computer must have Remote Registry Service enabled (disabled by default in Vista) and must be on a domain. You cannot Jump to a mobile device, though Jump Technology is available from mobile BeyondTrust consoles.
Create a Remote Jump Shortcut
To create a Remote Jump shortcut, click the Create button in the Jump interface. From the dropdown, select Remote Jump. Remote Jump shortcuts appear in the Jump interface, as well as Jump Clients and other types of Jump Item shortcuts.
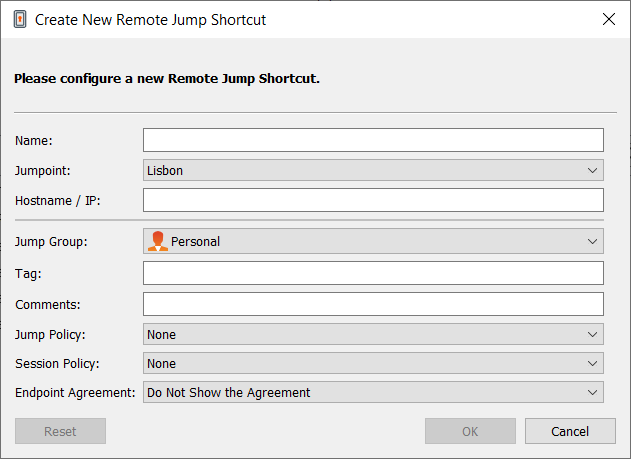
Enter a Name for the Jump Item. This name identifies the item in the session tabs. This string has a maximum of 128 characters.
From the Jumpoint dropdown, select the network that hosts the computer you wish to access. The access console remembers your Jumpoint choice the next time you create this type of Jump Item.
Enter the Hostname / IP of the system you wish to access.
Move Jump Items from one Jump Group to another using the Jump Group dropdown. The ability to move Jump Items to or from different Jump Groups depends upon your account permissions.
Further organize Jump Items by entering the name of a new or existing Tag. Even though the selected Jump Items are grouped together under the tag, they are still listed under the Jump Group in which each Jump Item is pinned. To move a Jump Item back into its top-level Jump Group, leave this field blank.
Jump Items include a Comments field for a name or description, which makes sorting, searching, and identifying Jump Items faster and easier.
To set when users are allowed to access this Jump Item, if a notification of access should be sent, or if permission or a ticket ID from your external ticketing system is required to use this Jump Item, choose a Jump Policy. These policies are configured by your administrator in the /login interface.
Choose a Session Policy to assign to this Jump Item. The session policy assigned to this Jump Item has the highest priority when setting session permissions. The ability to set a session policy depends on your account permissions.
Choose an Endpoint Agreement to assign to this Jump Item. Depending on what is selected, an endpoint agreement is displayed. If there is no response, the agreement is automatically accepted or rejected.
Use a Remote Jump Shortcut
To use a Jump shortcut to start a session, select the shortcut from the Jump interface and click the Jump button.
A dialog box opens for you to enter administrative credentials to the remote computer in order to complete the Jump. The administrative rights must be either a local administrator on the remote system or a domain administrator.
The client files are pushed to the remote system, and a session attempts to start.
Because a Remote Jump attempts to connect directly back through the appliance, the end machine must be able to communicate with the appliance as well. If this is not the case, you can use the Jump Zone Proxy feature to proxy the traffic through the Jumpoint.
Jump Items can be set to allow multiple users to simultaneously access the same Jump Item. If set to Join Existing Session, other users are able to join a session already underway. The original owner of the session receives a note indicating another user has joined the session, but is not allowed to deny them access. For more information on simultaneous Jumps, please see Jump Item Settings.