Deploy Zone Processors
Considering a zone processor license has been purchased and applied, management sets are used to define the lists of systems for which a zone processor will be responsible. Thus, proper planning of management sets is essential to proper deployment of zone processors.
Consider a network with only two segments: internal and DMZ. At a minimum, two management sets will be created, one for each zone. In turn, a zone processor will be deployed and assigned to each specific management set. In this way, when you create a job destined for an internal system, it is run by the internal zone processor. Similarly, when you create a job destined for a server in the DMZ, it is run by the zone processor in the DMZ.
Zone processors require direct connectivity to the database. This communication is unidirectional from a known source to a known destination over a known port. Specifically, the communication is initiating from the zone processor host to the central database over the SQL communications port.
At a Glance
When the zone processor feature is enabled, the Zone Processors button will be available in the Stored Jobs dialog, available by clicking the Jobs button in the management console.
Zone processors can be deployed by pushing the zone processors files and settings from the management console (by clicking Install) on the Zone Processors dialog, or by using the standalone installer, available in the in the SupplementalInstallers folder within the installation directory. The standalone installer must be configured for each zone you are deploying a zone processor to.
When installing a zone processor, prerequisites such as .NET framework requirements, Windows Management Framework requirements, and required database provider requirements are not verified. If the correct database provider is not present when the zone processor attempts to startup, the startup process will fail.
For more information, please see Host System Requirements.
Pushing a Zone Processor
When pushing a zone processor, you need file system and remote registry access to the target host. If either of these is unavailable, the push will fail. When pushing a zone processor, the database configuration is identical to that currently configured for the management console.
- In the management console, click the Jobs button.
- On the Stored Jobs dialog, click Zone Processors.
if you don't see the Zone Processors button, the feature is not enabled. A zone processor is enabled by the purchase and application of a license.
- Click Install.
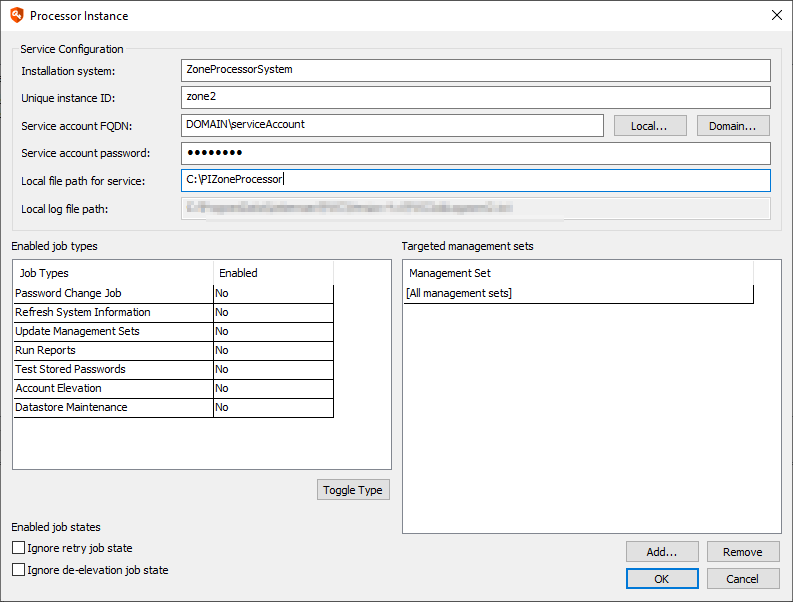
- Supply the following information:
- Installation system: This is the name (simple, IP, or FQDN) for the zone processor host.
- Unique instance ID: This is the instance ID of this zone processor. It must be unique on that system to avoid collisions with other zone processors hosted on the same system.
- Service account FQDN: This is the qualified name of the account that will run the service. It must be an administrator of the target host and be granted Logon as a Service. If using integrated authentication to the database, this account must also have proper database access as defined in the Privileged Identity Installation Guide.
For more information, please see the Privileged Identity Installation Guide.
- Local file path for service: The physical location for the zone processor and its supporting files to be copied to.
We do not recommend using the default file path.
- Enabled job types: Specify the types of jobs this zone processor will be allowed to perform.
- Management Sets: Specify one or more management sets this zone processor will be responsible for managing.
- Click OK to begin the process. The files will be copied and the registry configured, but you will need to start the service as a separate step.
Zone Processors Via Standalone Installer
When a zone processor cannot be automatically pushed, such as when dealing with an untrusted system or DMZ, use the zone processor standalone installer located in the SupplementalInstallers directory.
- Launch CreateZoneInstaller.exe.
- Supply the following information:
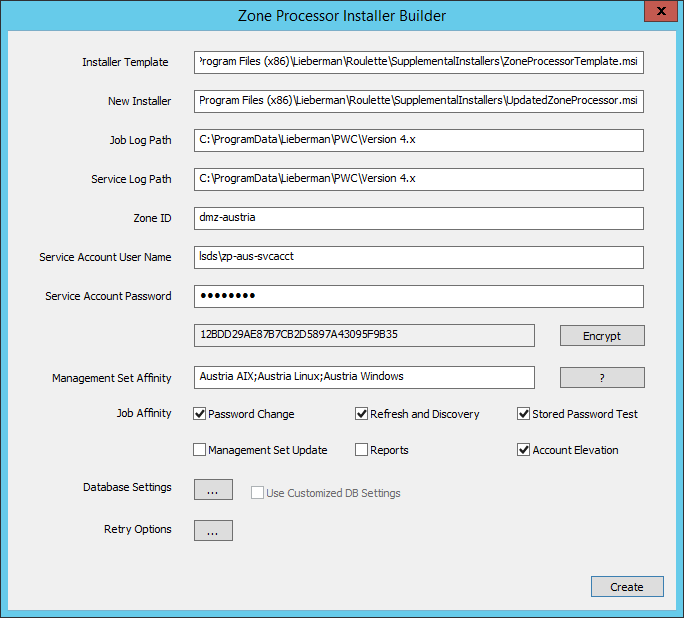
- Installer Template: This value will already be configured.
- New Installer: This is the new file that will be created and distributed to the target zone processor hosts.
- Job Log Path: You can change the log file path for jobs if desired.
- Service Log Path: You can change the log file path for the zone processor scheduling service if desired.
- Zone ID: This is the instance ID of this zone processor. It must be unique on the system to avoid collisions with other zone processors hosted on the same system.
- Service Account Username: This is the qualified name of the account that will run the service. It must be an administrator of the target host and be granted Logon as a Service. If using integrated authentication to the database, this account must also have proper database access as defined in the Privileged Identity Installation guide.
If the zone processor is installed to a DMZ or an untrusted endpoint, it must still be an administrator of the target host and must be granted Logon as a Service, but a separate, explicit SQL Security Login account will need to be applied in the DataStore configuration. This explicit SQL Security Login account must have appropriate permissions to the application database.
For more information, please see the Privileged Identity Installation Guide.
- Service Account Password: The password for the service account. Click the Encrypt button to encrypt the password inside of the created installer package. If you don't encrypt the password, the password will be kept in clear text in the installer package.
- Management Set Affinity: Define one or more management sets to assign to the zone processor. If assigning more than one management set, separate management set names by a semicolon.
- Job Affinity: Define the job types this zone processor will run.
- Database Settings: If no settings are made, this installer will use the same database settings currently defined in the console, even if they might not work for this specific zone processor. Click the ellipses symbol (…) next to Database Settings to define custom settings for this zone processor to use when connecting to the database, such as changing the server name to an IP address or changing authentication to an explicit SQL account rather than integrated authentication. After making changes, select the option for Use Customized DB Settings.
- Retry Options: If no settings are made, the installer will use the same retry settings as currently defined for this management console. Click the ellipses symbol (…) to configure a different retry policy for this zone processor.
- Click Create.
- Copy the new MSI file to the target machine and install it.