Microsoft Certificate Services
Microsoft Certificate Services is a useful way for organizations to run their Certification Authority. In its enterprise editions, Certificate Services integrates with Active Directory to publish certificates and Certificate Revocation Lists to a location that is accessible to all computers in the Active Directory domain.
Custom certificate templates can only be managed using enterprise CAs, therefore the following procedure is only possible on Enterprise Editions of Windows 2008 R2.
Create an Endpoint Privilege Management for Windows Configuration Certificate Template
The easiest way to create a certificate with the BeyondTrust Endpoint Privilege Management for Windows Configuration Signing Enhanced Key Usage extension is to create a new certificate template. Certificate templates allow the content and format of certificates to be defined so users can request a certificate using a simple template rather than having to generate a complex certificate request.
To create a certificate template, an existing template must be duplicated and then modified.
To create a new version 2 or 3 certificate template:
- Open the Certificate Templates snap-in.
- In the details pane, right-click an existing certificate to serve as the starting point for the new certificate, and select Duplicate Template.
- Choose whether to duplicate the template as a Windows Server 2003–based template or a Windows Server 2008 R2–based template.
- On the General tab, enter the Template display name and the Template name, and click OK.
- Define any additional attributes for the newly created certificate template.
The template must then be edited to make it suitable for signing Endpoint Privilege Management for Windows configuration. This is done by adding the BeyondTrust Endpoint Privilege Management for Windows Configuration Signing OID as an application policy for the template.
The Configuration Signing OID must first be defined.
To define an object identifier:
- Open the Certificate Templates snap-in.
- In the details pane, right-click the certificate template you want to modify, and then click Properties.
- On the Extensions tab, click Application Policies, and then click Edit.
- In the Edit Application Policies Extension dialog box, click Add.
- In Add Application Policy, ensure the Endpoint Privilege Management for Windows Configuration Signing policy that you are creating does not exist, and then click New.
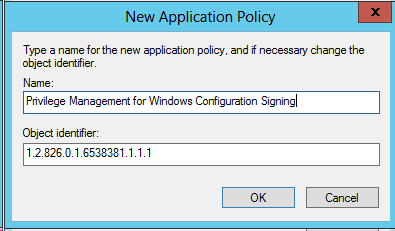
- In the New Application Policy dialog box, provide the name and OID for the new application policy, and then click OK.
Now that the application policy is defined, you can associate it with the certificate template.
To associate the application policy with the certificate template:
- Open the Certificate Templates snap-in.
- In the details pane, right-click the certificate template you want to change, and then click Properties.
- On the Extensions tab, click Application Policies > Edit.
- In Edit Application Policies Extension, click Add.
- In Add Application Policy, click the application policy, and then click OK.