Work with Smart Rules
You can use Smart Groups to add assets, systems, and accounts into Password Safe management. The Smart Rule filters that you configure for the Smart Groups determine the assets that are added as managed systems and managed accounts in Password Safe.
There are three types of Smart Rules available with a Password Safe license: Asset, Managed Account, and Managed System.
You can use Smart Rules to add the following types of assets:
- Systems
- Network Devices
- Databases
- Local Linux and Windows accounts
- Active Directory accounts
- Dedicated accounts
The settings in a Smart Rule override the settings configured on the managed system.
For more information on using Smart Rules, please see the BeyondInsight User Guide.
Predefined Smart Groups
By default there are Smart Groups already defined and created.
The following tables list Smart Groups useful in Password Safe environments.
Asset Based Smart Groups
| Smart Group | Category | Definition |
| All Assets in Password Safe | Assets and Devices | All assets under Password Safe management. |
| Recent Assets not in Password Safe | Assets and Devices | All assets discovered in the last 30 days that have not yet been added to Password Safe. |
| Recent Non Windows Assets not in Password Safe | Assets and Devices | All non Windows assets discovered in the last 30 days that have not yet been added to Password Safe. |
| Recent Windows Servers not in Password Safe | Servers | Windows servers discovered in the last 30 days that have not yet been added to Password Safe. |
| Recent Virtual Servers not in Password Safe | Virtualized Devices | Virtualized server assets discovered in the last 30 days that have not yet been added to Password Safe. |
- Microsoft Hyper-V
- Parallels
- Recent Virtual Servers not in Password Safe
- Virtual Servers
- Virtual Workstations
- VMware vSphere
- Xen
Managed System Smart Rules
| Smart Rule | Category | Definition |
| Database Managed Systems | Types | Database Managed Systems |
| Directory Managed Systems | Types | Directory Managed Systems |
| Cloud Managed Systems | Types | Cloud Managed Systems |
| Asset Managed Systems | Types | Asset Managed Systems |
| All Managed Systems associated with BeyondInsight Assets | Managed Systems | All Managed Systems associated with BeyondInsight Assets |
| All Managed Systems not associated with BeyondInsight Assets | Managed Systems | All Managed Systems not associated with BeyondInsight Assets |
| All Managed Systems | Managed Systems | All Managed Systems |
| Recently Added Managed Systems | Managed Systems | Managed Systems added less than 30 days ago |
Managed Accounts Smart Groups
| Smart Group | Definition |
| All Managed Accounts | All accounts managed by Password Safe. |
| Recently Added Managed Accounts | Filters on managed accounts added less than 30 days ago. |
| Database Managed Accounts | Filters on the database platform and includes SQL Server and Oracle platforms. |
| Hardware Device Managed Accounts | Filters on hardware devices including Dell DRAC and HP iLO platforms. |
| Linux Managed Accounts | Filters on the Linux platform. |
| Mac Managed Accounts | Filters on the macOS platform. |
| Unix Managed Accounts | Filters on the Unix platform. |
| Windows Managed Accounts | Filters on the Windows platform. |
Considerations When Designing Smart Rules
- The filter criteria is processed hierarchically. When creating the filter structure, place the filters that reduce the largest number of entities at the top of the hierarchy.
- When adding Active Directory accounts using a directory query, ensure the query is as restrictive as possible. For example, configure the query on a smaller set of data in your environment.
- When adding assets to Password Safe, be cautious about creating more than one Smart Rule with the same systems or accounts. If the Smart Rules have different actions, they will start continually overwriting each other in an endless loop.
- There can be delays when a Smart Rule depends on external data source, such as LDAP, as processing can take longer. For example, a directory query that uses the discover accounts feature (managed account Smart Rule) or discover assets feature (asset-based Smart Rule).
Smart Rule Processing
A Smart Rule processes and updates information in Smart Groups when certain actions occur, such as the following:
- The Smart Rule is created, or edited and saved.
- A timer expires.
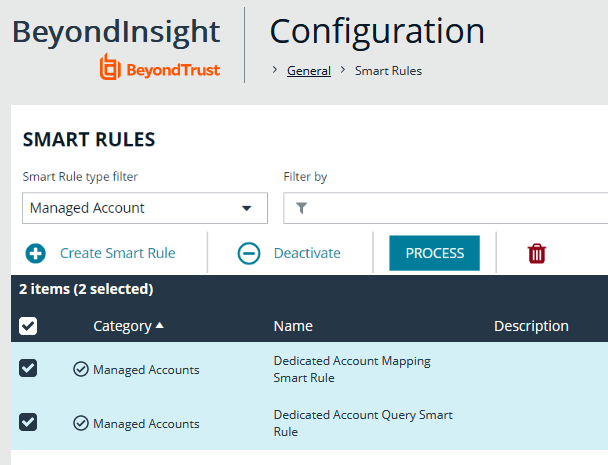
- You manually kick off the processing by selecting the Smart Rule from the grid on the Smart Rules page, and then click Process.
The Process action from the grid on the Smart Rules page does not apply to managed account and managed system Quick Group Smart Rules, because these only run once upon creation and cannot be triggered to run again.
- A Smart Rule with Smart Rule children triggers the children to run before the parent completes.
- Managed account Smart Rules with selection criteria Dedicated Account process when a change to a mapped group is detected. This can occur in the following scenarios:
- A new user logs on.
- The group refreshes in Active Directory by an administrator viewing or editing the group in Configuration > Role Based Access > User Management.
Change the Processing Frequency for a Smart Rule
By default, Smart Rules process when asset changes are detected. The assets in the Smart Rule are then dynamically updated. For Smart Rules that require more intensive processing, you might want Smart Rules to process less frequently.
To provide more restrictive processing, you can select alternate frequency settings to override the default processing. The Smart Rules process in the selected time frame (for example, the rule processes once a week).
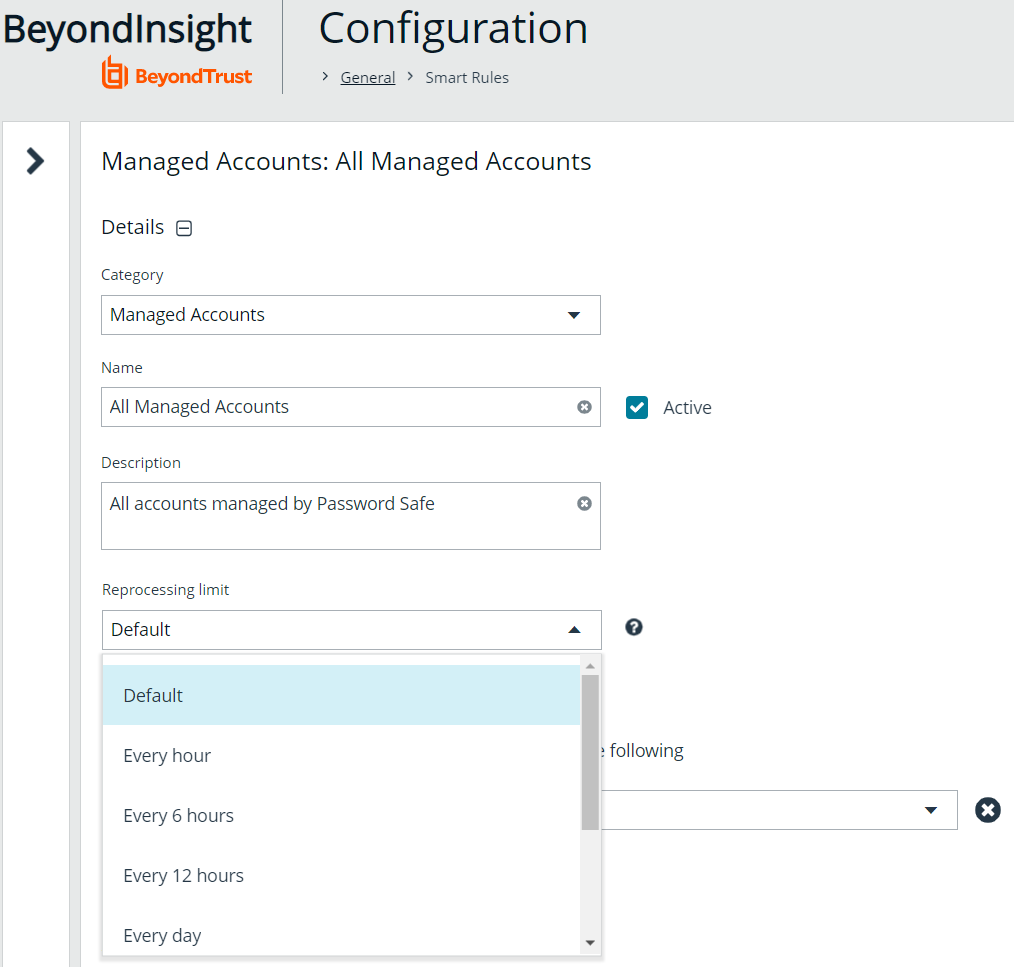
When creating a new Smart Rule or updating an existing one, select your desired frequency from the Reprocessing limit list in the Details section.
A Smart Rule is always processed when first saved or updated.
View and Select Smart Rules Processing Statistics
The Smart Rules grid displays some processing statistics by default. Additional Smart Rules processing statistics, such as Processed Date, Successful Attempts, and Failed Attempts are available and can be displayed in the Smart Rules grid.
To add this information to the grid:
- From the left menu in BeyondInsight, click Smart Rules.
- Click the Column chooser icon in the upper right of the grid.
- Click the desired column to add that information to the grid.
- Check marks indicate columns currently displayed.
- You can remove a displayed column by clicking the column name in the Column chooser list.
- If there are more columns displayed than can fit in the width of the screen, a scroll bar appears at the bottom of the grid. It may be necessary to scroll sideways to view any additional columns.
Create and Use Dedicated Account Smart Rules
A dedicated account Smart Rule allows you to dynamically map dedicated administrative accounts outside of BeyondInsight to users in a BeyondInsight group. This allows a lower privileged BeyondInsight user to access a higher privileged user's account temporarily while using Password Safe.
The below procedures provide instructions for configuring BeyondInsight users with the ability to access a dedicated directory account's credentials, using a query matching on directory attributes. Once configured, the users are able to request a password checkout for the dedicated account from the Password Safe portal. The user can then access resources using the dedicated account credentials.
You must configure the following in BeyondInsight:
- Create a directory query to retrieve the directory account as well as its attributes.
- Create a Smart Rule to run the directory query to find the account and its directory attributes, and add it as a managed account in Password Safe.
- Create a Smart Rule to map the dedicated account to a user group in BeyondInsight.
- Assign user group permissions to the two newly created Smart Rules.
Create the Directory Query
- Navigate to Configuration > Role Base Access > Directory Queries.
- Click + Create New Directory Query, and complete form as follows:
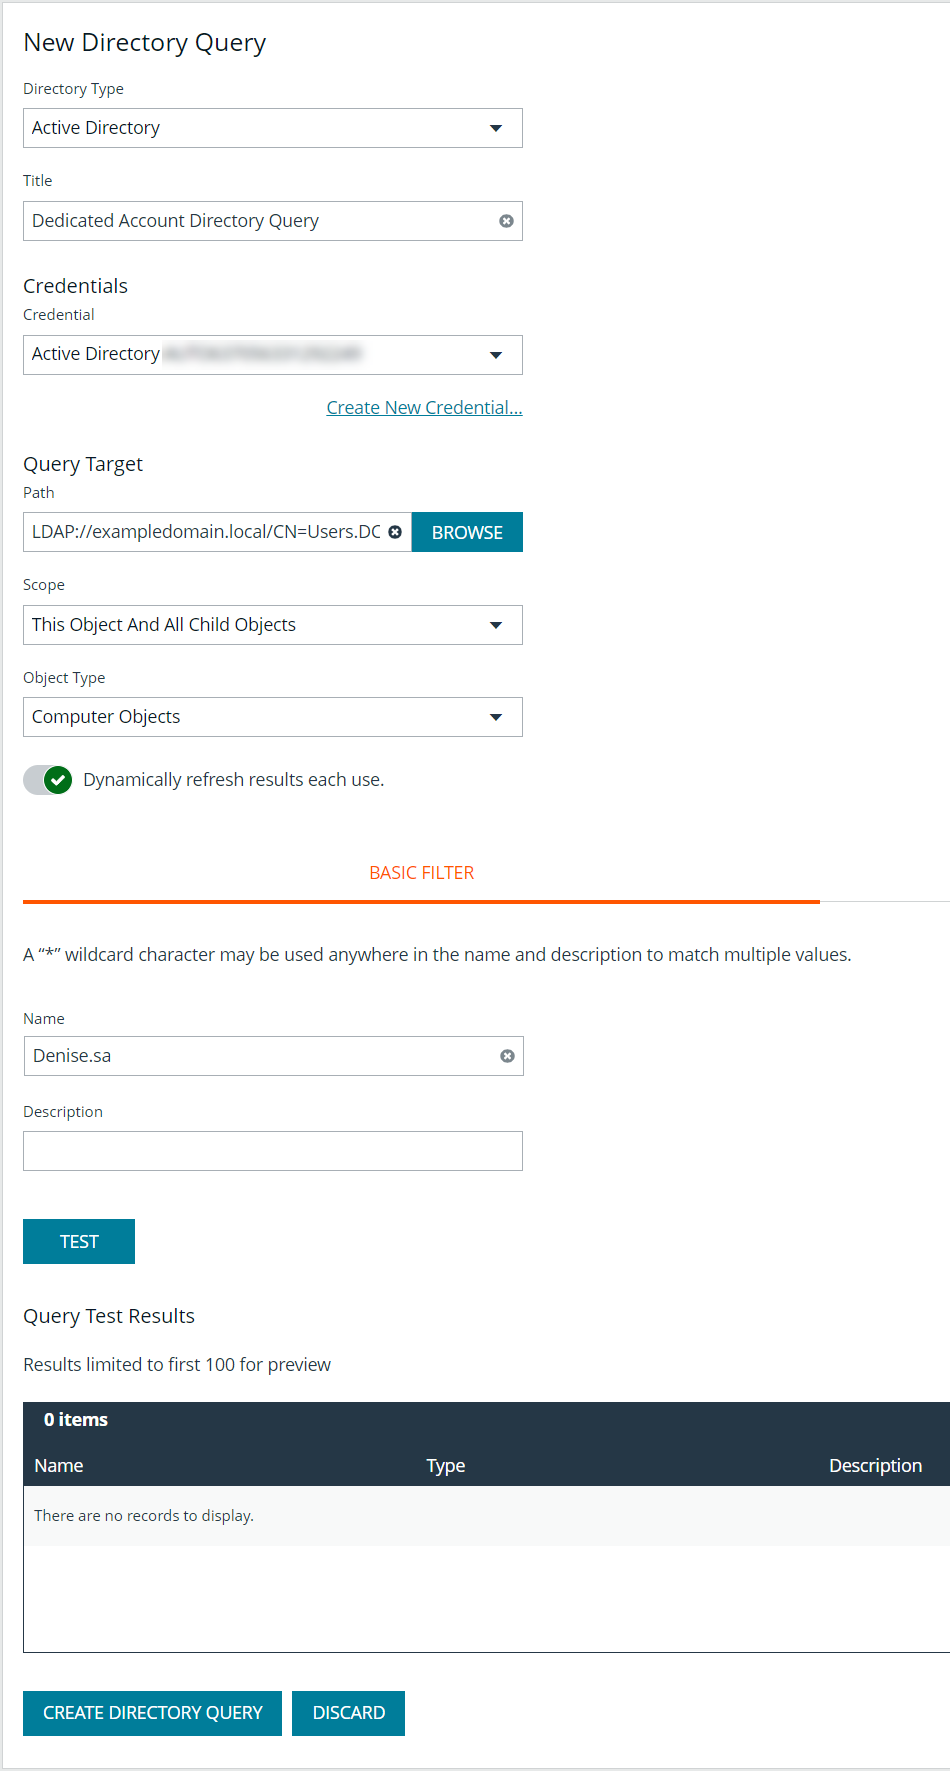
- Directory Type: Leave as Active Directory.
- Title: Provide a meaningful name that allows for easy identification of the query.
- Credentials: Select a credential that has permissions to query the directory user accounts.
- Query Target: Provide the LDAP path to the target.
- Scope: Leave as This Object and All Child Objects.
- Object Type: Select User Objects.
- Dynamically refresh results each use: Leave enabled.
- Basic Filter: Provide the name of the dedicated account.
- Click Create Directory Query.
Create the Smart Rule to Run the Directory Query and Add Managed Account
This example is specific to managed accounts. Similar instructions apply for the other rule or entity types
- From the left menu, click Smart Rules.
- Select Managed Account from the Smart Rule type filter dropdown.
- Click + Create Smart Rule.
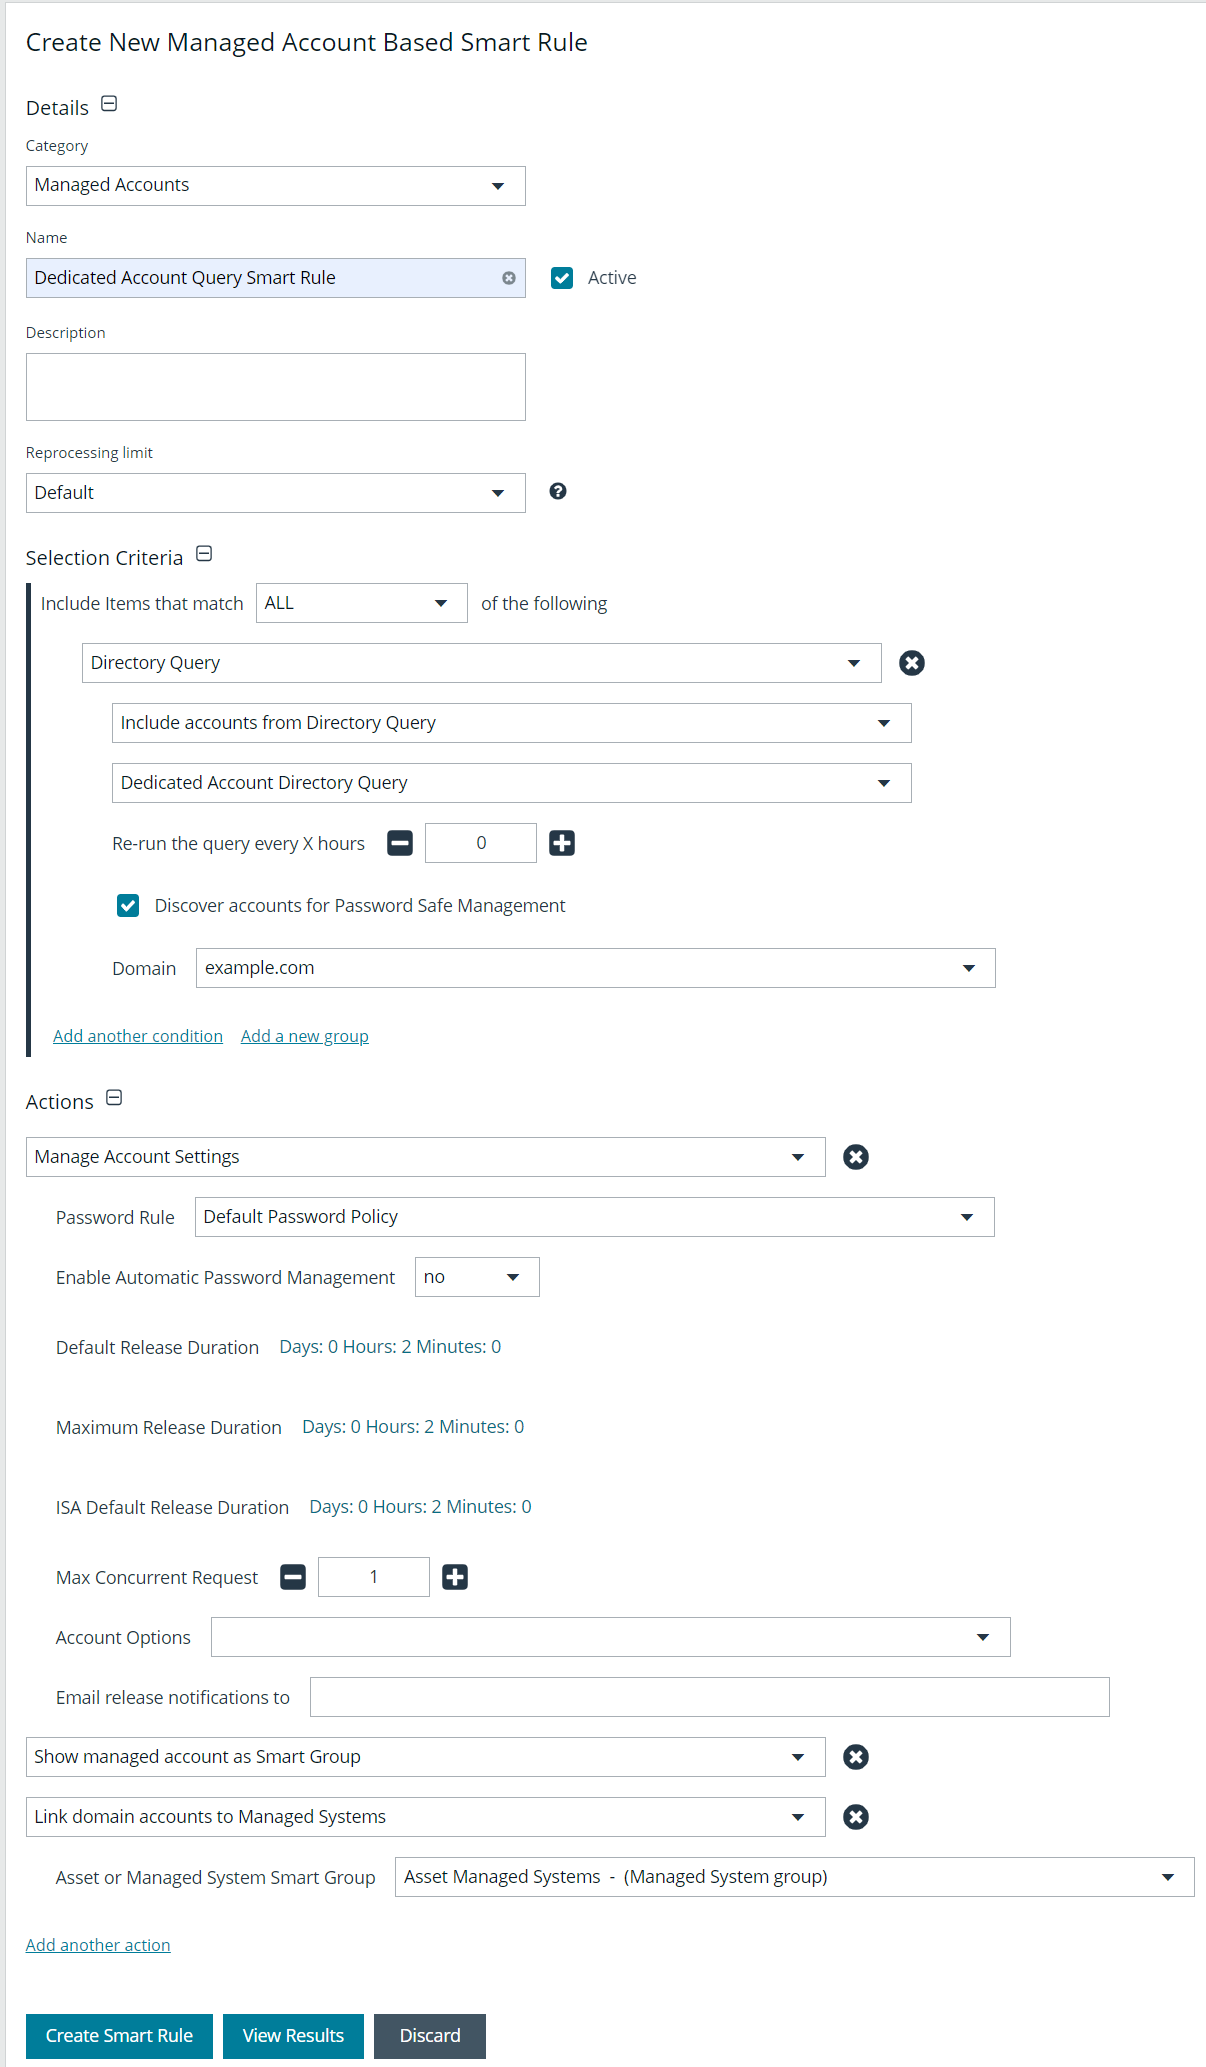
- Configure the Smart Rule as follows:
- Category: Select Managed Accounts.
- Name: Provide a meaningful name that allows for easy identification of the Smart Rule.
- Selection Criteria:
- Select Directory Query from the dropdown.
- Leave Include accounts from Directory Query selected.
- Select the directory query created in above steps.
- Leave Discover accounts for Password Safe Management enabled.
- Select the Domain from the dropdown.
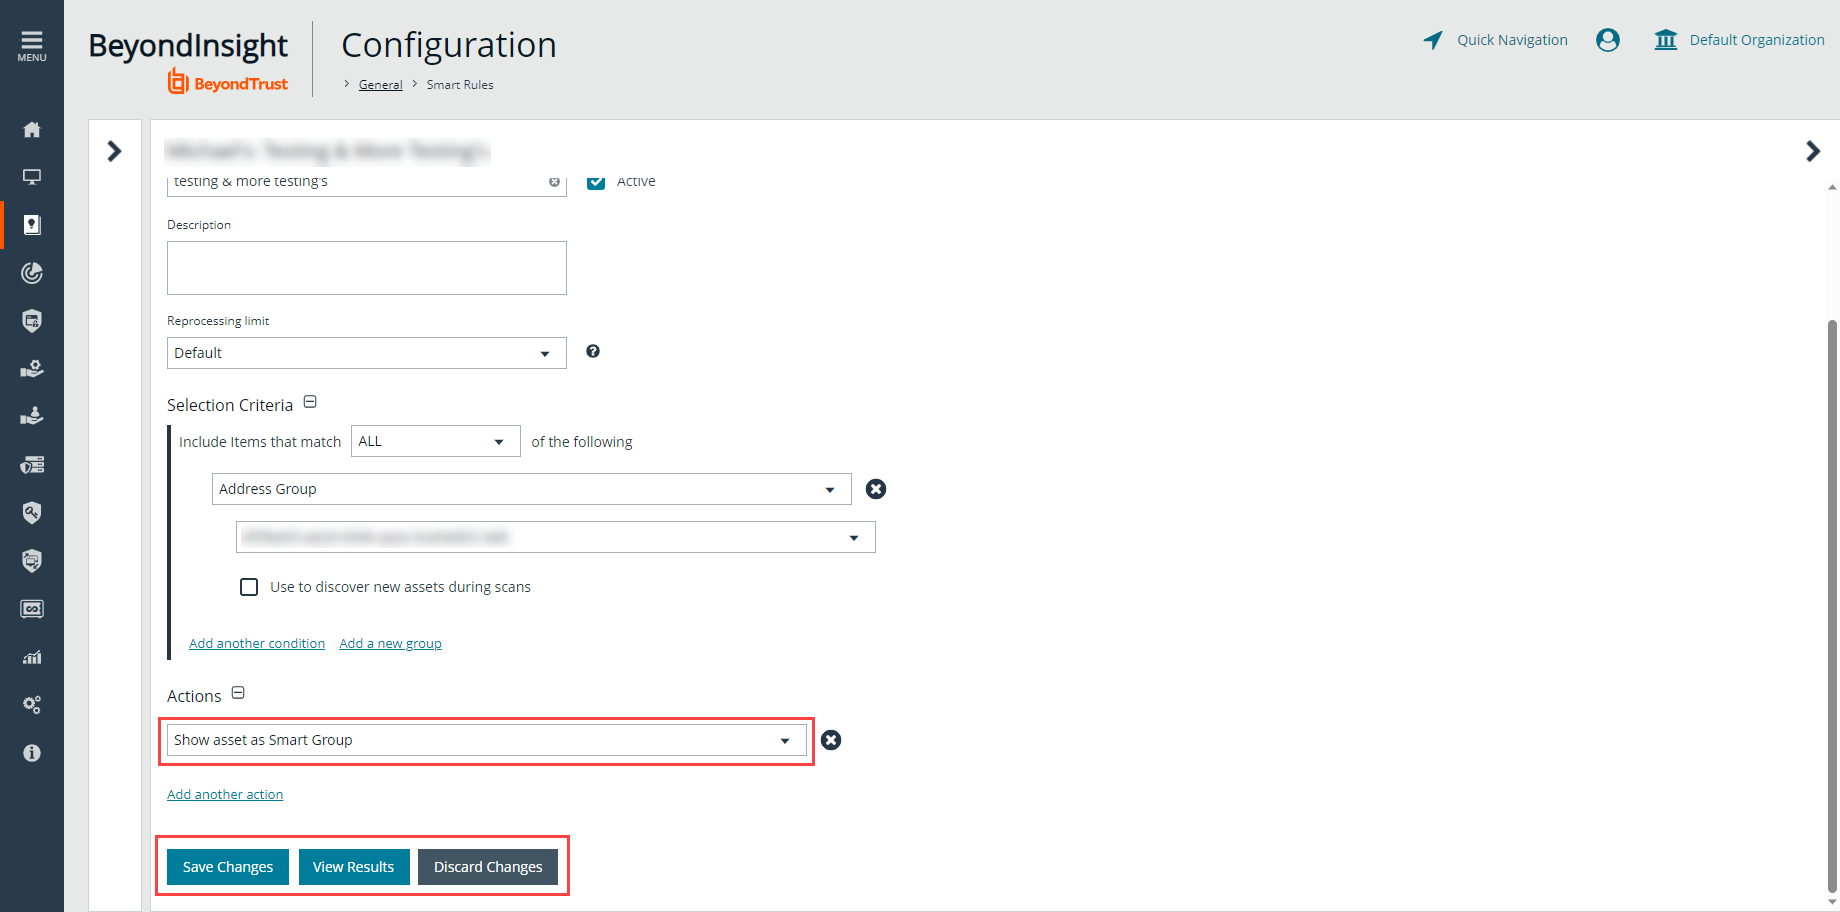
- Actions:
- Select Manage Account Settings from the dropdown and set its related options as desired.
- Add another action and select Show managed account as Smart Group from the dropdown.
- Add another action and select Link domain accounts to Managed Systems from the dropdown, and then select your desired Asset or Managed System Smart Group from the dropdown.
- Click Create Smart Rule.
- Once the rule is saved, click View Results.
- You are taken to the associated grid, where the contents of the Smart Rule are listed.
- If the rule is actively processing, a banner displays letting you know that.
- View Results displays only if you have permissions to the grid corresponding to the Smart Rule, i.e.; Assets, Managed Accounts, Managed Systems.
- The Smart Rule must be saved with Show <entity> as Smart Group selected under Actions to view the results.
Once you have confirmed the rule contains your desired items, you can then add additional actions to the Smart Rule.
Create the Smart Rule to Map the Dedicated Account to the User Group
- From the left navigation pane, click Smart Rules.
- Select Managed Account from the Smart Rule type filter dropdown.
- Click + Create Smart Rule.
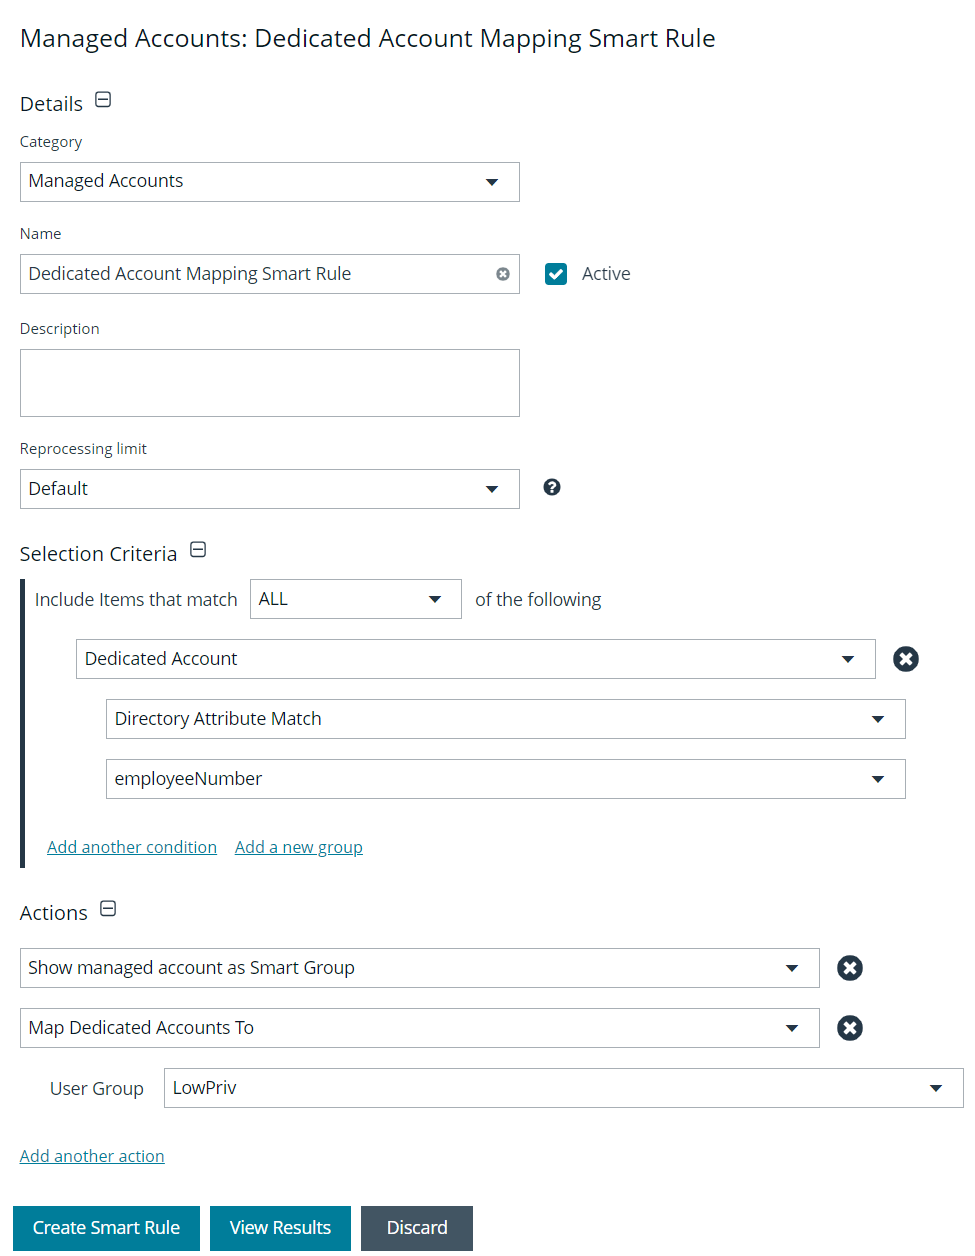
- Configure the Smart Rule as follows:
- Category: Select Managed Accounts.
- Name: Provide a meaningful name that allows for easy identification of the Smart Rule.
- Selection Criteria:
- Select Dedicated Account from the dropdown.
- Select Directory Attribute Match from the dropdown.
- Select the directory attribute you wish to match.
- Actions:
- Select Show managed account as Smart Group from the dropdown.
- Add another action and select Map Dedicated Accounts to from the dropdown.
- Select the applicable User Group to map to.
- Click Create Smart Rule.
- Once the rule is saved, click View Results.
- You are taken to the associated grid, where the contents of the Smart Rule are listed.
- If the rule is actively processing, a banner displays letting you know that.
- View Results displays only if you have permissions to the grid corresponding to the Smart Rule, i.e.; Assets, Managed Accounts, Managed Systems.
- The Smart Rule must be saved with Show <entity> as Smart Group selected under Actions to view the results.
Once you have confirmed the rule contains your desired items, you can then add additional actions to the Smart Rule.
Assign User Group Permissions to the Smart Rules
- Navigate to Configuration > Role Based Access > User Management.
- Locate the user group you had selected when creating the Smart Rule for dedicated account mapping.
- Click the vertical ellipsis for the group, and then select View Group Details.

- In the Group Details pane, click Smart Groups.
- In the Smart Group Permissions pane, select the two dedicated account smart groups you created.
- Click Assign Permissions > Assign Permissions Read Only above the grid.
From the Smart Rules page, process the two newly created smart groups. After processing, the dedicated account discovered by the directory query is listed on the Managed Accounts page. Users belonging to the group you chose to map the dedicated account to are indicated in the Mapped to User column. You might need to add this column to the grid using the Column Chooser button above the grid.
Use an Entra ID Smart Rule
An Entra ID Smart Rule enables Password Safe to automatically discover Entra ID accounts. This allows privileged accounts in Entra ID to be managed, including password rotation and check-in and check-out.
Follow the steps below to discover Entra ID accounts.
- From the left menu, click Smart Rules.
- Select Managed Account from the Smart Rule type filter dropdown.
- Click + Create Smart Rule.

- Configure the rule as follows:
- Category: Select Managed Accounts.
- Name: Provide a meaningful name and description that allows for easy identification of the Smart Rule.
- Reprocessing Limit: If desired, select a reprocessing limit.
- Under Selection Criteria:
- Select Azure Directory Query from the dropdown. There are several filters, and options are dynamic, depending on other selections:
- Include ALL or ANY of the selection criteria.
- There are two matching options available for discovering Entra ID accounts: Group Name and User Principle Name. Use a Group Name match to discover all accounts that are a member of the specified group. Use a User Principle Name match to allow a partial name match.
- If using a Group Name, equals is the only match option. Enter the Group Name.
- If using a User Principle Name, select starts with or ends with and enter the name.
- Set the value for how many hours for rerunning the query.
- Check the Discover accounts in Azure synced from on-premise option to include Entra ID accounts synced from on-premises Entra ID, as well as Azure-only accounts.
- Leave Discover accounts for Password Safe Management checked.
- Select an Azure domain from the dropdown.
- Add additional selection criteria and groups, as required.
- Select Azure Directory Query from the dropdown. There are several filters, and options are dynamic, depending on other selections:
- Under Actions, select Show managed account as Smart Group, and then add other actions as required to manage settings or work with the managed account.
- Click Create Smart Rule.
- Once the rule is saved, click View Results.
- You are taken to the associated grid, where the contents of the Smart Rule are listed.
- If the rule is actively processing, a banner displays letting you know that.
- View Results displays only if you have permissions to the grid corresponding to the Smart Rule, i.e.; Assets, Managed Accounts, Managed Systems.
- The Smart Rule must be saved with Show <entity> as Smart Group selected under Actions to view the results.
Once you have confirmed the rule contains your desired items, you can then add additional actions to the Smart Rule.
Use Quick Groups
For a simpler way to organize managed accounts, you can group them using a Quick Group. The default processing time on a Quick Group is Once.
- In the console, click Managed Accounts.
- From the Smart Group filter dropdown, select an existing smart group in which the managed accounts are members.
- Check the boxes for the managed accounts that you want to add to the Quick Group.
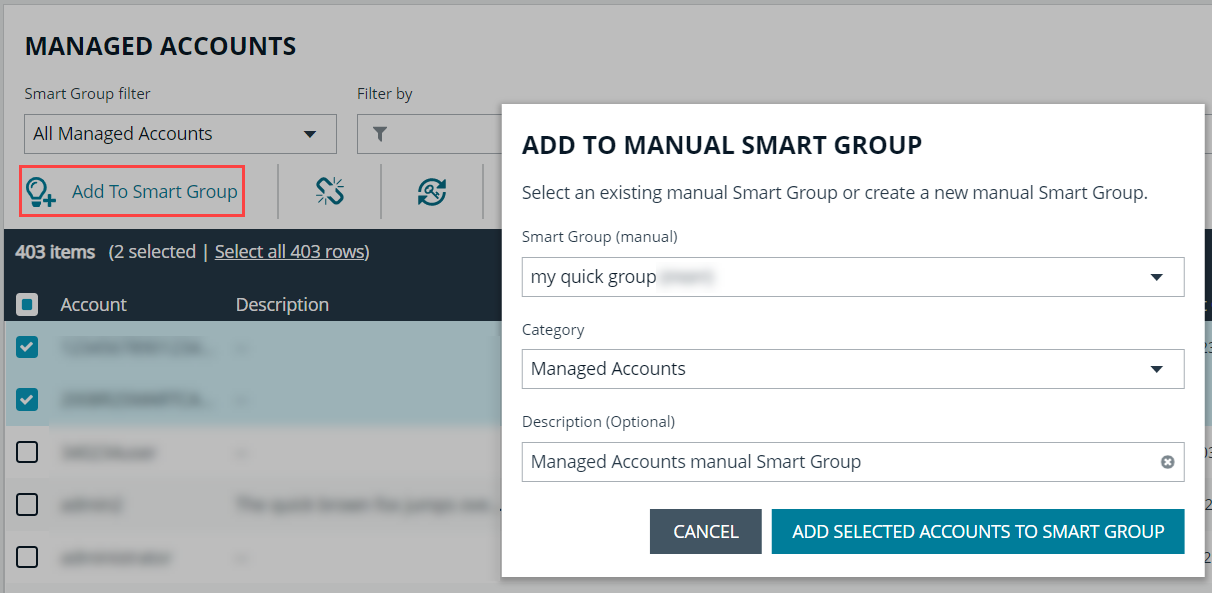
- Click Add to Smart Group above the grid.
- Select a group from the Smart Group dropdown or create a new one by typing in the name and clicking Add as New Option.
- Select Quick Groups from the Category dropdown.
- Leave the default description or enter a new one.
- Click Add Selected Accounts To Smart Group.
- Your new smart group is now available in the Smart Group filter dropdown.
- To remove accounts from the Quick Group:
- Select the group from the Smart Group filter dropdown.
- Check the boxes for each account you wish to remove, and then click Remove From Smart Group above the grid.
- To quickly locate Quick Groups from the Smart Rules page, select Quick Groups from the Category dropdown.
- To change the name and description for a Quick Group, or to deactivate a Quick Group:
- From the Smart Rules page, click the vertical ellipsis for the group, and then select View Details.
- Make your changes, and then click Save Changes.
You can also quickly manually add managed systems to Smart Groups from the Managed Systems page.
Managed systems do not have a Quick Group category; however, the concept and process is essentially the same as it is for managed accounts.
- In the console, click Managed Systems.
- From the Smart Group filter dropdown, select an existing Smart Group in which the managed systems are members.
- Check the boxes for the managed systems that you want to add to the Quick Group.
- Click Add to Smart Group above the grid.
- Select a group from the Smart Group dropdown or create a new one by typing in the name and clicking Add as New Option.
- Select a Category from the dropdown.
- Leave the default description or enter a new one.
- Click Add Selected Systems To Smart Group.
- Your new smart group is now available in the Smart Group filter dropdown.
To remove a managed system from a Smart Group:
- Select the Smart Group from the Smart Group filter.
- Check the boxes for the managed systems that you want to remove from the group.
- Click Remove From Smart Group above the grid.
To change the name and description for a managed system Quick Group, or to deactivate a Quick Group:
- Navigate to the Smart Rules page.
- Select Managed System from the Smart Rule type filter.
- Locate the Quick Group you created.
- Click the vertical ellipsis for the group, and then select View Details.
- Make your changes, and then click Save Changes.
You cannot add or modify filters or actions for Quick Groups.
For more information about Smart Rule processing, please see Change the Processing Frequency for a Smart Rule.
Edit Smart Rules
- From the left menu in BeyondInsight, click Smart Rules.
- Click the vertical ellipsis to the right of the Smart Rule.
- Select Edit Smart Rule.
- Make the necessary changes and then click Save Changes.
- Once the rule is saved, click View Results.
- You are taken to the associated grid, where the contents of the Smart Rule are listed.
- If the rule is actively processing, a banner displays letting you know that.
- View Results displays only if you have permissions to the grid corresponding to the Smart Rule, i.e.; Assets, Managed Accounts, Managed Systems.
- The Smart Rule must be saved with Show <entity> as Smart Group selected under Actions to view the results.
Once you have confirmed the rule contains your desired items, you can then add additional actions to the Smart Rule.
Delete Smart Rules
- From the left menu in BeyondInsight, click Smart Rules.
- Select one or more Smart Rules.
- Click the Trash Can icon above the grid. You can also click the vertical ellipsis to the right of a single Smart Rule and select Delete.
Built in Smart Rules cannot be deleted. These are identified by the Lock icon.
A Smart Rule that is used in another Smart Rule cannot be deleted or marked as inactive.
Audit Smart Rules
To audit new or edited Smart Rules:
- Go to Configuration > General > User Audits.
- Select Section from the Filter by dropdown.
- Select Smart Rule from the Section dropdown.
- Click the information icon to the right of the Smart Rule.
- If a Smart Rule is added, the Add Details pane displays with all added information.
- If a Smart Rule is edited, the Edit Details pane displays with all edited information.