Configure Settings on the Oracle Platform
When adding Oracle as a managed system, follow these steps:
- Add the functional account to the console.
- Add the functional account to the Oracle user list in Oracle.
- Set the IP address for the host in Oracle Net Manager.
Add the Functional Account
- Select Configuration.
- Under Privileged Access Management, click Functional Accounts.
- Click Create Functional Account.
- Select Database from the Type dropdown list.
- Select Oracle from the Platform list.
- Select SYSDBA from the Privilege list, and then enter the username and password. The SYSDBA role is required if you use the SYS Oracle account as the functional account.
- Continue to set the remaining options.
When adding the Oracle platform as a managed system, be sure to select the SYSDBA functional account.
For more information, please see Create a Functional Account.
Set Permissions for the Functional Account in Oracle
In Oracle Enterprise Manager, the functional account (other than SYS) must be added to the Oracle user list.
The user account must be assigned the following Privileges & Roles:
- ALTER USER
- CONNECT
- SELECT ON DBA_USERS (Required for auto Discovery of Oracle instance managed accounts.)

Create the Functional Account in Oracle
To create a functional account in Oracle:
CREATE USER [FunctionalAccountName] IDENTIFIED BY password;
    GRANT CONNECT TO [FunctionalAccountName];
To grant permission to the functional account to change passwords on a managed account:
GRANT CONNECT TO [FunctionalAccountName];
    GRANT ALTER USER TO [FunctionalAccountName];
    GRANT SELECT ON DBA_USERS TO [FunctionalAccountName];
Configure the Host
On the Oracle platform, you must configure the following settings:
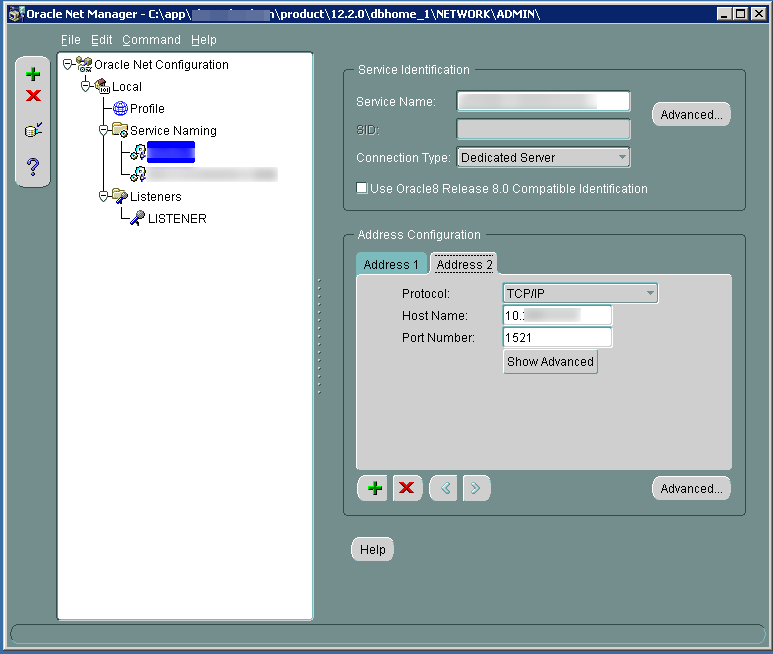
- In Oracle Net Manager, the host name IP address must be explicitly set as a listener.

- Also in Oracle Net Manager, set the service name as the host name IP address.
Use Encrypted Connections
Password Safe supports Oracle database connections that are configured to use encryption. Using encryption is optional.
The following encryption protocols are supported:
- AES128
- AES192
- AES256
- RC4_128, RC4_256, 3DES112
- 3DES168
Configure encryption using Oracle Net Manager.
The following section is provided for guidance only. For more information, refer to Oracle product documentation.
On the Profile node, select Network Security and then set the following:
- On the Integrity tab, select:
- Server from the Integrity menu
- required from the Checksum Level menu
- SHA256 as the method
- On the Encryption tab, select:
- Server from the Encryption menu
- required from the Encryption Type menu
- AES256 as the method
If you select required for Checksum Level and Encryption Type, you must enter an encryption seed in the sqlnet.ora file.
Oracle Internet Directories OID
OID Connect Descriptors (also known as TNS Connect Strings) define all parameters needed to connect to a specific Oracle database service, such as the instance name, DNS name, IP address, and port. You can leverage OID Connect Descriptors to add Oracle database systems to Password Safe.
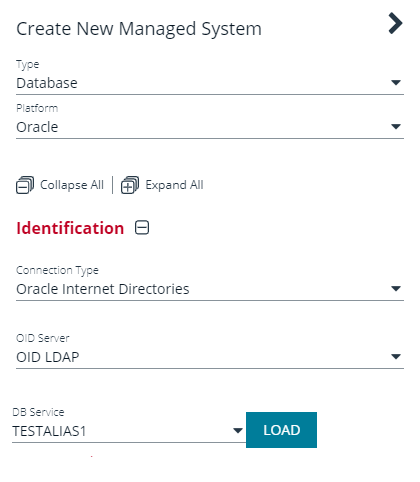
When adding an Oracle database as a Managed System in Password Safe, select the appropriate database service and Password Safe reads the Connect Descriptor data when communicating with the Oracle database.
Configure an Oracle Internet Directory
To use this functionality, you must configure an OID, as follows:
- Go to Configuration > Privileged Access Management > Oracle Internet Directories.
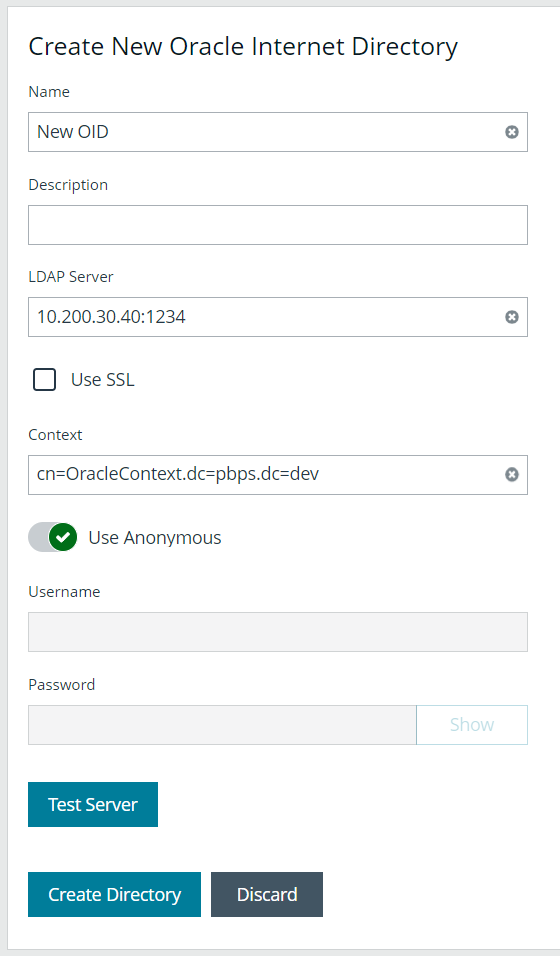
- Click Create New Oracle Internet Directory +.
- Enter a name for the directory, a short description, and information for the LDAP server.
- Check Use SSL if desired.
- If you turn off Use Anonymous, enter a name and password.
- Click Create Directory when done, or Discard, if you do not wish to keep it.
- You can also click Test Server to test the connection.